Publication 1785-IN022C-EN-P - September 2005
10 Firmware Update Instructions for Ethernet, Enhanced and ControlNet PLC-5 Programmable Controllers
Step 4 - Install the New Firmware EPROMS
Note: Do not reinstall the controller until you complete the next step.
On the Ethernet PLC-5, Series C and D: Do this:
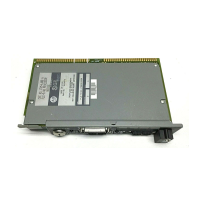
1785-L20E programmable controller 1. Remove the four screws that hold the right
side plastic
cover.
2. Remove the cover.
3. Remove the two large screws and washers
located in the center of the exposed circuit
board.
4. Carefully separate the two processor
boards by pulling the exposed circuit board at
the backplane edge connector away from the
metal cover as you would open a book.
5. Remove and replace the firmware EPROMS
one at a time, taking note of the location
number and the orientation of the notch in
each of the EPROMS.
6. See the figure to the left for the numbers
and locations of the EPROMS.
7. Reassemble the controller by reversing
steps 1 thru 4.
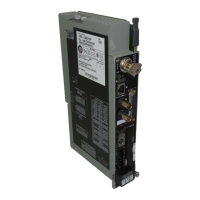
1785-L40E and -L80E programmable controllers 1. On the front of the controller, remove the 2
hex nuts on Channel 0.
2. Remove the screw on the communication
card and gently pull the card out of the
controller.
3. Remove the four screws that hold the right
side plastic
cover and remove the cover.
4. Remove the two large screws and washers
located in the center of the exposed circuit
board.
5. Carefully separate the two processor
boards by pulling the exposed circuit board at
the backplane edge connector away from the
metal cover as you would open a book.
6. Remove and replace the firmware EPROMS
one at a time, taking note of the location
number and the orientation of the notch in
each of the EPROMS.
7. See the figure to the left for the numbers
and locations of the EPROMS.
8. Reassemble the controller by reversing
steps 1 thru 5.
* EPROM numbers may vary and their locations shown in these illustrations are approximate. Your series and revision of controller and firmware may be different. Make certain the EPROM numbers
from your firmware update match the numbers on their respective circuit boards and communication cards.
U18*
U61*
U70*
Replace the
U61 and U70
EPROMS*
If applicable,
replace the U18
EPROM*
(if applicable)
U5*
U31*
U7 or U12*
Replace the
U5 and U31
EPROMS on the
circuit board*
If applicable,
Remove communication card
replace the U7
or U12 EPROM
(if applicable)
on the
communication
card*
 Loading...