ITA ENG FRA ESP DEU POR
6-1622349 rev.3 28/03/2019 pag. 2
4.3 Memorisation of the transmitters (only with the chain totally closed (UP) ).
Memorize at least one single channel transmitter. The control unit is provided with the rolling code decodifying. To vary the decodifying see
paragraph 5.3. During the normal functioning the first memorized button executes the step-by-step function (opening and closing), the second button
(optional) controls the courtesy light.
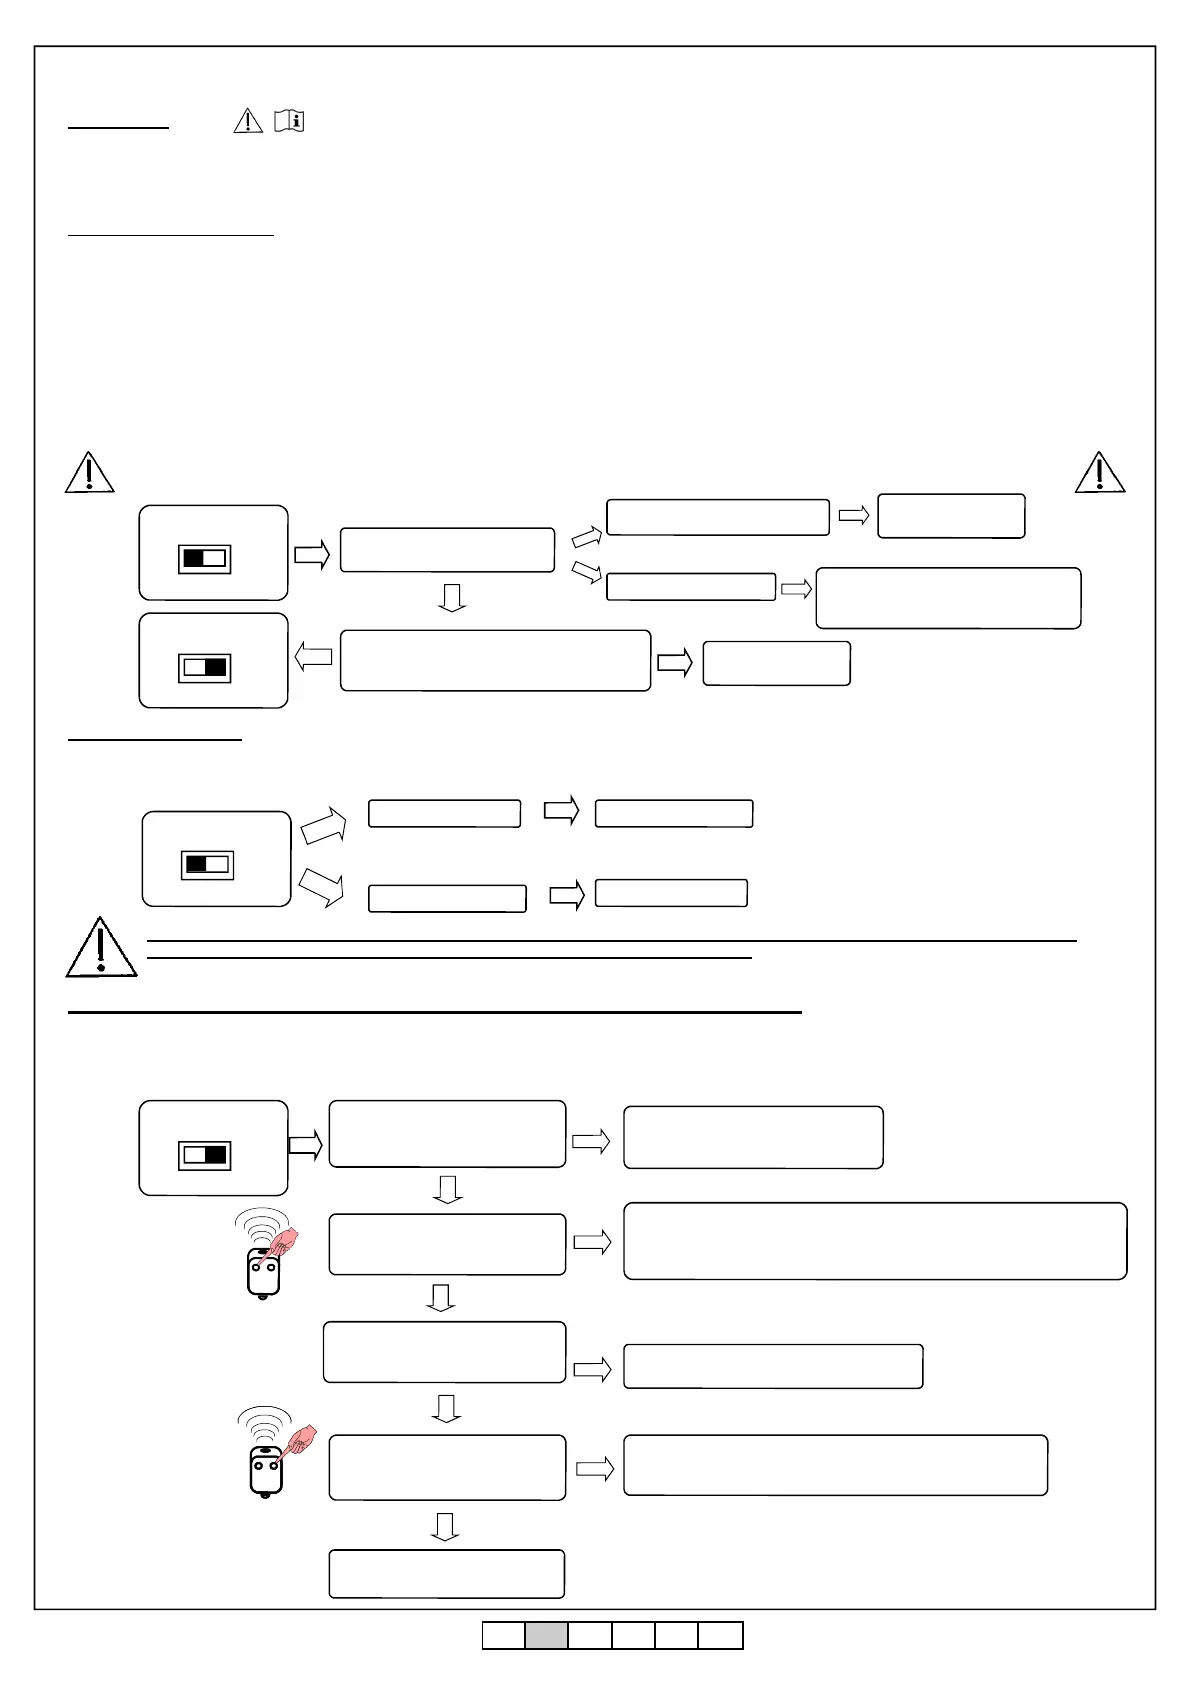
4.1 Preliminary checks.
Before powering up the control panel, check the wirings. In particular check that there are no damaged wires, short-circuits between wires and that
all the accessories are connected to the terminal board in the points indicated in the diagram on the previous page.
Once the power supply is on check that:
1. The POWER LED is constantly on.
2. The radio module is inserted and working.
3. The motor and the encoder connections are correct by following the procedure described below:
This procedure allows us to check the rotation sense of the motors, any possible blockages during the movement of the chain. It is important to
carry out this check in order to locate any wiring errors or anything else that can jeopardize.
This chapter contains important informations for a secure and correct installation. Follow exactly all the instructions because a wrong installation can
cause serious damages to the automation.
Push the BLUE button. The chain
has to move downwards
MAN
AUT
SW1 position
Release the BLUE button and press the YELLOW
button. The chain must move upwards. Return it to
the completely closed ( UP ) position.
Check the cables and
repeat the test.
MAN
AUT
SW1 position
N.B.: During this handling the photocells, the radio and the buttons are NOT active.
The Chain does not move
4. Settings
NO
The chain moves upwards
Modify the orientation of the 2 jumpers
present on the card. If not present, invert
the phases of the motor. Repeat the test.
NO
MAN
AUT
SW1 position
Press and release the RED button.
The flashing LED will remain con-
stantly lit.
Check that the chain is completely closed
(UP) and that the SW1 is in position
AUTO, repeat again from the beginning.
Press the 1st button on the remote
control. The flashing signal emits 2
slow flashes followed by a fast flash
The 1st button is memorized. Press
and release the RED button. The flash-
ing LED will remain constantly lit.
If the flashing signal has emitted 1 slow flash followed by 1 fast flash, the button
pressed was already memorized and you can continue with the procedure. Contrari-
ly check that the remote control is working, that it has the same decoding set in the
control unit and that the radio module is inserted. At this stage repeat the test.
Press the 2nd button on the remote
control. The flashing signal emits one
slow flash followed by 1 fast flash.
The 2 buttons are memorized and the
procedure ends.
Check that the chain is completely up and that
SW1 is in the AUTO position and repeat the test.
Check that the remote control is working, that it has the same decod-
ing set in the control panel and that the radio module is inserted. At
this stage repeat the test.
NO
NO
NO
NO
Yes
4.2 Manual moving
This procedure must be carried out ONLY by the installer and ONLY during the setting up of the system. The movement can be effectuated in partic-
ular situations in which it is not possible to move the chain to the closed (UP) position in automatic mode.
MAN
AUT
SW1 position
Press the blue button
To lower the chain
To raise the chain Press the yellow button.
WARNING: the reactivation of the automatic mode (AUT) implies the use of the reached position as totally closed position.
WARNING: During the manually moving, the anti-squeezing safety is not active.
Check the cables and
repeat the test.
NO
Yes
Yes
Yes
Yes
Yes
 Loading...