3
Coagulation
For coagulation there are two possibilities:
FORCED COAG: with sparking ‘fulguration or spray type’
SOFT COAG: without sparking.
The current ‘SOFT COAG’, usually combined with bigger size electrodes, is more suitable for coagulations with deep effective effect, but with limited
superficial sparking, such as for ex.:
- Coagulation by means of surgical forceps (from 10 W)
- Coagulation by round end electrodes in endoscopy, included the urological one under liquid (from 10 W)
- All coagulations by ball type electrodes (available with diam. mm2 and 4 both short type: E12, E14, and long type: E46, E47) (from 10 W)
The current ‘FORCED COAG’, usually combined with small size electrodes, is more suitable for coagulations having lower deep effect, but better superficial
efficiency, such as for ex.:
- Coagulations by loop electrodes for polypectomies and urological endoscopy under liquid (from 4 ÷ 5 W)
- Coagulations by above mentioned electrodes for cut and blend cut, for gynaecology too (from 4 ÷ 5 W)
- Superficial coagulations in dermatology (from 2 ÷ 3 W)
Of course the current ‘FORCED COAG’ may be used by more suitable electrodes for the SOFT one and vice versa even if is lost a little specific effect, so it’s
certainly useful to get personal experience.
Bipolar coagulation (for use by bipolar forceps, bipolar electrodes for laparoscopy or endoscopy, for spider naevi coagulation by double needle
method, and so on)
1. Use bipolar forceps or bipolar electrodes (the needles for microcoagulation for spider naevi).
2. Select ‘BIPOLAR’ current (from 0.5 ÷ 1 W)
3. Please remind that during the operation is very useful to reduce ‘sticking phenomena‘ of the tissue on the points of bipolar forceps, to clamp them as
little as possible , reduce at max. the time of power delivery and keep them moistened by physiological solution (or plunged inside a cup or on a
imbibed gauze).
Power adjusting
All different powers may be adjusted in micro scale (0,5 Watt p/time from 0,5 to 5 Watts, 1 Watt p/time from 5 to 10 Watts, 2 Watts p/time from 10 Watts to
max.).
So, at first by starting the use of the apparatus it’s advisable to start from the lowest values of power, then raising gradually up to desired results.
On this subject it’s important to remind that for pure cut (first of all by loop electrodes or for conization) by reaching a certain power level (that may change
according to the sizes of the same electrode) we start to obtain cut phenomenon, but it presents again a certain ‘sticking’ of the tissue on the electrode. The
optimum adjusting is obtained by raising a little again power by subsequent increments of 5, 10 Watts p/time.
RUNNING
Every time you switch on the apparatus, the microcontroller does automatically an auto test (of about 15 seconds) to verify anomalies of working (if present).
If everything is all right you will have in sequence:
1)Lighting of 5 green leds of the working selector;
2)Lighting of the all power display and (only in mod. MB1/A) of the timer display;
3)Lighting of the red led (neutral plate alarm device) and yellow and blue leds (cut/blend cut and coagulation) with short acoustic signals;
4)At the end, if everything is all right, you will have a short acoustic signal (on the display appears first the software code, then indication “power O”).
The auto test stops if reveals anomalies.
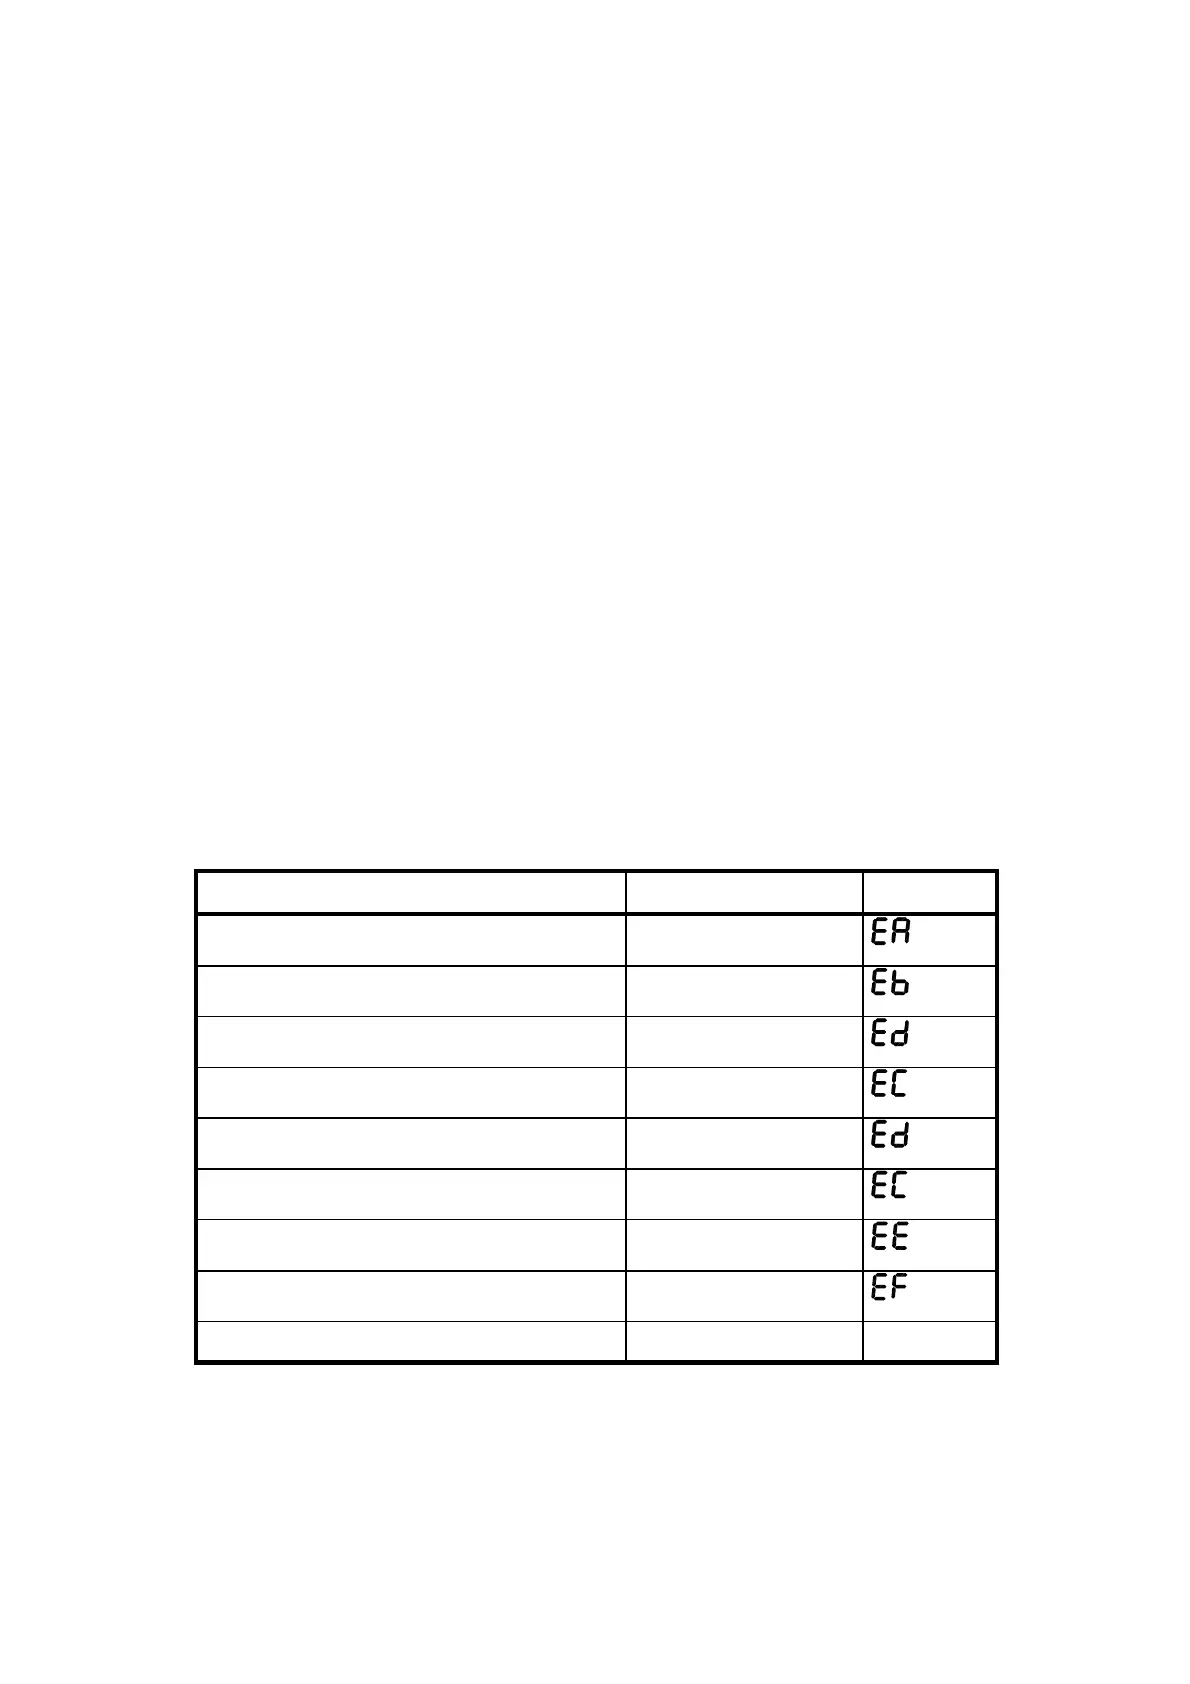
The system runs also (during the working) to prevent possible risks (because of internal breakdowns) stopping the output power and giving specific codes.
(SEE TABLE)
ATTENTION PLEASE: WHEN YOU SWITCH ON THE APPARATUS, IF THE LED DISPLAY DOESN’T LIGHTEN, DON’T USE THE
APPARATUS AND CALL THE TECHNICAL SERVICE.
1. Monopolar mode: by active electrode and neutral electrode for pure cut, blend cut and coagulations. In this case the current flows from active
electrode to the neutral one, so the phenomenon concerns the zone around exact application point of active electrode.
2. Bipolar mode: without neutral electrode for coagulation only. In this case the current flows from a point to the other of the kind of electrode
employed, so the phenomenon concerns only the part of the tissue included between the points of the same forceps. For this reason this method results
very interesting when there is the necessity to operate on delicate tissues trying to damage as little as possible.
kind of anomaly acoustic signal display code
RAM memory during auto diagnosis 1kHz 70ms ON 130ms OFF
EPROM memory during auto diagnosis 1kHz 70ms ON 130ms OFF
supply voltage during auto diagnosis 1kHz 70ms ON 130ms OFF
RF signal modulation during auto diagnosis 1kHz 70ms ON 130ms OFF
supply voltage during working 1kHz 70ms ON 130ms OFF
RF signal modulation during working 1kHz 70ms ON 130ms OFF
variables check failure 1kHz 70ms ON 130ms OFF
failure about foot pedal signal 1kHz 70ms ON 130ms OFF
neutral plate device control 1kHz 190ms ON 190ms OFF
-
 Loading...