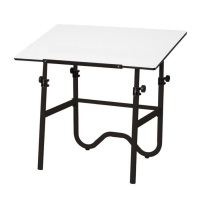
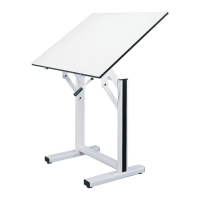
Onyx
™
Drafting Table
Tools required: Phillips screwdriver and awl or
1
⁄
16
" drill.
Assembly Instructions
Parts Included:
A 1 pc
B 2 pcs C 2 pcs E 4 pcs
To Assemble: Unpack and inspect contents to confirm you have all the parts listed above.
G 12 pcs
1
Base frame
Rear extension tubes Height
adjustment collars
½" Phillip screws
F 2pcs
Front guide tracks
Front extension tubes
Open base frame (
A
) in the upright position and place one
height adjustment collar (
E
) on top of each leg tube as
shown in figure 1. Position adjustment knobs facing out
and tighten lower screws using a Phillips screwdriver.
Figure 1
2
Insert front and rear extension
tubes, (
B
) and (
C
), into base frame
as shown in figure 1. For the time
being, set each tube at a height of
approximately 4" and lock into place
by tightening adjustment knob.
(see figure 2).
Figure 2
Lower Phillips screw
Front extension tube
Adjustment knob
Rear extension tube
H 1 pc
Pencil ledge Pencil ledge screws
J 2 pcs
Figure 3
3
Place your drawing board/tabletop on a soft pad or carpet to avoid
scratches with the best side facing down. Turn the assembled base
frame (
A
) upside down and place on tabletop as shown in figure 3.
Position the frame according to the dimensions in figure 4,
depending on the size or your tabletop. Center from left to right.
Place front guide tracks (
F
) under front leg extensions as shown.
4
Use an awl or a
1
⁄
16
" drill to start screw holes.
Be careful not to drill all the way through tabletop.
5
Attach rear extension brackets and front guide
tracks to tabletop using ½" Phillips screws (
G
).
6
Once all screws are secure, return table to its upright
position and adjust tube extensions until tabletop is at
desired height and angle.
Since some screws are hard to reach, try spinning
adjustment collar so that adjustment knob is out of your way.
Hint
Rear extension brackets
Front guide tracks