RS5290000 Rev. 0 104 April 1998
Kit Instructions
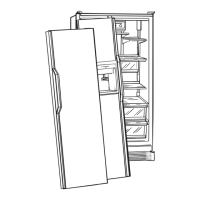
Thin Section
WARNING
To avoid electrical shock which can cause severe
personal injury or death, green ground wire must
remain attached to freezer door hinge.
16. Install new bottom door handle caps by pushing up
into bottom of new handle until caps snap in place.
17. Install new door handles by placing door handles on
door. Insert and tighten screws. Install new handle
inserts by snapping in place.
18. Remove thin section on end caps to allow room for
panels. Discard section. Replace top end caps by
placing end caps on handles. Insert and tighten
20. Install new top door trim by peeling off 1 1/2 inches
(38 millimeters) of backing. Place trim firmly
against top handle cap and against back of door.
After checking placement, peel off backing and
press into place.
21. Dispenser Models
Install new dispenser trim on freezer panels by
sliding trim on bottom edge of upper freezer door
panel and top edge of lower freezer door panel.
22. Non Dispenser Models
Remove nameplate by placing putty knife covered
with masking tape under nameplate and pulling
forward. Discard nameplate.
24. Install side door trim by peeling off 1 1/2 inches
(38 millimeters) of backing. Place trim against top
corner of refrigerator cabinet over edge of top
trim. After checking placement, peel off backing
and press into place. Place side door trim over
edge of bottom trim.
screws.
19. Dispenser Models
Replace dispenser cover by snapping in place.
Insert and tighten screws. Replace switch by
snapping in place.
Important
Permanent, double-sided tape is used to attach some
trim pieces to refrigerator. Before removing paper
backing, check placement of trim pieces on refrigerator.
Trim pieces may be damaged if adjustment or removal is
attempted after installation.
23. Slide decorator door panels into place until panels
are secure under handle inserts.
25. Push water tube into plastic union nut and tighten
union nut by hand. Gently pull on tube to confirm
nut is tight. Tighten water tube clamp screw.
Caution
To avoid property damage, confirm water tube union
nut is secure before replacing toe grille.
26. Install new toe grille inserting clips in holes and
snapping in.
 Loading...