EasyManua.ls Logo

American Legend AL3010W User Manual

American Legend AL3010W
9 pages
To Next Page IconTo Next Page
Page #1 background imageLoading...
Page #1 background image
©
202 0 Escalad e Sports
Fo r Custome r Servic e Cal l 1-888-996-2729
1
All Rights Reserved.
1-888-996-2729
FAX: 1-866-873-3531
We strive to ensure that our products are of the highest quality
and free of manufacturing defects or missing parts. However, if
you have any problems with your new product,
DO NOT RETURN IT TO THE STORE ,
please contact us toll free @:
Or write to:
Escalade Sports
Customer Service Department
P.O. Box 889
Evansville IN 47706
Your Model Number ____________________
have your model number when inquiring about parts.
gameroom@escaladesports.com
Please
Date Code ___________________________
2 - AL3010W- - SY
When contacting Escalade Sports please provide your model number, date
code (if applicable) and part number if requesting a replacement part. These
numbers are located on the product, packaging, and this owners manual.
Purchase Date ________________________
PLEASE RETAIN THIS INSTRUCTION MANUAL FOR FUTURE REFERENCE
AL3010W/F
Question and Answer IconNeed help?

Do you have a question about the American Legend AL3010W and is the answer not in the manual?

American Legend AL3010W Specifications

General IconGeneral
BrandAmerican Legend
ModelAL3010W
CategoryIndoor Furnishing
LanguageEnglish

Summary

Hardware and Parts Identification

Hardware Identifier

Lists and illustrates all hardware components like bolts, washers, and wrenches.

Parts Identifier

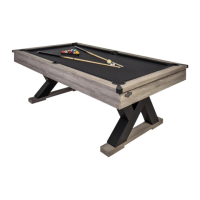
Lists and illustrates the main structural parts of the billiard table, including cabinet and legs.

Accessories Identification

Accessories Identifier

Lists and illustrates accessories such as billiard balls, cues, chalk, and leveling shims.

Billiard Table Assembly

Step 1: Attach Legs to Cabinet

Attaching upper and middle legs to the main cabinet using H2 bolts, H3 washers, and H4 lock washers.

Step 2: Attach Bottom Legs

Attaching the P5 bottom leg onto the P3 middle leg using H1 bolt, H3 flat washer, and H4 lock washer.

Step 3: Attach Leg Bases and Tighten Bolts

Attaching P2 leg bases to P3 middle legs and P5 bottom legs and tightening all leg bolts.

Instructions for Leveling a Pool Table

Care and Use of Your Table

Product Parts List

90 Day Limited Warranty

Related product manuals