EasyManua.ls Logo

American Lighting OMNI Puck User Manual

American Lighting OMNI Puck
2 pages
To Next Page IconTo Next Page
Page #1 background imageLoading...
Page #1 background image
OMNI Puck
Installation instructions for OMNI-3KIT and OMNI-1 Series
WARNING: These products may represent a possible shock or re hazard if improperly installed or attached in any way. Products
should be installed in accordance with these instructions, current electrical codes and/or the current National Electric Code (NEC).
WARNING: To avoid electrical shock, disconnect or disable power at the source prior to installation or maintenance.
WARNING: To avoid electrical shock, use only with 12V DC plug-in power supply or with 12V DC hardwire power supply.
Factory warranty will be void if used with a non-recommended power supply, transformer, or driver.
IMPORTANT SAFETY INSTRUCTIONS
1. The OMNI Puck is IP44 rated and intended for indoor use in dry locations only. Do not use in the vicinity of standing water or
liquids. Do not submerge in water or liquids.
2. Do not use if there is any damage to the unit or to the power cord’s insulation. Inspect periodically.
3. Do not route cords or units through walls, doors, windows or any similar part of a building structure.
4. Do not secure unit or its power cord with staples, nails, or any other sharp objects that may damage xture.
5. Please read and understand these instructions before beginning installation.
IMPORTANT
Risk of shock or re hazard: This xture utilizes a constant voltage design and has a maximum number of pucks that can be
connected to a power supply, depending upon the power supplys capacity and the type of installation. Do not exceed
capacity of power driver used, nor maximum number of pucks per the examples below. Each puck consumes 3 watts. For all
drivers, a maximum load less than or equal to 80% of its capacity will result in maximum driver life.
PRIOR TO INSTALLATION:
3-light OMNI Kits (OMNI-3KIT-XX items) include three OMNI Pucks with surface mounting hardware and a plug-in 12-watt
power supply, c/UL/us Listed for indoor use with attached 6ft power cord and 3-port connection hub on a 24AWG lead, also 6
feet in length. Kits are designed to be used in a hub system as illustrated below.
Bulk/individual OMNI Pucks (OMNI-1-XX items) are available to build sytems with more or less than three pucks. Bulk pucks
have a 24 AWG lead wire, 6 feet in length, each of the two conductors is stripped back to 3/8” for attaching to a plug-in or
hardwire driver with a regulated 12V DC output.
Determine the quantities and locations of OMNI Pucks that will be needed, whether pucks will be surface mounted or
recessed, and what type of power supply (plug-in or hardwire) will be best.
RV1502
Continued on next page...
©2015 American Lighting, Inc
Page 1 of 2
www.americanlighting.com
Hub system
Figure 1
Surface mounting
1. Separate the surface ring from the OMNI Puck housing. With the puck
lens facing away from you, hold the surface ring with your ngers
and press on the center of the back of the puck with your thumbs to
separate housing from surface ring. See Figure 1.
2. Determine desired locations for each puck and mark the locations of
the mounting holes on the mounting surface, using the surface ring
as a template. Note: Each puck has a 72” lead wire which needs to be
routed to the power connection hub (for kits) or to the driver (for
bulk pucks). Be sure to locate the puck lights and power hub (or
driver) so that each puck can reach it.
3. Before attaching the surface ring to the mounting surface, route the
lead wire through the installation notch. See Figure 1.
4. Secure surface ring using appropriate mounting hardware.
5. Gently push the puck light into the surface ring until it is fully seated,
making sure the lead wire is not pinched or crimped in any way.
Press on center back of housing
to separate surface
ring from puck.
Housing
Surface ring
Installation
notch
3-port connection hub (kits)
Question and Answer IconNeed help?

Do you have a question about the American Lighting OMNI Puck and is the answer not in the manual?

American Lighting OMNI Puck Specifications

General IconGeneral
Lumens180 lm
Voltage12VDC
Dimensions2.36" Dia. x 0.33" H
Input Voltage12VDC
IP RatingIP44
Beam Angle120°
Luminous Flux180 lm
TypePuck Light
Color Temperature3000K
DimmableYes
FinishWhite
CRI80
LED TypeSMD

Summary

General Safety Warnings

Electrical Safety Precautions

Instructions to prevent electrical shock and fire hazards during installation and use.

Usage and Environment Limitations

Guidelines for proper use, including indoor dry location restrictions and avoiding water exposure.

Installation and Handling Precautions

Advice on safely routing cords, securing the unit, and inspecting for damage to prevent hazards.

Puck Load Capacity and Power

Maximum Puck Load

Details on the maximum number of pucks connectable to a power supply based on wattage and load.

Product Kits and System Overview

Kit Contents and System Design

Information on 3-light kits, individual pucks, and how they integrate into a hub system for installation.

Surface Mounting Installation

Separating Puck Housing

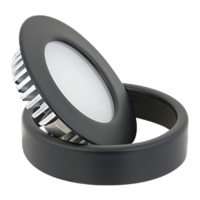
Instructions on how to detach the surface mounting ring from the OMNI Puck housing before installation.

Marking and Routing

Guidance on marking mounting hole locations and routing the puck's lead wire through the installation notch.

Securing and Seating Puck

Steps for securing the surface ring and gently inserting the OMNI Puck into the ring until fully seated.

Recessed Mounting Installation

Preparing for Recessed Mount

Instructions for preparing a recessed installation, including separating the surface ring and drilling holes.

Seating Puck in Recessed Mount

Steps to route the puck's lead wire through the hole and press the OMNI Puck into the mounting surface.

Power Connection Instructions

Connecting to Hub or Driver

Guidance on routing puck lead wires to the power connection hub (for kits) or driver (for bulk pucks).

Connecting to 120V Outlet

Steps for connecting the power supply for kits to a standard 120V AC wall outlet.

Connecting Bulk Puck Wires

Instructions for connecting lead wires from bulk pucks to a plug-in or hardwire power supply.

Power Supply Load Requirements

Details on selecting a driver with sufficient capacity for multiple puck lights and maximum load limits.

General Installation and Safety Restrictions

Prohibited Modifications

Restrictions against removing LEDs, altering plugs, or routing wires through walls or ceilings.

Additional Safety Measures

Recommendations for cord securing, avoiding direct LED viewing, and keeping away from flammable materials.

Polarized Plug Usage

Instructions for using the polarized plug with a compatible outlet to reduce electric shock risk.

Related product manuals