Do you have a question about the AMF REECE S-4000 CAED and is the answer not in the manual?
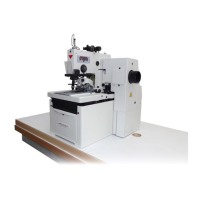
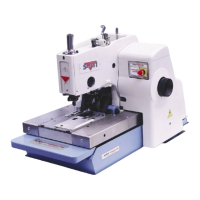
Overview of the machine's design, benefits, and key features for operators.
Identification and explanation of safety devices, warning labels, and their importance.
Detailed description and labeling of major machine components for user familiarization.
Technical specifications including sewing speed, dimensions, power requirements, and materials.
Essential safety guidelines for operation, maintenance, and precautions to prevent injury.
Information on optional accessories available for the machine, such as voltage guards and needles.
Details on what is included in the machine shipment, including the main unit and accessories.
Listing and description of standard accessories supplied with the machine for setup and operation.
Instructions for connecting the machine to power and air supply, including pressure settings.
Pneumatic diagram and explanation of air connections for the machine head components.
Step-by-step guide for correctly installing the thread holder assembly onto the machine.
Procedures for powering on the machine and ensuring it is in the correct home position for operation.
Detailed instructions on how to correctly install a needle into the machine, including safety warnings.
Guide on how to properly thread the machine for sewing, including tension adjustments.
Explanation of the sewing cycle, foot pedal functions, and machine stopping procedures.
Identification and function of all buttons and indicators on the operator control panel.
Understanding display messages, standard messages, and error messages shown on the control panel.
Guide to navigating and using the machine's programming menu for parameter adjustments.
Procedures for running diagnostic tests on machine functions and components.
Information about the current software version installed on the machine.
Visual representation of the programming flow and parameter selection paths.
A reference list of all adjustable parameters with their ranges and default settings.
Steps to ensure the machine's needle bar and other parts are in the correct home position.
Procedure for adjusting the shifter mechanism to ensure correct fabric feeding.
General guidelines and precautions for performing machine adjustments safely and effectively.
Adjusting the needle bar position, height, and eccentric for proper stitch formation.
Setting up the "bite" or stitch width adjustment for optimal sewing results.
Adjusting the feeding wheels and mechanism for correct fabric transport and stitch formation.
Information on adjusting the clutch pressure, typically set by the manufacturer.
Adjusting the stitch density by modifying the feeding rod position in the density lever.
Detailed steps for adjusting the loopers to ensure correct stitch formation and timing.
Setting the correct home position for the clamp plate assembly before sewing.
Adjusting the distance between the clamp plate cover and the throatplate edge.
Adjusting the trimming knife and shear edge for proper fabric cutting.
Adjusting the clamp plate change-over mechanism for proper stitch and cut fabric distance.
Procedures for adjusting the uplift, centering, and pressure of the machine's clamping foot.
Adjusting the thread draw-off mechanism to prevent skipped stitches or improve looping.
How to adjust thread tension for optimal sewing appearance based on material.
Adjustment of the trimming cylinder and hook for correct thread trimming.
Adjusting the airflow and period for the cuts-off blow-off feature.
Details on the special accessory for thread blow-off, including airflow and period adjustments.
Setting the position of the stop sensor for accurate needle bar stopping.
Step-by-step instructions for replacing the drive belt on the machine.
How the voltage fluctuation protection accessory works and its settings.
Adjustment and sensitivity settings for the optical fiber sensor.
Routine cleaning procedures for the sewing mechanism, guides, and general machine parts.
Instructions for accessing and cleaning or replacing the filter cover and pad.
Procedures for maintaining the air filter, regulator, and automatic condensate separator.
Steps for replacing the filter pad in the filter regulator assembly.
Recommended service intervals and tasks, including lubrication and checks.
Diagram illustrating the group lubrication circuit for various machine parts.
Detailed instructions on where and how to lubricate machine components before operation.
Environmental guidelines for the proper disposal of machine parts and materials.
Common mechanical issues, their possible causes, and solutions for thread breakage and stitch skipping.
Explanations of error messages displayed on the control panel and how to resolve them.
Descriptions of servo error codes and procedures for troubleshooting servo-related issues.
Troubleshooting guide for electrical faults, power issues, and component failures.
| Brand | AMF |
|---|---|
| Model | REECE S-4000 CAED |
| Category | Sewing Machine |
| Language | English |