EasyManua.ls Logo

AmpliVox BELT BLASTER - User Manual

AmpliVox BELT BLASTER
2 pages
Print Icon
To Next Page IconTo Next Page
Loading...
AmpliVox 650 Anthony Trail Suite D, Northbrook, IL 60062 Phone: (800)267-5486 Fax: (800)267-5489 www.ampli.com
S206 BELT BLASTER /
S207 BELT BLASTER PRO
WAISTBAND AMPLIFIER
INCLUDED:
1. Belt Blaster Pro Personal Waistband Amplifier
2. 44″ Adjustable Belt
3. Headset and Lapel Microphone
4. AC Adapter/Recharger
5. Storage Case
6. Waistband Case
7. 6 - NiMH rechargeable batteries
S206 Batteries: Insert six (6) standard ʺAAʺ batteries (not included) as show below.
Install Batteries:
1. Locate the battery compartment on the right rear side of the amplifier.
2. Press (do not pry) the cover locking tab to the right and lift to remove battery cover.
3. Install the 6 batteries . Follow the picture of battery direction as seen in the bottom of
the holder. Negative (-) flat side of battery toward spring.
4. Insert battery cover and press back into place.
BATTERY REPLACEMENT
When batteries (S207) will no longer hold a charge, all 6 batteries MUST be replaced at the same
time. Mixing old and new batteries can lead to battery failure.
CHARGING BATTERIES FOR FIRST USE (S207)
Your new Belt Blaster Pro is shipped with 6 NiMH rechargeable batteries. Once they have been installed,
they must receive a deep charge (24 hours) before being used.
1. Insert battery charger mini plug (AC adapter) into the charging port located on the bottom of the amplifier.
2. Plug the adapter into a working power outlet. Charge the Belt Blaster Pro for 24 hours for the first charge.
After this, only 8 - 14 hour charge is necessary
.
S207 Rechargeable Batteries: The rechargeable Nickel Metal Hydride batteries of the S207 Belt Blaster Pro will have a life
expectancy of approximately 2 years. Actual life will vary significantly depending on your usage and charging habits. There may
be a time when you need to use backup power to get through a presentation. The Belt Blaster PRO was intentionally designed
to accommodate standard AAbatteries for just such occasions.
NOTE:
The AC Adapter/Charger can ONLY be used to recharge the batteries . Can not power the amplifier simultaneously.
CAUTION! NEVER PLUG IN AC ADAPTER/CHARGER WITH NON-RECHARGEABLE BATTERIES INSIDE AMPLIFIER.
SERIOUS DAMAGE MAY BE CAUSED TO BATTERIES AND AMPLIFIER.
1. Belt Blaster Personal Waistband Amplifier
2. 44″ Adjustable Belt
3. Headset and Lapel Microphone
4. Storage Case
INCLUDED:
S206 S207
INSERTING/CHANGING THE BATTERIES
CHARGER PORT
Question and Answer IconNeed help?

Do you have a question about the AmpliVox BELT BLASTER and is the answer not in the manual?

Summary

Inserting and Changing Batteries

S206 Battery Installation

How to insert standard AA batteries into the S206 model.

S207 Battery Replacement

Guideline for replacing all batteries simultaneously for S207.

Charging Batteries for First Use (S207)

S207 Rechargeable Battery Information

Information on rechargeable NiMH batteries and their lifespan.

Operating Instructions

Wearing and Attaching Components

How to attach the microphone and wear the amplifier on the waist.

Powering On and Volume Control

Instructions for turning the amplifier on and adjusting the volume level.

USB Thumb Drive Operation

Using the USB Thumb Drive

Steps for inserting and playing content from a USB thumb drive.

Troubleshooting

Popping or Crackling Noise

Common causes and cleaning methods for audio noise issues.

Overview

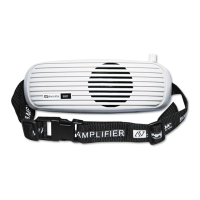
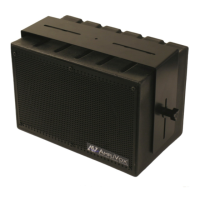
The AmpliVox S206 Belt Blaster and S207 Belt Blaster Pro are personal waistband amplifiers designed to enhance voice projection. These devices are ideal for situations requiring amplified sound, such as presentations, teaching, or guiding tours, allowing the user to be heard clearly without straining their voice.

S206 Belt Blaster

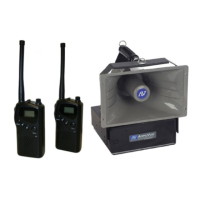
The S206 Belt Blaster is a personal waistband amplifier that comes with essential accessories for immediate use.

Included Components:

  • Belt Blaster Personal Waistband Amplifier
  • 44" Adjustable Belt
  • Headset and Lapel Microphone
  • Storage Case

Powering the S206: The S206 operates on six (6) standard "AA" batteries (not included). Battery Installation:

  1. Locate the battery compartment on the right rear side of the amplifier.
  2. Press (do not pry) the cover locking tab to the right and lift to remove the battery cover.
  3. Install the 6 batteries, ensuring to follow the picture of battery direction seen at the bottom of the holder. The negative (-) flat side of the battery should face the spring.
  4. Insert the battery cover and press it back into place until it clicks.

S207 Belt Blaster Pro

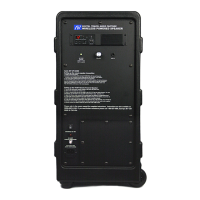
The S207 Belt Blaster Pro is an advanced version of the waistband amplifier, offering rechargeable capabilities and additional accessories for extended use and convenience.

Included Components:

  • Belt Blaster Pro Personal Waistband Amplifier
  • 44" Adjustable Belt
  • Headset and Lapel Microphone
  • AC Adapter/Recharger
  • Storage Case
  • Waistband Case
  • 6 - NiMH rechargeable batteries

Powering and Charging the S207: The S207 uses six (6) NiMH rechargeable batteries. Battery Installation: The installation process for the NiMH batteries is the same as for the S206. Charging Batteries for First Use: Your new Belt Blaster Pro is shipped with 6 NiMH rechargeable batteries. Once installed, they must receive a deep charge (24 hours) before being used for the first time.

  1. Insert the battery charger mini plug (AC adapter) into the charging port located on the bottom of the amplifier.
  2. Plug the adapter into a working power outlet.
  3. Charge the Belt Blaster Pro for 24 hours for the initial charge. After this first charge, only an 8-14 hour charge is necessary for subsequent recharges.

Battery Replacement (S207): When the NiMH batteries no longer hold a charge, all 6 batteries MUST be replaced at the same time. Mixing old and new batteries can lead to battery failure. The rechargeable Nickel Metal Hydride batteries of the S207 Belt Blaster Pro have an expected life expectancy of approximately 2 years, though actual life will vary significantly based on usage and charging habits. The Belt Blaster PRO is designed to accommodate standard "AA" batteries as a backup power source for occasions when recharging is not feasible.

Important Note on Charging: The AC Adapter/Charger can ONLY be used to recharge the batteries and cannot power the amplifier simultaneously. CAUTION! NEVER PLUG IN THE AC ADAPTER/CHARGER WITH NON-RECHARGEABLE BATTERIES INSIDE THE AMPLIFIER. Doing so can cause serious damage to both the batteries and the amplifier.

General Operating Instructions (S206 & S207)

The amplifier is typically worn on the front of the waist, similar to a "waist pack." The woven nylon waistband is adjustable up to 44 inches. To prevent feedback, ensure the speaker grill faces out and away from your body.

Setup and Operation:

  1. With the amplifier turned OFF, insert the 3.5mm lapel/headset microphone plug into the jack on top of the amplifier.
  2. Place the amplifier on your waist, adjust the attached belt to fit, and then clip the buckle. Pay attention to the path of the nylon belt through the clips; if the belt is disassembled, it must be reinstalled correctly.
  3. Turn the amplifier ON by rotating the volume control knob to the 11 o'clock position while speaking at a consistent volume level.
  4. Once your voice is perceived as loud enough, slightly reduce the volume. This adjustment is necessary because you are positioned behind the speaker, and your voice will sound considerably louder to you than to your audience.

USB Thumb Drive Functionality (S206 & S207): The amplifier includes a USB slot for playing recorded audio from a thumb drive.

  1. Insert a USB Thumb Drive into the USB Slot on top of the amplifier.
  2. Press the ON/OFF/Play button to activate the USB function. The USB power LED will light up and flash. Press the button again to play the first recorded item.
  3. Press the "forward" button to advance to the next song/message, or hold for 2 seconds to fast forward.
  4. Press the "backward" button to go back to the last song/message, or hold for 2 seconds to fast backward.

Troubleshooting

Popping or Crackling Noise: Popping or crackling noises emanating from the speaker, particularly when the microphone cable is moved, are usually caused by dirt, finger oils, or corrosion build-up on the microphone plug. Solution: Remove the microphone plug and clean the metal tip and sleeve with a clean cloth or cotton swab moistened with alcohol, or with a pre-moistened towelette (such as a Wet Wipe). If these are unavailable, a clean, dry cloth or paper towel can be used, which, while less effective, should still improve contact.

AmpliVox BELT BLASTER Specifications

General IconGeneral
BrandAmpliVox
ModelBELT BLASTER
CategorySpeakers
LanguageEnglish

Related product manuals