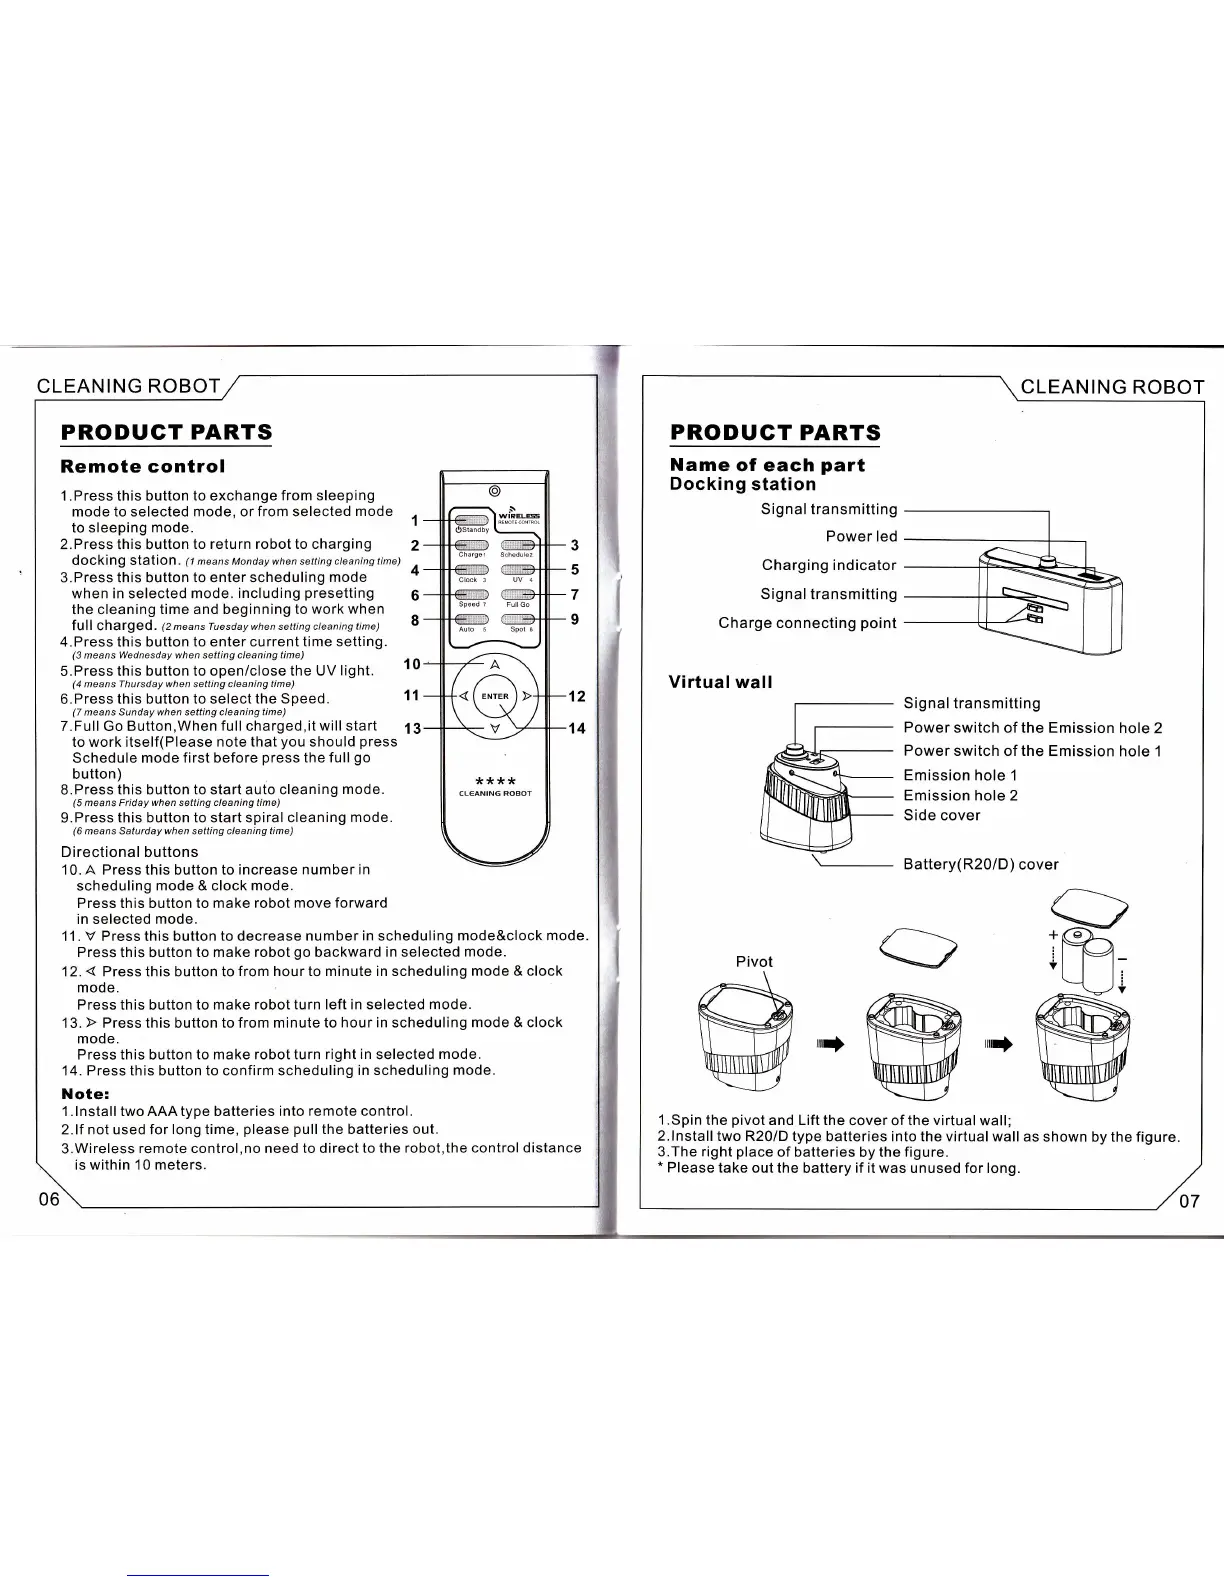
PRODUGT
PARTS
Remote control
l.Press this button to exchange
from sleeping
mode to selected mode, or from selected
mode
1
to sleeping
mode.
2.Press this button
to return robot to charging
2
dOCking StatiOn.
(1
means Monday when setting cleaning time)
3.Press this button to enter scheduling
mode
+
when in selected mode. including
presetting
6
the cleaning
time and beginning to work
when
full Chafged
.
(2meansTuesdaywhensettingcleaningtime)
8
4.Press this button to enter current
time setting.
(3
means
Wednesday when
setting cleaning
time)
5.Press this button
to openi close the UV
light.
10
(4
means Thursday when setting cleaning time)
6.Press
this button to select the Speed.
11
(7
means Sunday when setting cleaning time)
7.Full Go Button,When
full
charged,it
will start
fi
to work itself(Please
note
that
you
should
press
Schedule
mode first before
press
the
full
go
button)
S.Press
this
button
to start auto cleaning
mode.
(5
means Friday
when
setting cleaning
time)
9.Press
this button to start spiralcleaning
mode.
(6
means Saturday when setting cleaning time)
Directional
buttons
10. A Press this button to increase
number in
scheduling
mode &
clock
mode.
Press this button to make robot move forward
in selected
mode.
11 .
V
Press this button
to decrease number
in
scheduling
mode&clock mode.
Press this button
to make robot
go
backward
in selected mode.
12.
{
Press this button to from
hour to minute in scheduling
mode &
clock
mode.
Press this button to make
robot
turn
left in selected mode.
13.
F
Press
this button
to from minute to hour
in
scheduling
mode & clock
mode.
Press this button
to make robot turn right
in
selected
mode.
14. Press this button to confirm scheduling
in scheduling
mode.
Note:
l.lnstall
twoAAAtype batteries into remote control.
2.lf not used for long time,
please pull
the batteries out.
3.Wireless
remote
control,no
need to direct
to the robot,the control distance
is within 10 meters.
12
14
Clock 3
UV 4
Sp€ed ?
Futt Go
Aulo 5 Spot
6
*:k**
CL€ANING ROBOT
CLEANING
ROBOT
PRODUCT
PARTS
Name
of each
part
Docking
station
Signal transmitting
Power
led
Charging indicator
Signal transmitting
Charge connecting
point
Virtual wall
Signal transmitting
Power
switch of the
Emission hole 2
Power switch
of
the
Emission hole
1
Emission hole
1
Emission
hole 2
Side cover
Battery(R20/D)
cover
rrr$
rruf
1 .Spin
the
pivot
and Lift the
cover of the virtual wall;
2.lnstalltwo
R20/D
type batteries into the virtualwallas
shown by the figure.
3.The right
place
of
batteries by the
figure.
*
Please
take
out
the
battery
if
it was unused for long.
Pivot
CLEANING ROBOT
07
 Loading...