890121234567890123456789012345678901212345678901234567890123456789012123456789012345678901234567890121234567890123456789012345678901212345678901234567890123
8
9012123456789012345678901234567890121234567890123456789012345678901212345678901234567890123456789012123456789012345678901234567890121234567890123456789012
9012123456789012345678901234567890121234567890123456789012345678901212345678901234567890123456789012123456789012345678901234567890121234567890123456789012
9012123456789012345678901234567890121234567890123456789012345678901212345678901234567890123456789012123456789012345678901234567890121234567890123456789012
9012123456789012345678901234567890121234567890123456789012345678901212345678901234567890123456789012123456789012345678901234567890121234567890123456789012
9012123456789012345678901234567890121234567890123456789012345678901212345678901234567890123456789012123456789012345678901234567890121234567890123456789012
9012123456789012345678901234567890121234567890123456789012345678901212345678901234567890123456789012123456789012345678901234567890121234567890123456789012
9012123456789012345678901234567890121234567890123456789012345678901212345678901234567890123456789012123456789012345678901234567890121234567890123456789012
9012123456789012345678901234567890121234567890123456789012345678901212345678901234567890123456789012123456789012345678901234567890121234567890123456789012
9012123456789012345678901234567890121234567890123456789012345678901212345678901234567890123456789012123456789012345678901234567890121234567890123456789012
9012123456789012345678901234567890121234567890123456789012345678901212345678901234567890123456789012123456789012345678901234567890121234567890123456789012
9012123456789012345678901234567890121234567890123456789012345678901212345678901234567890123456789012123456789012345678901234567890121234567890123456789012
9012123456789012345678901234567890121234567890123456789012345678901212345678901234567890123456789012123456789012345678901234567890121234567890123456789012
9012123456789012345678901234567890121234567890123456789012345678901212345678901234567890123456789012123456789012345678901234567890121234567890123456789012
9012123456789012345678901234567890121234567890123456789012345678901212345678901234567890123456789012123456789012345678901234567890121234567890123456789012
9012123456789012345678901234567890121234567890123456789012345678901212345678901234567890123456789012123456789012345678901234567890121234567890123456789012
9012123456789012345678901234567890121234567890123456789012345678901212345678901234567890123456789012123456789012345678901234567890121234567890123456789012
9012123456789012345678901234567890121234567890123456789012345678901212345678901234567890123456789012123456789012345678901234567890121234567890123456789012
9012123456789012345678901234567890121234567890123456789012345678901212345678901234567890123456789012123456789012345678901234567890121234567890123456789012
3
890121234567890123456789012345678901212345678901234567890123456789012123456789012345678901234567890121234567890123456789012345678901212345678901234567890123
04
Introduction
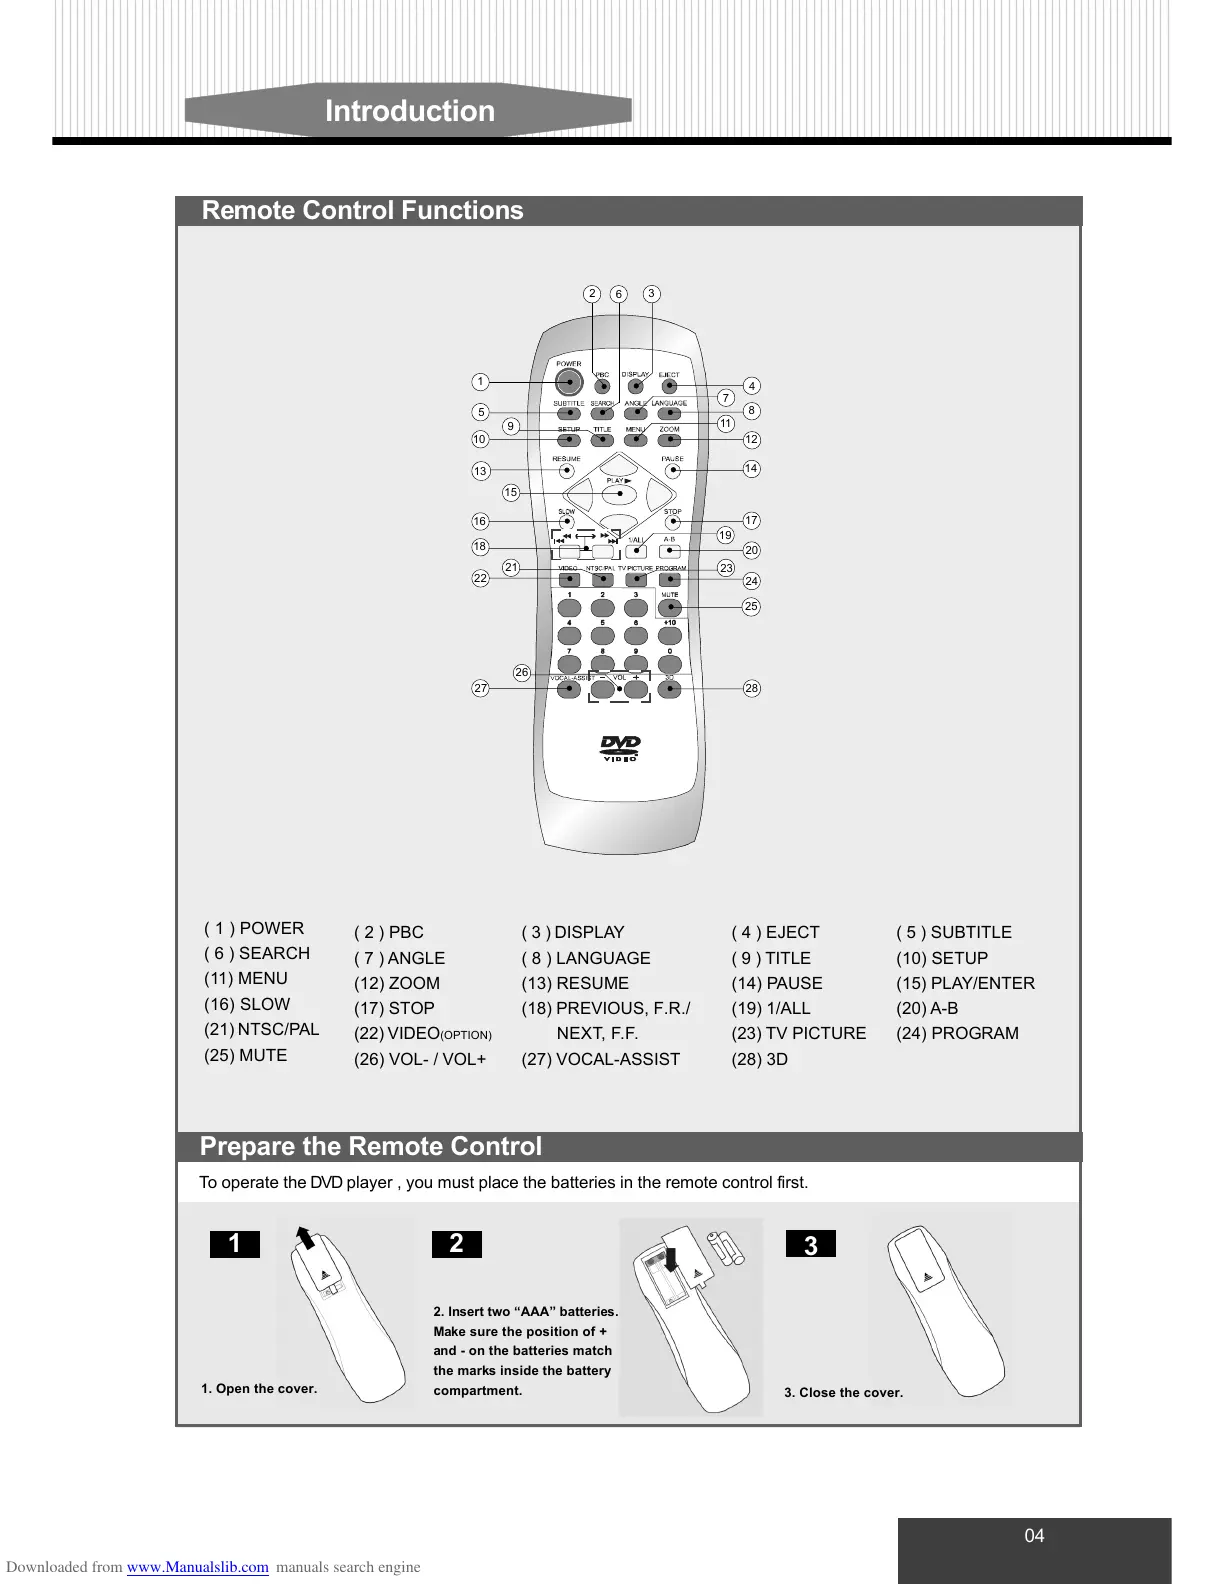
( 3 ) DISPLAY
( 8 ) LANGUAGE
(13) RESUME
(18) PREVIOUS, F.R./
NEXT, F.F.
(27) VOCAL-ASSIST
Remote Control Functions
To operate the DVD player , you must place the batteries in the remote control first.
3
21
1. Open the cover.
3. Close the cover.
Prepare the Remote Control
( 1 ) POWER
( 6 ) SEARCH
(11) MENU
(16) SLOW
(21) NTSC/PAL
(25) MUTE
( 4 ) EJECT
( 9 ) TITLE
(14) PAUSE
(19) 1/ALL
(23) TV PICTURE
(28) 3D
( 5 ) SUBTITLE
(10) SETUP
(15) PLAY/ENTER
(20) A-B
(24) PROGRAM
( 2 ) PBC
( 7 ) ANGLE
(12) ZOOM
(17) STOP
(22) VIDEO
(OPTION)
(26) VOL- / VOL+
5
10
1
13
18
15
16
26
28
25
24
14
17
12
8
9
4
7
11
22
21
2
6
3
19
20
23
27
2. Insert two “AAA” batteries.
Make sure the position of +
and - on the batteries match
the marks inside the battery
compartment.