7
f1
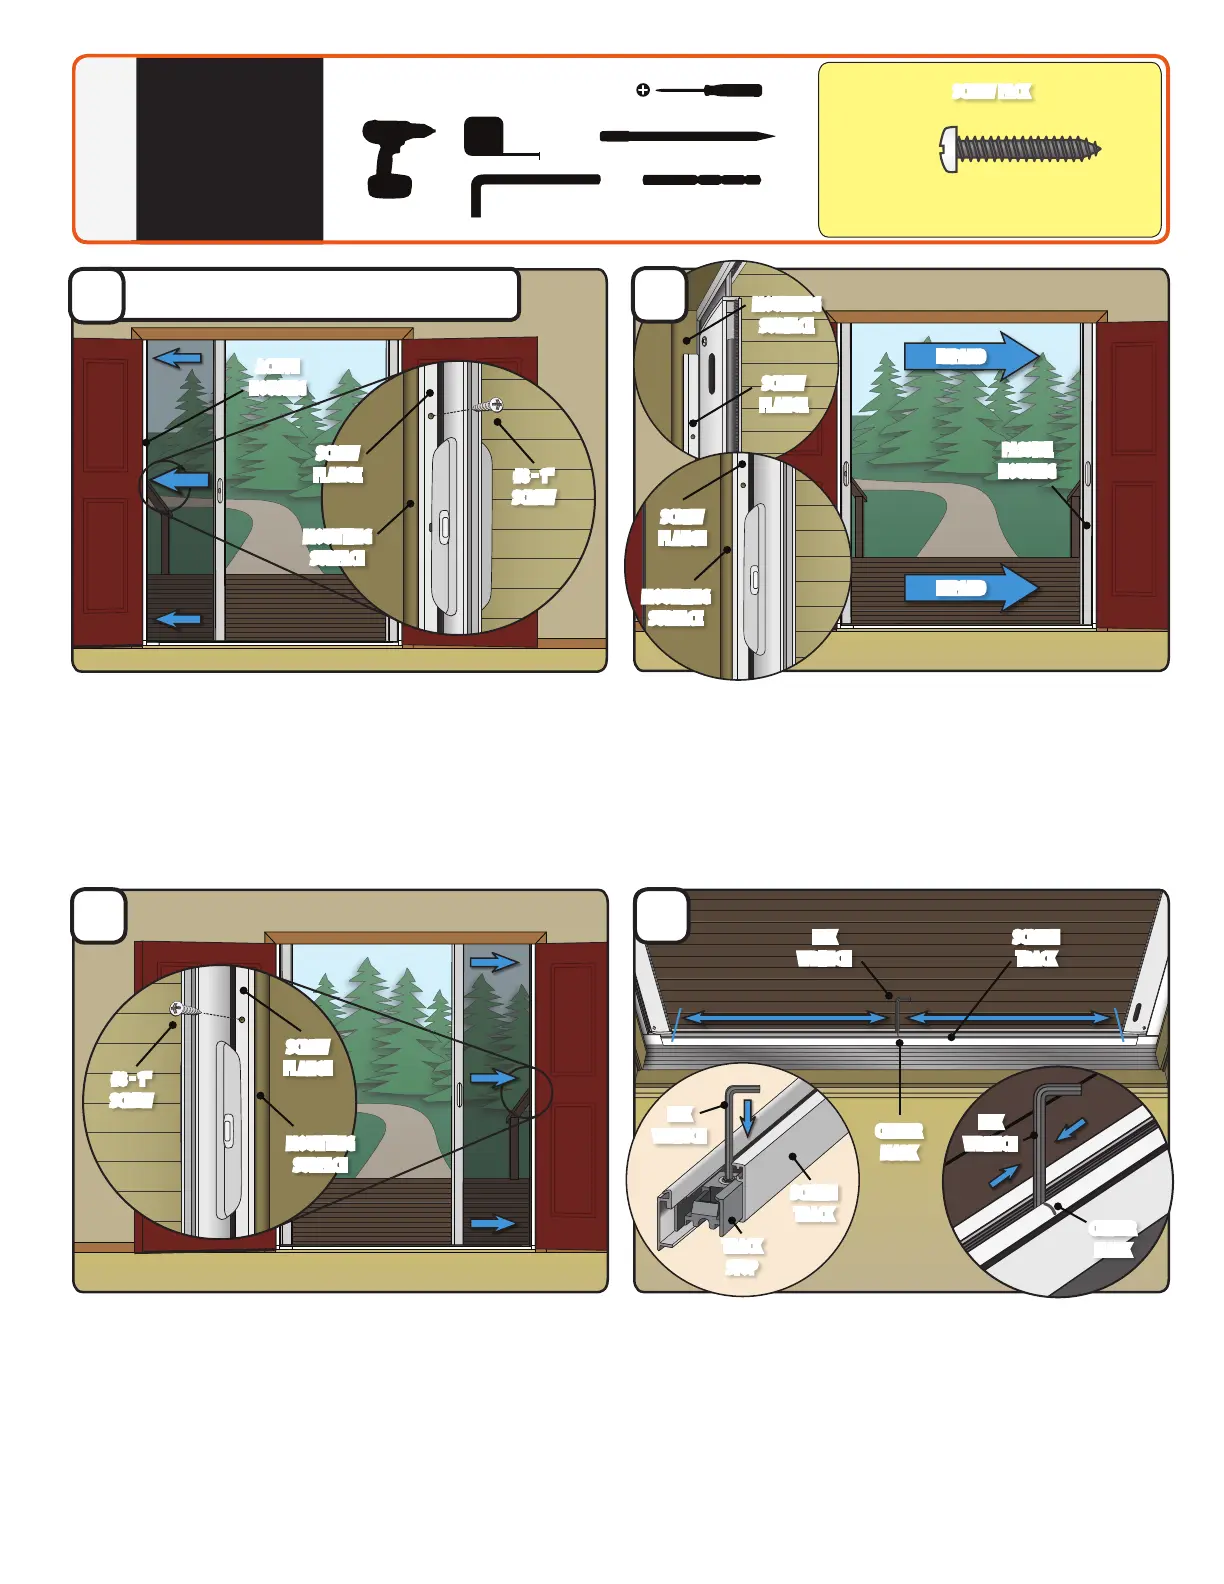
From the interior, while holding the Passive Housing side Screw Flange
tight to the Mounting Surface, extend the screen so it is clear of your drill/
driver. Orange installation clips can come o and be properly disposed of.
f2 With ⁄" bit provided, predrill through the three holes on the Passive
Housing side Screw Flange into the Mounting Surface a maximum
depth of ¾".
f3 With the three remaining #8 - 1" screws, fasten Passive Housing
to the Mounting Surface. (Be careful not to over tighten)
PLACE, FASTEN
ASSEMBLY
INTO OPENING
Continued
2
Tools Recommended:
g1 With a pencil and tape measure nd the center of the opening and make
a Center Mark on the lower and upper Screen Tracks.
g2 Insert the Hex Wrench into the Track Stop, positioned near the center of
the Screen Track.
g3 Loosen the set screw just enough to move the Track Stop, and reposition
it to the Center Mark on the Screen Track. Tighten the set screw in place.
g4 Repeat step for other Screen Track.
e1 Expand the screen assembly in the door opening until the
Passive Housing side Screw Flange is on the Mounting Surface.
e2 Verify the screen assembly is plum, level and square in the door
opening and the Passive Housing side Screw Flange is tight to
Mounting Surface.
d1 From the interior, while holding the Active Housing side Screw Flange
tight to the Mounting Surface, extend the screen so it is clear of your drill/
driver. Orange installation clips can come o and be properly disposed of.
d2 With the ⁄" bit provided, predrill through the center hole of the Screw
Flange (large arrow) into the Mounting Surface a maximum depth of ¾".
d3 With one #8 - 1" screw, fasten Active Housing to the Mounting Surface.
(Be careful not to overtighten)
d4 Repeat steps for top and bottom holes. (Being careful not to overtighten)
#8-1"
(Qty 6)
SCREW PACK
#8
#10
#12
#6
3/4” Machine Pan Painted
1/2” SMS Pan
1/2” SMS Pan Painted
1/2” SMS Flathead
1/2” Self-Drill Pan
1/2” Self-Drill Pan Painted
3/4” Machine Flathead
7/8” Machine Pan Painted
1” SMS Pan
1” SMS Pan Painted
1” Machine Pan Painted
1-1/2” Machine Flathead
1-1/2” Machine Flathead
2” SMS Pan Painted
5/8” SMS Pan Painted
1-1/4” SMS Pan
gf
MOUNTING
SURFACE
MOUNTING
SURFACE
ACTIVE
HOUSING
CENTER
MARK
HEX
WRENCH
SCREW
FLANGE
SCREW
FLANGE
#8 1"
SCREW
EXPAND
EXPAND
PASSIVE
HOUSING
#8 1"
SCREW
MOUNTING
SURFACE
MOUNTING
SURFACE
SCREW
FLANGE
SCREW
FLANGE
e
SCREEN
TRACK
SCREEN
TRACK
TRACK
STOP
HEX
WRENCH
HEX
WRENCH
CENTER
MARK
Switch to Interior View
d
Drill/Driver
1/8 Drill Bit
(provided)
3/32 Hex Wrench
(provided)
Tape
Measure
Screwdriver
Pencil
 Loading...