6
POWER ADJUSTMENT
Your Andis clipper has been adjusted to line voltage at the factory. However, because
of voltage variations it may be necessary to adjust the power setting for your area.
If the power adjustment is off, you will usually notice a “clatter”, when the clipper is
on or introduced into the hair. (It is normal for your clipper to “clatter” for an instant
when initially turned on).
TO ADJUST YOUR CLIPPER
1. Oil the blades (Figure L).
2. The power screw is located in the lower part of the housing opposite the switch
(Figure F).
3. Turn your clipper ON.
4. Use a screwdriver to turn the power screw clockwise until the clipper clatters
continuously. Then turn the screw counter clockwise carefully until the clatter ceases.
5. Your clipper is now adjusted to its optimum power setting.
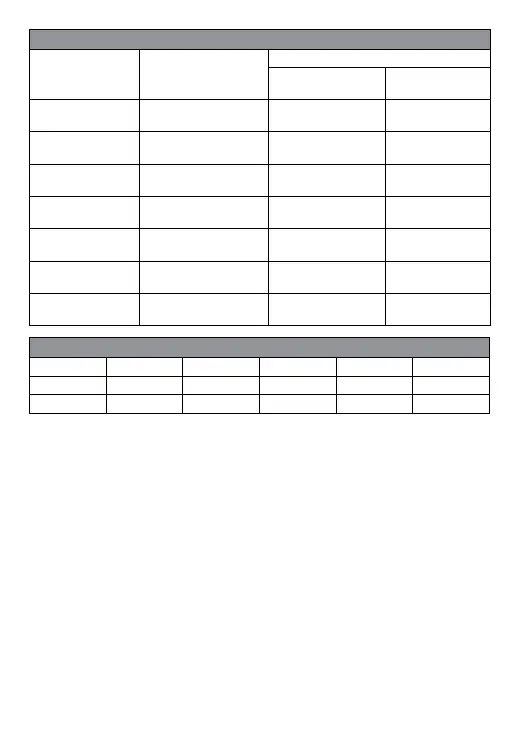
CLIPPING GUIDE
Description Clipping Direction
Approximate Length of Cut
Blade set to
shortest cut
Blade set to
longest cut
Standard Andis Blade
With hair grain
Against hair grain
1/16” (1.6 mm)
1/32” (0.8 mm)
3/16” (4.8 mm)
1/8” (3.2 mm)
1/8” Attachment Comb
With hair grain
Against hair grain
1/4” (6.4 mm)
1/8” (3.2 mm)
3/8” (9.5 mm)
1/4” (6.4 mm)
1/4” Attachment Comb
With hair grain
Against hair grain
3/8” (9.5 mm)
1/4” (6.4 mm)
1/2” (12.7 mm)
3/8” (9.5 mm)
3/8” Attachment Comb
With hair grain
Against hair grain
1/2” (12.7 mm)
3/8” (9.5 mm)
5/8” (15.9 mm)
1/2” (12.7 mm)
1/2” Attachment Comb
With hair grain
Against hair grain
5/8” (15.9 mm)
1/2” (12.7 mm)
7/8” (22.2 mm)
5/8” (15.9 mm)
3/4” Attachment Comb
With hair grain
Against hair grain
7/8” (22.2 mm)
3/4” (19.0 mm)
1-1/8” (28.6 mm)
1” (25.4 mm)
1” Attachment Comb
With hair grain
Against hair grain
1-1/8” (28.6 mm)
1” (25.4 mm)
1-3/8” (34.9 mm)
1-1/4” (31.8 mm)
MEASUREMENT OF ADJUSTABLE CLIPPER BLADE WHEN CUTTING
Position 000 • • • 1
On Edge .030 .060 .090 .150 .180
Flat .030 .040 .050 .060 .080