Do you have a question about the Aosom 370-149V80 and is the answer not in the manual?
Provides essential specifications, general warnings, and crucial safety advice for assembly and operation.
Details on storage battery care, charging procedures, and preventing fire or electric shock hazards.
Visual representation of all parts included in the assembly.
A detailed list of all parts with quantities and remarks.
Instructions for attaching the front bumper and taillight covers to the vehicle.
Step-by-step guide for attaching the steering column for basic and R/C types.
Instructions for correctly attaching the rear and front wheels to the vehicle axles.
Guidance on installing the steering wheel, including battery installation.
Steps for fitting the seat, seat back, and cargo basket to the vehicle body.
Instructions for assembling the roof structure, beams, and supports.
Guide to operating the vehicle's controls like power, shifter, and foot pedal.
Instructions for safely charging the vehicle's battery.
Solutions for common problems encountered with the vehicle's operation.
Contact details for customer support and service.
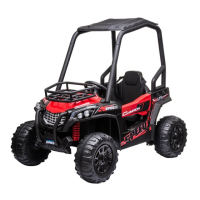
This document provides assembly and usage instructions for a ride-on vehicle, likely a children's electric toy car, manufactured by Aosom. It covers various aspects from initial setup to safe operation and maintenance.
The device is a ride-on vehicle designed for children, powered by an electric motor and a rechargeable battery. It allows children to drive forward and backward at different speeds, controlled by a foot pedal and a shift lever. The steering wheel provides directional control, and some models are equipped with sound functions and an AUX input for playing music. The vehicle is intended for recreational use, providing an interactive driving experience for young users.
Assembly: The assembly process involves several steps, starting with attaching the front bumpers and taillight covers. The front bumpers snap into place, and the taillight covers are inserted and snapped. Next, the steering column is attached. For basic models, this involves sliding washers onto the steering column and inserting it through holes in the vehicle body and dash. For R/C (remote control) models, the steering column is inserted through the steering gear box and vehicle body, ensuring it aligns with the gear box, and then a washer is added.
The front axle is then reset, which includes cutting plastic ties, adjusting the front axle plate, sliding a washer onto the steering column, inserting a split pin, and securing it with long nose pliers. Screws, washers, and lock nuts are used to fasten the front axle linkage to the front axle plate.
Attaching the rear wheels involves removing plastic ties and parts from the rear axle, inserting the axle through the vehicle body, and centering it. Each rear wheel is then slid onto the axle, followed by a washer, and secured with a lock nut tightened with a spanner. A split pin is inserted into the axle end and bent back, and finally, a hubcap is snapped onto each wheel. The front wheels are assembled similarly, sliding a washer, then the wheel, another washer, and securing with a lock nut and split pin, followed by a hubcap. A crucial step after assembling any wheel is to check the gap between the screw thread and the collapsible part; if the gap is too large, additional washers should be added to ensure smooth wheel rotation without pressing the wheel too tightly, which could damage the motor.
The steering wheel is attached by first adding batteries (if it has sound functions) by removing a screw and battery cover, inserting 2x1.5 AA batteries, and then reattaching the cover. The steering wheel is then placed over the steering column, aligning holes, and secured with a machine screw and nut.
The shift lever assembly and protecting board are installed by removing screws from the shift lever assembly, pushing it forward to align with mounting brackets, and securing it with the removed screws. The protecting board is then fitted and tightened with flat head screws.
Connecting the power supply involves plugging the battery connector into the vehicle connector. The rear bed board is then fitted by inserting its tabs into slots in the rear vehicle body until it clicks into place.
The seat and basket are attached next. The seat back is fitted to the seat and secured with flat head screws. The assembled seat is then fitted to the vehicle body and secured with flat head screws and machine screws. The basket fence is fitted to the basket base, secured with flat head screws, and then the cargo basket is fitted to the bonnet, also secured with flat head screws.
For models with a roof, the roof assembly is more involved. It requires removing screws and nuts from roof beams, fitting the beams to the roof, and securing them with flat head screws. The rear and front rollbar supports are then fitted to the roof beams and secured with machine screws and nuts. Finally, the complete roof assembly is fitted to the vehicle body, and the roof front and rear supports are secured to the bonnet and vehicle body with flat head screws.
Operation: The vehicle is operated using a power button to turn it on/off, a low speed forward/reverse shifter to change direction, and a foot pedal to apply power. Sound buttons activate sounds, and a 3.5mm AUX input allows playing music from portable devices. When changing speed or direction, the vehicle must be stopped to prevent damage to gears and the motor. The vehicle should only be used on generally level ground, not on lawns. For models with a high-speed option, an adult must remove a protective cover and two screws to access the high-speed shifter position. The product is designed to operate in low speed only when in reverse.
Battery Information and Maintenance: The battery requires specific charging and maintenance procedures. It should be charged for 8 to 12 hours before first use. Only the supplied adapter should be used for charging. The car should be recharged when its speed slows down to preserve battery life. Before storing the ride-on, the battery should be fully charged and then recharged every 30 days to ensure normal use. Batteries may leak fluids, so mixing old and new batteries or different types (alkaline, standard, rechargeable) should be avoided. Batteries should be inserted correctly and removed during long periods of non-use. Exhausted batteries must be removed and disposed of safely, not in fire. Battery terminals should never be short-circuited. Non-rechargeable batteries are not to be recharged. Rechargeable batteries, if removable, should be charged under adult supervision and removed from the product before charging. Each charging session should not exceed 20 hours. The charger and battery may become mildly warm during charging, which is normal. Malfunctioning adapters or batteries should not be used unless repaired. The charger and storage batteries are not toys. Periodical inspection of the storage battery, adapter wires, and plugs is recommended. The power switch should be turned off when the ride-on is not in use, and a full charge should be performed after long periods of inactivity. Charging should occur in a well-ventilated, dry place. The battery or charger should not be opened. Screws should be tightened with a screwdriver, but not overtightened.
Battery Disposal: Sealed lead-acid batteries must be recycled or disposed of in an environmentally sound manner. They should not be disposed of in fire or regular household trash, as incineration, landfilling, or mixing with household trash is prohibited by law.
Preventing Fire and Electric Shock: Only the supplied rechargeable battery and charger should be used. Substituting with other brands can cause fire or explosion. The battery or charger should not be used for other products. The electric circuit system should never be modified. Direct contact between battery terminals should be avoided. Liquids should not come into contact with the battery or its components. Charging should occur in a well-ventilated area, away from heat or flammable materials. The battery should be picked up by its case, not by wires or the charger. Charging should be done in a dry area. Battery posts, terminals, and related accessories contain lead and lead compounds, requiring hand washing after handling. The battery and charger should not be opened. Only adults should handle or charge the battery. The battery is heavy and contains lead acid (electrolyte) and should not be dropped. The battery, charger, supply cord, and connectors should be checked for wear or damage before charging. The battery should not be allowed to drain completely and should be recharged after each use or monthly if not used regularly. The battery should not be charged upside down and must always be secured with a bracket to prevent injury if the vehicle tips over.
General Maintenance: Parents are responsible for regularly checking main parts for potential hazards, including the battery, charger, cables, plugs, screws, and other parts. Any damaged parts should be properly repaired before use. Plastic parts should be checked for cracks or breaks. Moving parts like wheels can be lubricated occasionally with a lightweight oil. The vehicle should be parked indoors or covered with a tarp to protect it from wet weather. It should be kept away from heat sources to prevent plastic parts from melting.
Cleaning: The vehicle should not be washed with a hose, soap, or water, nor driven in rainy or snowy weather, as water can damage the motor, electric system, and battery. It should be cleaned with a soft, dry cloth. A non-wax furniture polish can be used to restore shine to plastic parts, but car wax or abrasive cleaners should be avoided. The vehicle should not be driven in loose dirt, sand, or fine gravel, which could damage moving parts, motors, or the electric system. When not in use, all electrical sources should be turned off, the power switch should be disconnected, and the battery connection should be removed.
Troubleshooting: A troubleshooting guide is provided to address common issues such as the vehicle not running, running slowly, needing a push to move, difficult shifting, loud noises, or the battery not recharging. It offers solutions like recharging the battery, resetting the thermal fuse, checking connections, replacing the battery, reducing vehicle weight, avoiding harsh conditions, or contacting the distributor for more complex issues.
| Product Name | Aosom 370-149V80 |
|---|---|
| Category | Motorized Toy Car |
| Weight Capacity | 66 lbs |
| First Charge Time | 8-12 hours |
| Regular Charge Time | 8-12 hours |
| Recommended Age | 3-8 years |
| Number of Speeds | 2 |
| Color | Red |
| Battery | 12V 7AH |
| Charger | 12V |
| Run Time | 45 mins (depending on the type of use) |
| Features | Horn, LED Lights, USB |
| Material | PP, Steel |