Do you have a question about the Architectural Mailboxes MB981 Series and is the answer not in the manual?
Details about mailbox mounting hardware included with posts and adapters.
Lists the tools necessary for installation that are not included with the kit.
Guides for attaching the mailbox to compatible or non-compatible posts.
Adhere optional mail clip to the inner front door surface without interfering with door closure.
This document provides instructions for installing and assembling the Architectural Mailboxes MB981 Series Post Mount Mailbox. It covers both the mounting of the mailbox to a post and the optional assembly of an outgoing mail clip.
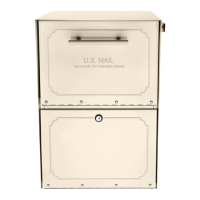
The Architectural Mailboxes MB981 Series Post Mount Mailbox is designed for residential mail delivery, intended to be mounted on a post. Its primary function is to securely receive and hold mail delivered by a mail carrier. The mailbox is designed to be compatible with Architectural Mailboxes brand posts and adapters, but also offers options for installation on non-Architectural Mailboxes posts. An optional outgoing mail clip can be installed to hold mail for pickup by the carrier.
Installation and Mounting: The mailbox comes with hardware for mounting to new Architectural Mailboxes posts and 4x4 wood-post adapters. If using an existing post not made by Architectural Mailboxes, users should refer to the provided diagrams for mounting hole diameter and pattern to determine the necessary hardware.
Option 1: Compatible Architectural Mailboxes Posts and Adapters: For Architectural Mailboxes brand posts and adapters, installation is straightforward. Users align the mailbox mounting holes with the holes on the post's mounting plate. The mailbox is then attached to the mounting plate using the hardware included with the Architectural Mailboxes post or adapter. This method ensures a seamless fit and utilizes the manufacturer's designed components.
Option 2: Non-Architectural Mailboxes Posts: When using a non-Architectural Mailboxes post or mounting surface, users must first check if their existing post has a matching hole pattern with the mailbox. If the hole patterns do not match, an adapter plate or a piece of wood will be required to drill the mounting holes into. It is explicitly stated that drilling new holes directly into the mailbox is not recommended by Architectural Mailboxes. Doing so would expose untreated metal and void the product warranty. The manual provides drawings with suggested bolt sizes (Fits #10 Bolts) and dimensions (7.00", 10.00", 3.25", 4.00") for creating an appropriate mounting surface or adapter. This flexibility allows the mailbox to be integrated with various existing post setups, provided the user takes the necessary steps to create a compatible mounting interface.
Outgoing Mail Clip (Optional): An optional outgoing mail clip is included for users who wish to have a designated spot for outgoing mail. To assemble this, the mail clip should be positioned inside the front door of the mailbox. It's crucial to ensure that the door can close without the mail clip interfering with the bottom of the mailbox. Once the correct position is determined, the sticker backing on the clip is removed, and the clip is adhered to the inner surface of the front door. This feature allows mail carriers to easily identify and collect outgoing mail.
USPS Guidelines: The manual emphasizes the importance of contacting the local post office before installing the mailbox. This is to ensure correct placement and height according to USPS regulations. Generally, mailboxes should be installed at a height of 41-45 inches from the road surface to either the inside surface where mail is placed or the lowest edge of the mail entry (for locked mail slot designs). The mailbox should also be set back 6-8 inches from the front face of the curb or the road edge to the mailbox door. These guidelines are critical for ensuring proper mail delivery and compliance with postal service requirements.
USPS Lock Statement: A specific note regarding locked mailboxes is included, stating that mail carriers are not responsible for opening locked mailboxes, accepting keys for this purpose, or locking mailboxes after delivery. This clarifies the limitations of mail carrier services concerning locked mailboxes and advises users on their responsibilities.
The manual does not explicitly detail maintenance features for the mailbox itself, such as cleaning or material care. However, the warning against drilling new holes into the mailbox (to avoid exposing untreated metal and voiding the warranty) implies that maintaining the integrity of the original finish and structure is important for the product's longevity and warranty coverage. Users are encouraged to follow the installation instructions carefully to prevent damage that could lead to maintenance issues or void the warranty. The focus is primarily on correct installation to ensure proper function and durability.
| Material | Galvanized Steel |
|---|---|
| Finish | Powder Coated |
| Lock Type | Cam Lock |
| Mounting Type | Post Mount |
| Product Type | Mailbox |
| Color | Black |
| Locking | Yes |
| Weather Resistance | Yes |