EasyManua.ls Logo

Argos Malibu Series User Manual

Argos Malibu Series
12 pages
To Next Page IconTo Next Page
Page #1 background imageLoading...
Page #1 background image
MADE IN
BRITAIN
Dimensions
Width - 38cm
Depth - 40cm
Height - 61cm
Malibu - 3 Drawer Bedside Chest
Assembly Instructions - Please keep for future reference
If you need help or have damaged or missing parts, call the Customer Helpline: 08456 400800
Issue 7 - 24/06/14
Important - Please read these instructions fully before starting assembly
Ruler - Use this ruler to help correctly identify the screws
0 10 20 30 40 50 60 70 80 90 100 110 120 130 140 150 160 170
267/7905
262/9049
257/8633
262/1449
268/4943
ALR3028
29/03/11 - Added Argos Codes 719/1709 and 719/1699
Issue 3 - 17/09/12 - Added notes to drawer wrap preparation stages telling customer the cams can be either surface of the wrap
Issue 4 - 10/10/13 - Title changed from ‘Malibu 3 Drawer Bedside (ZMB3D2) to ‘Malibu 3 Drawer Chest’ (ZMBK3D2).
6 new codes added to front page.
Issue 5 - 18/02/14 - 5 new HD codes added to front page.
Issue 6 - 23/03/14 - New version with metal runners, 3 piece drawer wraps etc...
Issue 7 - 24/06/14 - Removed cat codes 258/2801, 278/9783, 262/1236, 258/8207, 242/8941 and added cat code 275/5549.
266/8275
274/8762
249/7264
278/4056
267/8076
275/5549
Question and Answer IconNeed help?

Do you have a question about the Argos Malibu Series and is the answer not in the manual?

Argos Malibu Series Specifications

General IconGeneral
TypeSofa
MaterialFabric
Frame MaterialWood
ColorGrey
Weight40kg
Seat Height45cm
Seating Capacity3
AssemblyRequired

Summary

Safety and Care Advice

General Safety Precautions

Key safety guidelines for handling and assembling the unit, including weight, space, and child safety.

Care and Maintenance Instructions

Guidelines for cleaning the unit, checking for loose screws, and proper waste disposal.

Components - Panels

Components - Fittings

Tools Required

Identifies the necessary tools for assembling the unit, including a ruler for screw identification.

Assembly Instructions - Drawer Preparation

Step 1: Prepare Drawer Fronts

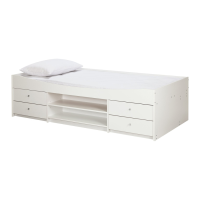
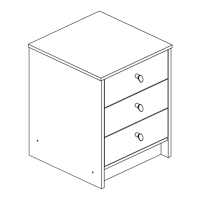
Screw metal dowels into each of the 3 drawer fronts.

Step 2: Prepare Drawer Sides

Insert small locking nuts into the designated holes on the left and right drawer sides.

Step 3: Attach Drawer Sides to Fronts

Connect drawer sides to drawer fronts and secure using locking nuts.

Assembly Instructions - Drawer Box Construction

Step 4: Fit the Drawer Base

Slide the drawer base into the grooves of the drawer sides and front.

Step 5: Fit the Drawer Back

Insert the drawer back between sides and secure with knock-in pegs.

Step 6: Attach the Handles

Attach handles to the drawer fronts using screws.

Step 7: Fit the Wedgefixes

Secure the drawer assembly by fitting wedgefixes into front and back grooves.

Assembly Instructions - Main Frame Construction

Step 8: Prepare the Left Side

Attach runners, locking nut, and wooden dowel to the left side panel.

Step 9: Prepare the Right Side

Attach runners, locking nut, and wooden dowel to the right side panel.

Step 10: Prepare Plinth, Rail and Back Rail

Insert wooden dowels into the plinth, rail, and back rail.

Assembly Instructions - Frame Completion

Step 11: Fit the Rail to the Right Side

Push the rail onto the right side panel.

Step 12: Fit Plinth and Back Rail to Right Side

Secure the plinth and back rail to the right side panel with screws.

Step 13: Fit the Left Side

Attach and secure the left side panel to the unit with screws.

Step 14: Prepare the Top

Screw metal dowels into the underside of the top panel.

Assembly Instructions - Final Steps

Step 15: Fit the Top

Place the top panel onto the side panels and tighten locking nuts.

Step 16: Fit the Back

Square the unit and attach the back panel using nails.

Step 17: Fit the 4 Plastic Nails

Tap plastic nails into the bottom edge of each side panel.

Step 18: Fit the Drawers

Slide the drawers into the unit and secure them with screws.

Related product manuals