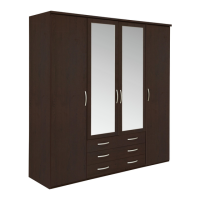
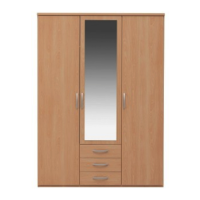
Do you have a question about the Argos Normandy Tall 3+3 Mirror Robe and is the answer not in the manual?
Prepare drawer fronts by attaching metal dowels, ensuring they are fully tightened against panels.
Insert small locking nuts into drawer sides, orienting the arrow towards the panel edge.
Connect drawer sides to drawer fronts and secure by turning locking nuts clockwise.
Slide the drawer base down the grooves in the drawer sides and into the front groove.
Fit the drawer back between sides and secure with knock-in pegs through side holes.
Attach handles to the front of each drawer using two screws.
Turn drawer assemblies over and fit wedgefixes into grooves, then tighten screws.
Prepare the divider by attaching runners, hinge plates, dowels, and large locking nuts.
Prepare the horizontal panel by inserting four large locking nuts and two wooden dowels.
Push the horizontal panel onto the divider and tighten the large locking nuts.
Prepare the small divider by attaching runners and screwing in two metal dowels.
Push the small divider onto the horizontal panel and tighten the large locking nuts.
Prepare the base panel by inserting four large locking nuts and two wooden dowels.
Attach the base panel to the divider and small divider using four screws.
Prepare the left side panel with five metal dowels, hinge plates, locking nuts, and a wooden dowel.
Prepare the right side panel with four metal dowels, hinge plates, locking nuts, and a wooden dowel.
Attach the prepared right side panel to the base using two large locking nuts.
Prepare the two plinths by inserting two large locking nuts and two wooden dowels into each.
Prepare the back rail by inserting two large locking nuts and two wooden dowels.
Attach the back rail to the divider and the plinths to the right side.
Attach the left side panel to the base, back rail, and plinths, securing with locking nuts.
Prepare the top panel by screwing six metal dowels into it.
Place the top panel onto the assembly and secure with locking nuts and plastic nails.
Square the unit, fit small and large back panels, and secure with nail screws.
Install rail holders and hanging rails in designated positions.
Insert screws through drawer sides into the runner's threaded holes to attach drawers.
Insert shelf studs into positions and lower the large and small shelves onto them.
Prepare doors by fitting hinges, ensuring they are at 90 degrees, and securing with screws.
Attach doors using hinges and fit handles to each door with screws.
Check unit levelness and adjust door height, forward/back, and sideways alignment.
Secure the unit to a wall using the overbalance protector kit for safety.
Final confirmation of assembly completion and a warning about the unit's weight.
| Brand | Argos |
|---|---|
| Model | Normandy Tall 3+3 Mirror Robe |
| Category | Indoor Furnishing |
| Language | English |