EasyManua.ls Logo

Argos Mix - User Manual

Argos Mix
16 pages
Print Icon
To Next Page IconTo Next Page
Loading...
MADE IN
BRITAIN
Mix and Match - Chests
Assembly Instructions - Please keep for future reference
If you need help or have damaged or missing parts, call the Customer Helpline: 08456 400800
Issue 2 - 11/12/12
Important - Please read these instructions fully before starting assembly
ALR2787
Chest
Dimensions
Width - 75cm
Depth - 36cm
Height - 57.5cm
Bedside
Dimensions
Width - 38.5cm
Depth - 36cm
Height - 41.5cm
709/2482
Issue 2 - 11/12/12 - Replaced the old ‘Blue/Pink’ cat code with 2 new ‘Blue and ‘Pink cat codes.
Changed the text regarding the handles on the fittings page.
709/0219
709/2475
Question and Answer IconNeed help?

Do you have a question about the Argos Mix and is the answer not in the manual?

Summary

Safety and Care Advice

General Safety Precautions

Critical safety notes, including weight, child safety, and assembly environment.

Care and Maintenance Guidelines

Advice on cleaning the furniture and checking for loose fittings.

Required Tools for Assembly

List of tools necessary for assembling the furniture units.

Component Identification - Panels

1 Door Bedside Panels

Detailed list and dimensions of all panels for the 1-door bedside.

3 Drawer Chest Panels

Detailed list and dimensions of all panels for the 3-drawer chest.

Component Identification - Fittings

Hardware and Fasteners List

Comprehensive list of all hardware, screws, dowels, and fittings required.

1 Door Bedside Assembly Guide

Choosing Door Opening Direction

Instructions on how to determine and set the door's opening side.

Preparing Side Panels

Steps for preparing the left and right side panels for hinge attachment.

Attaching Base and Plinth

Securing the base and plinth panels to the right side panel.

Attaching Side and Top Panels

Steps for attaching the left side panel and the top panel.

Fitting the Back Panel

How to square the unit and attach the back panel securely.

Preparing and Fitting the Door

Instructions for fitting hinges to the door and attaching it to the unit.

Adjusting Door Alignment

Methods for adjusting the door's position and alignment.

3 Drawer Chest Assembly Guide

Preparing Drawer Components

Adding dowels and nuts to drawer fronts and wraps.

Assembling Drawer Boxes

Constructing the drawer units by attaching bases, wraps, and fronts.

Installing Drawer Stops

Inserting drawer stops into the drawer wraps.

Attaching Drawer Handles

Fixing handles to the front of the assembled drawers.

Fitting Drawer Runners to Sides

Attaching drawer runners to the left and right side panels.

Preparing and Fitting Chest Plinths

Adding dowels to plinths and attaching them to side panels.

Attaching Chest Top and Back Panels

Securing the top and fitting the back panel to the chest.

Inserting Drawers into Chest

Final step of placing the assembled drawers into the unit.

Overview

This document provides assembly instructions and care advice for a range of "Mix and Match" furniture items, specifically chests and bedside units. The products are designed to be assembled by the user, with clear guidance provided for each step.

Function Description:

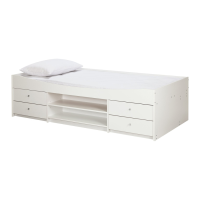
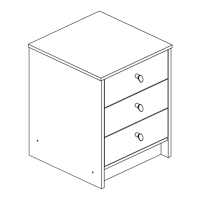
The manual covers the assembly of two primary furniture types: a 1-door bedside unit and a 3-drawer chest. These units are designed for storage, likely in a bedroom setting, offering surfaces for items and enclosed spaces for organization. The bedside unit features a single door, allowing access to an internal compartment. The chest, on the other hand, provides three drawers for more compartmentalized storage. The "Mix and Match" aspect suggests that these units might be part of a larger furniture collection, allowing users to combine them to suit their needs.

Important Technical Specifications:

The manual provides specific dimensions for both the chest and the bedside unit:

  • Chest Dimensions:
    • Width: 75cm
    • Depth: 36cm
    • Height: 57.5cm
  • Bedside Dimensions:
    • Width: 38.5cm
    • Depth: 36cm
    • Height: 41.5cm

The units are noted to be heavy, with a warning that they weigh approximately 21kgs, emphasizing the need for careful lifting. The components list includes various panels and fittings, such as wooden dowels, metal dowels, screws (40mm, 25mm, 13mm), locking nuts (small and large), nails, drawer stops, runners, hinge plates, hinges, and handles. The handles come in two variations: blue/pink for white units and silver for beech units, indicating color options for the furniture. The document also specifies part numbers for each component, which are useful for identifying damaged or missing parts when contacting customer service.

Usage Features:

The assembly process is broken down into sequential steps, starting with preparing individual panels and then combining them.

  • Door Bedside Unit (Steps 1-14):

    • Door Opening Direction: Users can choose whether the door opens to the left or right during assembly by fitting hinge plates accordingly.
    • Secure Assembly: The instructions emphasize securing components with screws and dowels, ensuring a sturdy structure.
    • Back Panel: The back panel is nailed to the unit, and specific instructions are given to ensure the unit is square before nailing to prevent misalignment.
    • Door Adjustment: After assembly, instructions are provided for adjusting the door's height, forward/back position, and sideways alignment using screws on the hinges. This allows for fine-tuning to ensure the door closes properly and looks even.
    • Door Stop: A door stop is pushed into a hole in the base to prevent the door from swinging too far inward.
  • 3-Drawer Chest (Steps 15-25):

    • Drawer Assembly: Detailed steps are given for assembling the drawers, including fitting metal dowels, small locking nuts, drawer bases into wraps, and attaching drawer fronts.
    • Drawer Stops and Runners: Drawer stops are fitted to the drawer wraps, and runners are attached to the side panels of the chest, ensuring smooth operation and preventing drawers from being pulled out completely.
    • Handle Attachment: Handles are attached to the drawer fronts using screws, with a caution not to overtighten.
    • Back Panel: Similar to the bedside unit, the chest's back panel is nailed, with an emphasis on squaring the unit beforehand.
    • Drawer Insertion: The final step involves inserting the assembled drawers into the chest, noting that they need to be lifted slightly to overcome the 'stop' system.
    • Smooth Drawer Operation: A tip is provided to spray furniture polish into the grooves of the drawers to ensure they run smoothly.

Maintenance Features:

The manual includes a "Care and maintenance" section with practical advice:

  • Cleaning: Only a damp cloth and mild detergent should be used for cleaning. Bleach or abrasive cleaners are explicitly prohibited to prevent damage to the unit's finish.
  • Screw Checks: Users are advised to periodically check for and tighten any loose screws to maintain the unit's stability and integrity over time.
  • Disposal: The product should not be discarded with household waste but taken to a local authority waste disposal center, promoting environmentally responsible disposal.

General Safety and Assembly Advice:

Several important safety and assembly tips are provided:

  • Lifting: Due to the weight (approx. 21kgs), careful lifting is recommended.
  • Component Check: Users should verify all components and tools are present before starting.
  • Fittings Organization: Fittings should be removed from plastic bags and separated into groups for easier identification.
  • Child and Animal Safety: Keep children and animals away from the work area due to small parts that could pose a choking hazard.
  • Two-Person Assembly: Some parts of the assembly will be easier with two people.
  • Work Area: Ensure sufficient space to lay out parts.
  • Product Handling: Do not stand or put weight on the products to avoid damage.
  • Assembly Location: Assemble items as close to their final position as possible.
  • Surface Protection: Assemble on a soft, level surface (e.g., an opened unit carton) to prevent damage to the units or the floor.
  • Power Tools: The use of power drill/drivers for inserting screws is not recommended as it can damage the units; only hand screwdrivers should be used. An electric drill can be used for drilling holes but not for fitting screws.
  • Wall Securing: A safety note advises securing the units to a wall using suitable fixings (not supplied) if there's a risk of them being pulled over, especially by children.
  • Packaging Disposal: Dispose of all packaging carefully and responsibly.
  • Customer Helpline: A customer helpline number (08456 400800) is provided for assistance with damaged or missing parts, requiring reference numbers from the component pages.
  • Ruler: A ruler is included on one page to help correctly identify screws.

Argos Mix Specifications

General IconGeneral
BrandArgos
ModelMix
CategoryIndoor Furnishing
LanguageEnglish

Related product manuals