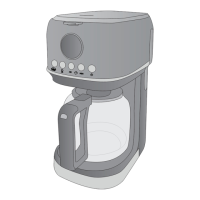
The Ariete 1396 filter coffee maker is a household appliance designed for brewing filter coffee. It features a sleek, modern design with a grey and black finish, suitable for various kitchen aesthetics.
Function Description:
The Ariete 1396 operates by heating water and passing it through ground coffee held in a filter, producing brewed coffee that collects in a glass jug. The device includes a water reservoir, a filter holder, and a heating plate to keep the coffee warm after brewing. It offers automatic brewing capabilities, allowing users to set a specific time for the coffee maker to start, and an auto-off function that activates after 35 minutes of inactivity to save energy. The control panel features several buttons for mode selection, setting the time (HR and MIN), and adjusting coffee intensity (SEL). A display provides visual feedback on the current settings and brewing status.
Important Technical Specifications:
- Model: 1396
- Power Supply: Voltage [V] and frequency [Hz] (specific values not provided in the general description, but indicated on the data plate).
- Electrical Power Consumption: [W] (specific value not provided, but indicated on the data plate).
- Water Reservoir Capacity: Not explicitly stated, but indicated by MAX level markings on the reservoir and jug. The jug has markings from 5 to 15, corresponding to the number of cups.
- Dimensions: Not explicitly stated, but the manual advises a minimum distance of 10 cm from walls, furniture, or other appliances.
- Safety Certifications: Complies with European Directives 2012/19/EU for waste electrical and electronic equipment (WEEE) and Regulation (EC) No. 1935/2004 for materials intended to come into contact with food.
- Components:
- A - Tank lid
- B - Tank
- C - Body of the appliance
- D - Water level indicator
- E - Power cord
- F - Heating plate
- G - Dispensing spout
- H - Jug
- I - Jug handle
- J - Jug lid
- K - Filter holder
- L - Coffee filter
- M - Measuring spoon
- N - MODE button
- O - SEL button (coffee intensity)
- P - HR button (hour)
- Q - MIN button (minute)
- R - ON/OFF button
- S - Display
Usage Features:
- Preliminary Operations: Before first use, or after a period of inactivity, it is recommended to perform an internal circuit cleaning cycle. This involves filling the water reservoir, running a full brewing cycle without coffee, and then discarding the water. All components should be checked for damage upon unpacking.
- Brewing Coffee:
- Open the tank lid (A) and fill the water reservoir (B) with fresh, cold water up to the desired MAX level. The water level indicator (C) has markings from 5 to 15 cups.
- Place the filter holder (K) in its seat and insert the coffee filter (L).
- Add the desired amount of ground coffee to the filter using the measuring spoon (M). One scoop typically corresponds to one cup of coffee.
- Close the tank lid (A) and ensure the dispensing spout (G) is correctly positioned over the jug lid (J).
- Place the jug (H) on the heating plate (F).
- Plug the appliance into a power outlet.
- Press the ON/OFF button (R). The appliance will start brewing, and the blue indicator light on the display will illuminate. The red indicator light will also turn on during brewing.
- Once brewing is complete, the red indicator light will turn off, and the blue light will remain on, indicating the keep-warm function is active.
- Automatic Brewing Function: Users can program the appliance to start brewing at a specific time.
- Press the MODE button (N) until "CLOCK" appears on the display. The current time will flash.
- Use the HR (P) and MIN (Q) buttons to set the current time.
- Press the MODE button (N) again until "TIMER" appears. The programmed brewing time will flash.
- Use the HR (P) and MIN (Q) buttons to set the desired brewing time.
- The appliance will automatically start brewing at the set time.
- Coffee Intensity Selection: Press the SEL button (O) to choose between light, medium, or strong coffee intensity. The display will show "x1," "x2," or "x3" to indicate the selected intensity.
- Keep Warm Function: After brewing, the heating plate (F) keeps the coffee warm for 35 minutes. The blue indicator light remains on during this period.
- Auto-off Function: The appliance automatically switches off after 35 minutes of inactivity to conserve energy.
- Reusing the Appliance: To brew another batch of coffee, allow the appliance to cool down, then repeat the brewing steps. Do not remove the jug from the heating plate for more than 30 seconds during dispensing to avoid overflow.
Maintenance Features:
- Daily Cleaning:
- Appliance Body: Clean with a damp, non-abrasive cloth.
- Water Tank (B): Periodically clean with a sponge and damp cloth.
- Coffee Filter (L) and Filter Holder (K): Remove the coffee residues after each use and wash under running water (Fig. 23).
- Jug (H): Wash with water and soap. Use a brush to remove any coffee residues from the lid. Dry with a soft cloth.
- Descaling: Descaling should be performed every 3 months, or monthly if the water is very hard.
- Fill the jug with a mixture of 1 cup of white vinegar and 3 cups of fresh, clean water up to the MAX level.
- Pour the mixture into the water tank.
- Run a brewing cycle without placing the coffee filter.
- After the cycle, discard the mixture and allow the appliance to cool.
- Repeat the process if necessary.
- Storage: Store the appliance in a stable, dry place, away from direct sunlight and heat sources.
- Troubleshooting: The manual provides a detailed troubleshooting guide for common issues such as the appliance not turning on, no water dispensing, coffee residues in the jug, or slow dispensing. It suggests causes and solutions, including contacting an authorized service center if problems persist.
- Decommissioning: When the appliance reaches the end of its useful life, it should be disconnected from the power supply and disposed of according to local regulations for waste electrical and electronic equipment. Materials should be separated for proper recycling.