This document describes the Timer-Controlled Thermostat, a device designed to program your central heating system for the entire week, ensuring your desired temperature at the desired time. It is available in both wired and wireless versions, with specific model numbers for each brand:
- ARISTON: CRONOTERMOSTATO 3319483 - 3319484
- CHAFFOTEAUX: EASY CONTROL II 3319486 - 3319487
- ELCO: PROGRAMMABLE ROOM THERMOSTAT II 3319489 - 3319490
Function Description:
The thermostat allows for weekly heating scheduling with up to 6 temperature set-points per day, offering 5+2 or 4 daily programming slots with 4 temperature levels. It features an optimization function to save energy while maintaining optimal comfort. This function, when enabled, helps by:
- Optimal Start: Learns the time needed to reach the set temperature and activates heating earlier if required.
- Delayed Start: Delays heating activation based on the difference between set and ambient temperatures, saving energy. The smaller the difference, the longer the delay.
- Optimal Stop: Switches off heating slightly before the programmed time, saving energy without noticeable temperature changes if the room is already at the right temperature.
The device operates in two main modes:
- Automatic Operation: Follows the pre-set heating schedule.
- Manual Operation: Deactivates the heating schedule, maintaining a manually set temperature throughout the day.
A one-hour override feature allows temporary temperature modification for one hour, after which it reverts to the pre-set temperature.
Important Technical Specifications:
- Power Supply: 2 x type AA LR6 - 1.5 V alkaline batteries (for the thermostat unit).
- Receiver Power Supply (wireless version): Mains 230 V 50 Hz.
- RF Frequency Band (wireless version): ISM (868.0–868.6) MHz.
- Max. Cable Cross-Sectional Area (wired version): 1.5 mm².
- Temperature Adjustment Range: 0–50°C.
- Control Functions: Fuzzy Logic Algorithm.
- Dimensions:
- Wired version: 136 x 97 x 26 mm
- Wireless version: 136 x 98 x 62 mm
- Energy Efficiency Contribution for Space Heating:
- Class I: +1%
- Class II (with external probe): +2%
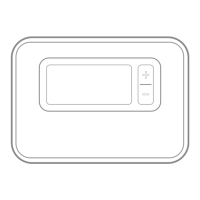
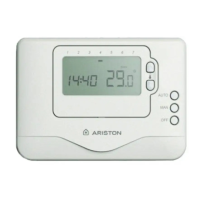
Usage Features:
The thermostat has a user-friendly interface with "plus" and "minus" buttons for temperature adjustment, "function" buttons for menu navigation, and a display showing various information:
- Programming menu
- Settings menu
- Alarm
- Room temperature
- Current time
- Heat request
- Optimization status
- Battery flat indicator
- Wireless signal strength (for wireless models)
- Key lock indicator
- Temperature adjustment
- Planning period
- Day
- Press the MENU button to access the main menu.
- Use the up/down arrows to select a menu item (the selected item will flash).
- Press the check mark button to confirm the selection.
- Use the up/down arrows to adjust a setting and save changes or skip to the next selection.
- Press the back arrow button to return to the previous selection or screen.
Keypad Lock:
The device features a keypad lock to prevent accidental changes.
- To lock: Simultaneously press the left and right buttons for 5 seconds. A lock icon will appear on the display, indicating limited or absent keypad functionality.
- To unlock: Simultaneously press the left and right buttons for 5 seconds. The lock icon will disappear, and all keypad functions will be restored.
Stand-by Mode (with anti-frost protection):
This mode helps save energy, especially during summer months or when windows/doors are open for extended periods.
- To activate: Press the right button. "OFF" and a relevant icon will appear on the display.
- To deactivate: Press the right button again.
In this mode, heating will only activate if the room temperature falls below 5°C, protecting pipes from freezing.
Maintenance Features:
Replacing the Batteries:
The thermostat is powered by 2 x AA batteries. A battery icon will only appear on the display when the battery level is low (around 10% remaining). If the battery level is very low, the icon will flash, requiring immediate replacement to avoid heating system interruptions.
- Lift the front flap of the thermostat.
- Remove the battery compartment cover by pushing it downwards and sliding it outwards.
- Replace with 2 new AA LR6 1.5 V alkaline batteries (approximate lifespan of 2 years).
- Warnings: Do not mix new and old or different types of batteries. Dispose of batteries separately from unsorted household waste, following local regulations for special treatment.
Installation:
The device should be installed by a qualified technician.
- Positioning: Place the thermostat approximately 1.5 meters above floor level, away from heat sources (radiators, sunlight, fireplaces) and drafts, which could affect temperature readings.
- Wired Version: Fasten the base to the wall, connect wires to terminals A and B, and then connect to the boiler's TA1 terminal. Position the thermostat onto the base and secure the cover.
- Wireless Version: The thermostat must be paired with a receiver (pre-configured by the manufacturer).
- Reception Test: Power the thermostat with batteries, keep it 2-3 meters from the receiver, and follow the receiver's instruction manual for the test.
- Wall Mounting: Fasten the base to the wall, then position the thermostat onto the base.
- Table-top Support: Fasten the support to the base, then gently position the thermostat onto the base.
- Receiver Installation: Install the receiver outside the boiler, away from electromagnetic fields. Separate the mounting base, fix it to the wall, connect power cables to the boiler's TA1 terminal, and then position the receiver onto its base.
- Recognition Procedure (Wireless): If communication is lost (indicated by a flashing + icon and a red LED on the receiver), move the thermostat to another location and attempt to restore communication. The boiler can be manually switched on/off via a button on the receiver (green LED for on, off for off). Do not press the reset button on the receiver, as this will erase connection data.
Troubleshooting:
The manual provides a comprehensive troubleshooting guide for common issues like a blank screen, low battery, boiler not switching on, heating system not responding, and wireless signal loss, with recommended solutions for each.