Do you have a question about the Ariston Andris Lux Series and is the answer not in the manual?
Warning against unauthorized access to internal components, risk of electrocution.
Warning against improper use of the power plug to start/stop the appliance.
Warning to avoid damaging the power cord to prevent electrocution.
Warning against placing objects on the appliance due to falling risk.
Warning against climbing on the appliance, risk of falling.
Warning to disconnect power before cleaning to prevent electrocution.
Instruction for secure wall mounting to prevent appliance detachment.
Warning about using correctly sized cables to prevent fire hazards.
Instruction to verify safety functions after maintenance.
Warning to drain hot water before handling to prevent burns.
Safety precautions for descaling, including ventilation and protective gear.
Warning against using harsh chemicals for cleaning to prevent damage.
Guidance on preventing Legionella growth through regular water heater use or flushing.
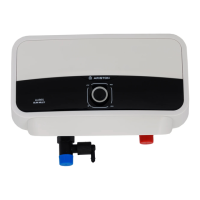
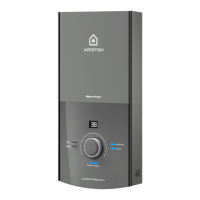
Identifies key components: LED, Cap, Adjustment knob, Water intake pipe, Water outlet pipe.
Presents product specifications including model, weight, wattage, heating time, and heat dispersion.
General advice for appliance installation by qualified technicians adhering to regulations.
Details on connecting the water inlet/outlet pipes according to SANS 10254 code.
Instructions for electrical wiring, compliance with SANS 10142, and earthing requirements.
Notes on warranty, electrical system compliance, cable types, and earthing.
Procedure for draining the appliance for maintenance or when subject to subzero temperatures.
Instructions for replacing components like thermostat, heating element, and anode.
Emphasizes the importance of using genuine spare parts for maintenance and repairs.
Guidelines for descaling the heating element and replacing the magnesium anode.
Procedure for dealing with an overheated appliance and its thermal cutout.
Safety advice, including not placing items under the heater and precautions for non-use.
Instructions on starting up the appliance and setting the desired water temperature.
Provides checks for cold water delivery, boiling hot water, and insufficient hot water.
Strong caution against self-repair, emphasizing professional technician intervention.
Diagram and dimensions for installing the water heater above a sink.
Diagram and dimensions for installing the water heater under a sink.
Warranty period for the inner tank against corrosion (leaking).
Warranty period for the heating element and thermostat.
Warranty period for other parts like gaskets, probe lamp, flange, and security valve.
Exclusion of warranty for the magnesium anode due to its consumable nature.
Covers exclusions like transportation, handling, and installation damages.
Specifies warranty begins on the date of purchase reported on receipt/invoice.
Requirement to keep receipt/invoice and filled certificate for claims.
Provides free replacement of defective components or the whole unit.
Ariston not responsible for indirect damages from non-observance of instructions.
Procedure for claims, requiring unit installation and contact with service center.
This document provides comprehensive instructions for the assembly, operation, and maintenance of an Ariston electric water heater, designed to ensure safe and efficient use.
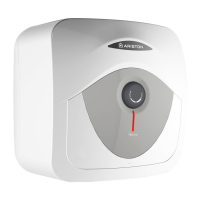
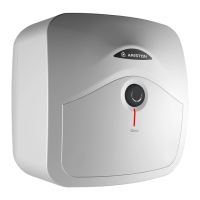
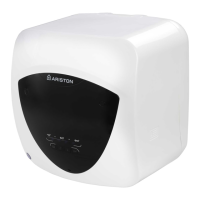
The Ariston electric water heater is designed to provide hot water for domestic use. It operates by heating water stored in its tank using an electric heating element. The device is available in various capacities, including 10L, 15L, and 30L models, suitable for both "oversink" and "undersink" installations, catering to different spatial and usage requirements. The water heater is equipped with a thermostat that automatically disconnects the heating element once the preset operating temperature is reached, ensuring energy efficiency and preventing overheating. An indicator lamp (LED) illuminates when the appliance is actively heating water.
Installation: The water heater must be installed by a qualified technician in accordance with local health and safety regulations, as well as SANS 10254 code of practice for hydraulic connections and SANS 10142 for electrical wiring. It is recommended to install the appliance as close as possible to the delivery points to minimize heat loss. For "undersink" models, a clearance of at least 50 cm within the enclosure is required for electrical equipment access. The supplied bracket should be securely fixed to a solid wall using appropriate screws and dowels.
Hydraulic Connection: Before connecting, it is crucial to purge the pipes of any impurities, especially if mixer units are being installed. The appliance should not be supplied with water of hardness less than 12°F or greater than 25°F; a properly calibrated water softener is recommended if water hardness is an issue. The connection must follow the diagram provided in the manual, ensuring specific taps are used and the outlet pipe acts as a vent. All exposed metal pipes should be lagged, and the hydraulic adaptors provided must be installed with sealing. A safety valve, compliant with national regulations (e.g., EN 1487), must be screwed onto the water inlet pipe, calibrated to a maximum pressure of 0.7 bar and including a cock, check valve, control, safety valve, and hydraulic load cutout. This safety device should be tripped periodically to prevent jamming and scale deposits. It is normal for water to drip from this device during heating, so a drainage pipe with a continuous downward slope and free of ice must be connected.
Electrical Connection: Before any electrical operations, the appliance must be disconnected from the mains using an external switch. Electrical installation must comply with SANS 10142, incorporating a means of disconnecting from the main supply with at least 3 mm separation in all poles. The circuit breaker on the distribution board must have the correct amperage. All electrical connections must be secure and sealed. The appliance must be earthed, with the earth cable (yellow-green) fixed to the terminal marked with the earth symbol and longer than the phase cables. If a power cord is supplied, it should be type H05VV-F 3x1.5 mm², 8.5 mm in diameter, compliant with SANS 60227-5. If not supplied, a flexible cable of type H05VVF 3X1.5mm2, 8.5 mm in diameter, compliant with applicable norms, should be used. It is critical to ensure the geyser is full of water before switching on electricity.
Startup and Operation: To start, fill the heater with mains water by opening the mains cock and the hot water tap until all air is vented from the boiler. Check for leaks and tighten fittings if necessary. Power up using the switch or by turning the adjustment knob clockwise. The water temperature can be set using the adjustment knob (M fig. 6) on models with external regulation. Water heated above 50°C can cause severe burns, especially to children, disabled persons, and the elderly; installing a thermostatic mixer valve on the water delivery line (marked with a red collar) is recommended.
General Safety: Maintenance work must only be performed by qualified technicians. Before calling for technical assistance, check for temporary lack of water or power failure.
Draining the Appliance: The appliance must be drained if it is out of service or in an area subject to subzero temperatures. To drain, disconnect it from the power supply and open the hot water tap (sink or bathtub).
Replacing Parts: To replace parts, disconnect the appliance from its power supply. Remove the enclosure to access electrical equipment. To work on the thermostat, extract it from its mount and disconnect it. To work on the heating element and anode, first drain the appliance. Only original spare parts should be used.
Scheduled Maintenance: The heating element (R fig. 5) should be descaled every two years to ensure proper functioning. Deposits can be broken off carefully without damaging the cladding. The magnesium anode (N fig. 5) must be replaced every two years, or annually if the water is corrosive or chloride-rich. To replace it, remove the heating element and unscrew it from its bracket. After any maintenance, fill and drain the tank completely to remove residual impurities.
Reactivating the Two-Pole Cutout: If the water overheats excessively, a thermal cutout (CEI-EN compliant) will trip, cutting the electrical power supply. In such cases, contact the Service Centre.
Cleaning: Do not use insecticides, solvents, or aggressive detergents to clean the appliance, as these can damage plastic and painted parts. The appliance should not be cleaned without first switching it off and disconnecting it from the power supply.
Legionella Prevention: To prevent Legionella bacteria growth, avoid long periods of water stagnation. The water heater should be used or flushed at least weekly. Existing national regulations for Legionella prevention remain in force.
| Installation Type | Wall-mounted |
|---|---|
| Heating Element | Copper |
| Voltage | 230V |
| Maximum Working Pressure | 8 bar |
| Maximum Working Temperature | 75°C |
| Capacity | 10 / 15 / 30 liters |
| Power | 1500W |
| Thermostat | Adjustable |
| Insulation | Polyurethane foam |
| Tank Material | Enameled steel |