puesta en marcha
commissioning
40
40
50
60
70
80
90
130
120
140
39,8
57,3
78,0
86,1
106,3
136,2
11,7
17,3
19,7
21,7
26,9
34,4
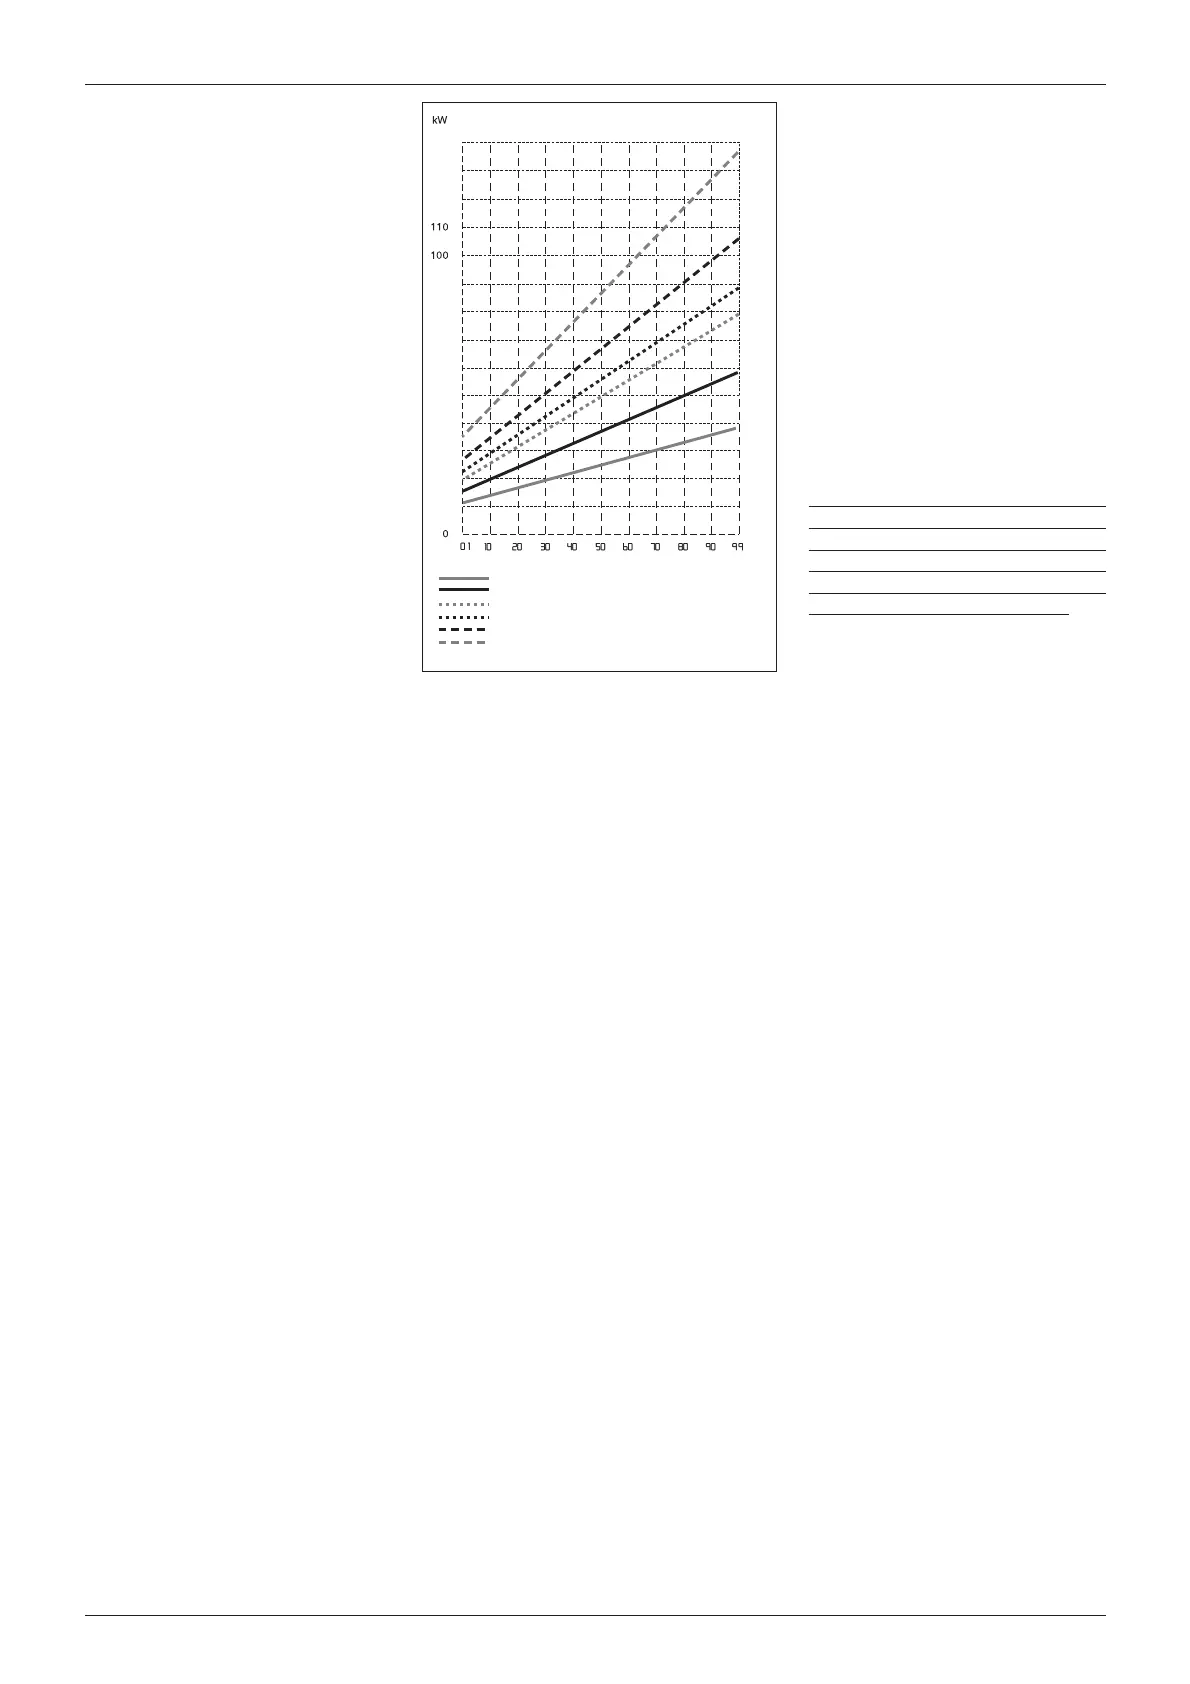
GENUS PREMIUM HP EVO 45
GENUS PREMIUM HP EVO 65
GENUS PREMIUM HP EVO 85
GENUS PREMIUM HP EVO 100
GENUS PREMIUM HP EVO 115
GENUS PREMIUM HP EVO 150
Maximun Heating Power
adjustment
The maximum heating power can be
adjusted to between the maximum
power allowed by the boiler and the
minimum power).
The display shows the value between
“100” and 0 of this interval.
To check the maximum heating power,
access parameter 2.3.1, check the value
and, if necessary, modify it as indicated
in the Gas Regulation Table.
Checking slow ignition power
The soft light can be adjusted between
the maximum power and the minimum
power.
The display shows the value between
“100” and 0 of this interval.
Change the parameter if the outlet
pressure from the gas valve in the
ignition phase (measured when the
boiler is in hot water heating operation)
does not coincide with the values
shown in the Gas Regulation Table.
To check the slow ignition power, access
parameter 2.2.0.
If needed, change the parameter value
until suitable pressure is achieved.
Ajuste de la potencia de calefacción
máxima
Este parámetro limita la potencia útil de
la caldera.
El porcentaje equivale a un valor de
potencia comprendido entre la potencia
mín (0) y la potencia nominal (100)
indicada en el grá co a continuación.
Para controlar la potencia máx. de
calefacción de la caldera, acceda al
parámetro 2.3.1.
Encendido lento
Este parámetro limita la potencia útil de
la caldera en fase de encendido.
El porcentaje equivale a un valor de
potencia útil comprendido entre la
potencia mín. (0) y la potencia máx. (100).
Para controlar el encendido lento de la
caldera, acceda al parámetro 2.2.0.
Ajuste del retardo del encendido de la calefacción
Este parámetro 2.3.5, permite ajustar en manual (0) o en automático
(1) el tiempo de espera antes del próximo encendido del quemador
tras su apagado para acercarse a la temperatura de mantenimiento.
Si se selecciona manual, se puede ajustar el anticiclo en el
parámetro 2.3.6 de 0 a 7 minutos
Si se selecciona automático, la caldera calculará automáticamente
el anticiclo sobre la base de la temperatura de mantenimiento.
Heating ignition delay adjustment
This parameter – 2.3. 5 - can be used to manually (0) or automatically
(1) set the delay time before the subsequent reignition of the burner
after it has switched o on reaching the desired temperature.
By selecting manual, it is possible to set the delay in minutes using
the successive parameter (menu 2.3.6), to a time between 0 and 7
minutes.
Automatic selection means that the boiler will establish the delay
time based on the set-point temperature.
Gas changeover
The boiler can be converted to use either methane (natural) gas
(G20) or L.P.G. ( G31) by an Authorised Service Centre.
The operations that must be performed are the following:
1. switch o the the electrical supply to the appliance
2. turn o the gas cock
3. disconnect the electrical connections to the boiler
4. gain access to the combustion chamber, as indicated in the
paragraph “Maintenance Guide - General Access”
5. add/remove the gas diaphragm as directed in the instruction
sheet for the Kit.
6. attach the labels contained inside the Kit
7. check that all connections are gas-tight
8. start up the boiler
9. carry out combustion analysis check CO2 parameters.
Cambio de gas
La caldera puede transformarse de gas metano (G20) a gas
líquido (G31) o viceversa. El cambio puede realizarlo un técnico
cuali cado con la utilización de un kit.
Las operaciones de transformación son las siguientes:
1. cortar la alimentación del aparato
2. cerrar la llave del gas
3. desconectar eléctricamente la caldera
4. acceder a la cámara de combustión como se indica en al
apartado “Instrucciones para el desmontaje de la cubierta e
inspección del aparato”
5. añadir/retirar el diafragma de gas, tal y como se indica en las
instrucciones del kit.
6. pegar la etiqueta contenida en el kit
7. comprobar la estanqueidad del gas
8. poner en marcha el aparato
9. realizar un análisis de la combustión y ajuste del CO2
 Loading...