T
o replace
, repeat the steps in re
v
erse order
, pa
ying
particular attention to the following:
a -
Centre the electrode in the positioning hole carefully
,
otherwise the electrode ma
y break;
b -Ensure that the left hand and right hand electrodes are
located the correct w
ay round (facing each other), to
giv
e the correct spar
k gap;
c -Check that the cables have been connected correctly;
d -Check that the rubber gasket seals the cable/
electrode connection point completely.
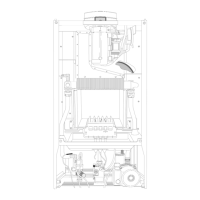
FIG.
6.14
FIG. 6.15
H
1. Drain the boiler of water;
2. Remove the side panels (see 6.2.3)
3. Remo
ve the overheat thermostat sensor “I” (F
IG.
6.16);
4. Remo
ve the clips “J” (F
IG.
6.16);
5. Release the connection nut “K” (FIG. 6.17);
6. Release the connection nut “L” (FIG. 6.18);
7. Pull down the pipe (FIG. 6.19);
4. Pull the exchanger out (FIG. 6.20).
6.3.4 Removing the main heat exchanger
FIG.
6.17
K
L
Fig. 6.16
J
J
FIG. 6.18
I
 Loading...