Page 4 @+-*)/93='91<*A,/()'+=(B*4</1(/*91<<*CDEEEDE!!D$%F%6 Item 64357
GH@;IJ KLGIHMMHIKNL OHPIG*MKGI
K=()1<<1)'+=*K=()-,9)'+=(
*P/1>*)3/*;LIKP;*KTONPIHLI*GH@;IJ*KL@NPTHIKNL*(/9)'+=*1)*)3/*0/8'=='=8*+7*)3'(*
:1=,1<*'=9<,>'=8*1<<*)/\)*,=>/-*(,03/1>'=8(*)3/-/'=*0/7+-/*(/)*,4*+-*,(/*+7*)3'(*4-+>,9)6
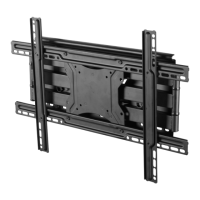
T+,=)*R1<<*T+,=)
R++>*G),>(
QH[IKNLY Do not mount to steel wall studs.
1. Verify wood studs are at least 16″ apart.
Use a stud finder (sold separately) to find two
adjacent studs 16″ apart. Mark locations of studs.
RHPLKLSY Verify that mounting surface has no
hidden utility lines before drilling or driving screws.
2. Set Wall Mount (1) against wall at desired height.
Place a level (sold separately) on top of Wall Mount,
adjust until level. Mark locations of mounting holes.
3. Drill four 3/16″ holes 3-1/2″ deep into
studs at marked locations.
RHPLKLSY N=<W*:+,=)*R1<<*T+,=)*)+*.++>*(),>(6*
Do not mount Wall Mount to drywall or plaster.
4. Use four Wall Lag Bolts (17) and
four Wall Washers (19) to mount
Wall Mount to wood studs.
R1<<*M18*
U+<)*]C%^
R1<<*R1(3/-*
]CF^
R1<<*
T+,=)*]C^