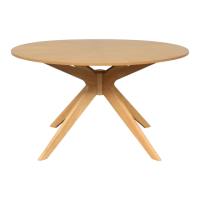
This document is an assembly instruction manual for the ARTICLE. CONAN Oval Dining Table, Version 1.1. It provides a step-by-step guide for assembling the table, along with a parts inventory, estimated assembly time, required number of people, and difficulty rating.
Function Description:
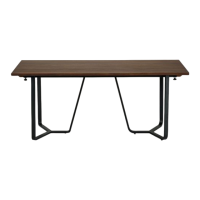
The ARTICLE. CONAN Oval Dining Table is a piece of furniture designed for dining purposes. Its primary function is to provide a stable and aesthetically pleasing surface for meals and other activities. The assembly instructions detail how to construct the table's base and attach it to the tabletop (though the tabletop itself is only implicitly shown in the final steps of assembly, not as a separate part to be attached). The design features a distinctive base with multiple legs radiating from a central block, suggesting a modern and sturdy construction.
Important Technical Specifications (Derived from Parts Inventory):
The table's construction involves several key components and fasteners:
- Large Legs (A): 2 units. These form part of the table's support structure.
- Small Legs (B): 2 units. These also contribute to the table's base.
- Center Block (C): 1 unit. This is the central hub where the legs connect, providing structural integrity to the base.
- Center Block Cap (D): 1 unit. This likely covers the top of the center block, possibly for aesthetic or protective purposes, and also serves as a point of attachment for the tabletop.
- Wrench (E): 1 unit. A tool provided for tightening hexnuts.
- Hexnut (F): 8 units. These fasteners are used to secure the legs to the center block.
- Allen Key (G): 1 unit. A tool for tightening M6 x 80mm bolts.
- M6 x 80mm Bolt (H): 4 units. These longer bolts are used to connect the legs to the tabletop or a sub-assembly of the tabletop.
- M6 Lock Washer (I): 4 units. These washers are used with the M6 bolts to prevent loosening due to vibration or movement.
- M6 Washer (J): 4 units. Standard washers used with the M6 bolts, distributing the load and protecting the surface.
The use of M6 bolts and hexnuts indicates a robust fastening system for the table's components. The inclusion of lock washers further emphasizes the design's focus on stability and durability.
Usage Features:
- Oval Design: The table features an oval tabletop, which can be advantageous for seating arrangements, often allowing more people to sit comfortably compared to a rectangular table of similar surface area, and promoting easier conversation.
- Distinctive Base: The radiating leg design (four large legs and four small legs, as implied by the assembly steps) provides a unique aesthetic and potentially enhanced stability. The base appears to be a central pedestal-style support with multiple points of contact with the floor.
- Levelers: The final step (Step 4) indicates the presence of levelers on the legs. This is a crucial feature for ensuring the table is stable and wobble-free on uneven floors, allowing users to adjust each leg individually as needed.
- DIY Assembly: The product is designed for self-assembly, with clear instructions and all necessary tools (wrench and Allen key) provided. This allows for easier shipping and potentially lower cost.
Maintenance Features (Implicit):
- Soft Surface Assembly: The instructions recommend assembling the table on a "soft, clean, and flat surface such as a carpet to prevent scratches." This suggests that the table's materials (likely wood, metal, or a combination) are susceptible to scratching during assembly, implying a need for care during handling and potentially in daily use to maintain its appearance.
- Tightening Fasteners: Step 3 explicitly states to "Fully tighten all nuts and bolts after turning upright." This is a critical maintenance step to ensure the table's long-term stability and safety. Over time, fasteners can loosen, and periodic checks and re-tightening might be necessary to maintain optimal performance.
- Adjustable Levelers: The levelers (Step 4) not only aid in initial setup but also serve as a maintenance feature. If the table becomes wobbly due to floor settling or movement, the levelers can be re-adjusted to restore stability without needing to move or shim the entire table.
Assembly Process Overview:
The assembly process is broken down into four main steps:
- Step 1A & 1B (Base Assembly): This involves connecting the large legs (A) and small legs (B) to the center block (C). The instructions highlight that holes on the top of the center block and dowels on the legs should face up. Hexnuts (F) are used with a wrench (E) to secure these connections.
- Step 2A (Top Frame Attachment): This step shows the base being attached to what appears to be a top frame or support structure for the tabletop. It emphasizes aligning all four legs before tightening bolts.
- Step 2B (Final Base Fastening): This step details inserting M6 x 80mm bolts (H), M6 lock washers (I), and M6 washers (J) using an Allen key (G) to secure the base components. The instruction "Insert bolt into side without threading" might refer to initial placement before full tightening.
- Step 3 (Final Tightening): After the table is turned upright, all nuts and bolts must be fully tightened to ensure structural integrity.
- Step 4 (Leveler Adjustment): The final step involves adjusting the levelers on the legs as needed to achieve a stable and level surface.
The manual is designed to be user-friendly, with clear diagrams and concise instructions, making the assembly process manageable for individuals. The estimated assembly time is 30 minutes, requiring 2 people, and rated with a difficulty of 4 out of 5, suggesting it might require some attention to detail but is generally achievable by consumers. Customer support contact information is also provided for assistance.