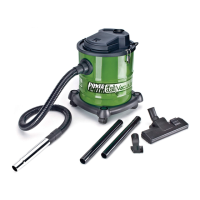
Motor Housing 1
Metal Canister, Base attached 1
Filter 1
Flexible Hose, Metal lined 1
Metal Nozzle 1
Crevice Tool 1
Floor/Carpet Tool 1
Plastic Extension Tubes 2
Casters 4
Operator’s Manual 1
6
English
UNPACKING AND CONTENT
IMPORTANT! Due to modern mass production techniques, it is unlikely the
tool is faulty or that a part is missing. If you fi nd anything wrong, do not operate the
tool until the parts have been replaced or the fault has been rectifi ed. Failure to do so
could result in serious personal injury
.
CONTENTS IN PACKAGE
Description QTY Description QTY
ASSEMBLY INSTRUCTIONS
WARNING: For your own safety, never connect plug to power source outlet
until all assembly steps are complete and you have read and understood the safety
and operation instructions. Do not operate the vacuum with any parts damaged or
missing.
INSTALLING THE CASTERS
1. With the motor housing removed and vacuum canister empty, turn canister over (upside down) so the
black base is now on top. Be sure the canister is not resting on the clamps. See fi gure 2
2. Locate the small diameter hole in a corner of the base and insert the caster stem into the hole. Using
fi rm and steady pressure, press the caster downward until it will go no further. See fi gure 2
3. Repeat Step 2, installing a caster in each of the remaining 3 corners of the vacuum base.
4. Turn the canister over so that canister and base are now resting on the four installed casters. The unit
should rest evenly on the 4 casters; if not, one or more casters is not completely inserted.
INSTALLING THE FILTER, MOTOR AND HOSE
1. The fi lter bag used in your ash vacuum utilizes a special two-part construction giving it 2 (two) distinct
surfaces. The outer surface of the fi lter is smooth with a silver like shiny appearance, while the inner
surface has a gray woven fabric look.
2. Lower the fi lter bag into the metal canister with the shiny silver surface facing outward and rubber
gasket at the top. See fi gure 3.
3. Lower the fi lter until the rubber gasket rests evenly on the lip of the metal canister.
4. If necessary, adjust the rubber gasket so it completely covers the canister lip without any gaps.
5. Insert the motor housing into the canister so it rests on top of the rubber gasket with the on/off switch
and FULL indicator above the canister vacuum port.
IMPORTANT! Be sure each clamp end is aligned over a clamp landing on
the motor housing as shown in fi gure 4.
6. Secure the motor housing in place by locking down the clamps.
7. Align the raised boss on the large hose end with the gap at the top of the canister vacuum port. Push
the hose end inward and rotate clockwise to lock in place. See fi gure 5.


 To Next Page