4
INSTALLATION
Read these instructions carefully and completely
before you install the machine. The installation
should be carried out by a qualified service technician
who is familiar with all local codes and ordinances
for electrical and plumbing connections.
NOTE:
Cosmetic damage must be reported to the dealer
within five days from the date of purchase. After
unpacking the dryer, thoroughly check the unit for
cosmetic damage.
SPECIFICASPECIFICA
SPECIFICASPECIFICA
SPECIFICA
TIONSTIONS
TIONSTIONS
TIONS
Height 33-1/2”–34-1/2 (850–876 mm)
Width 23-7/16” (595 mm)
Plus exhaust hose connection
Depth T760/T 780: 23-7/16" (595 mm)
T700/T 720: 24-7/16” (620 mm)
Depth w/door open All Models: 46-1/16”
Weight T700/T 760: 86 lbs (39 kg)
T720/T 780: 103 lbs (47 kg)
Drum material Stainless Steel
Outer casing Stove-enamelled hot-dipped
galvanized steel with powder
coat paint or Stainless Steel
on T760 and T780
Power requirement 2800 watts
Electrical connection Stand-alone: single-phase,
208–240 V, 15 Amp
ASKO washer connected to
ASKO dryer: single-phase,
208–240 V, 30 Amp
Internal fuses (2) 15 amp.
Heating element 2500 watts
Speed 52 rpm
Drain (T 720/780) 7’ 6-3/4” rubber hose
Vent hose Must be UL, CSA, or
C
UL
(not provided) approved.
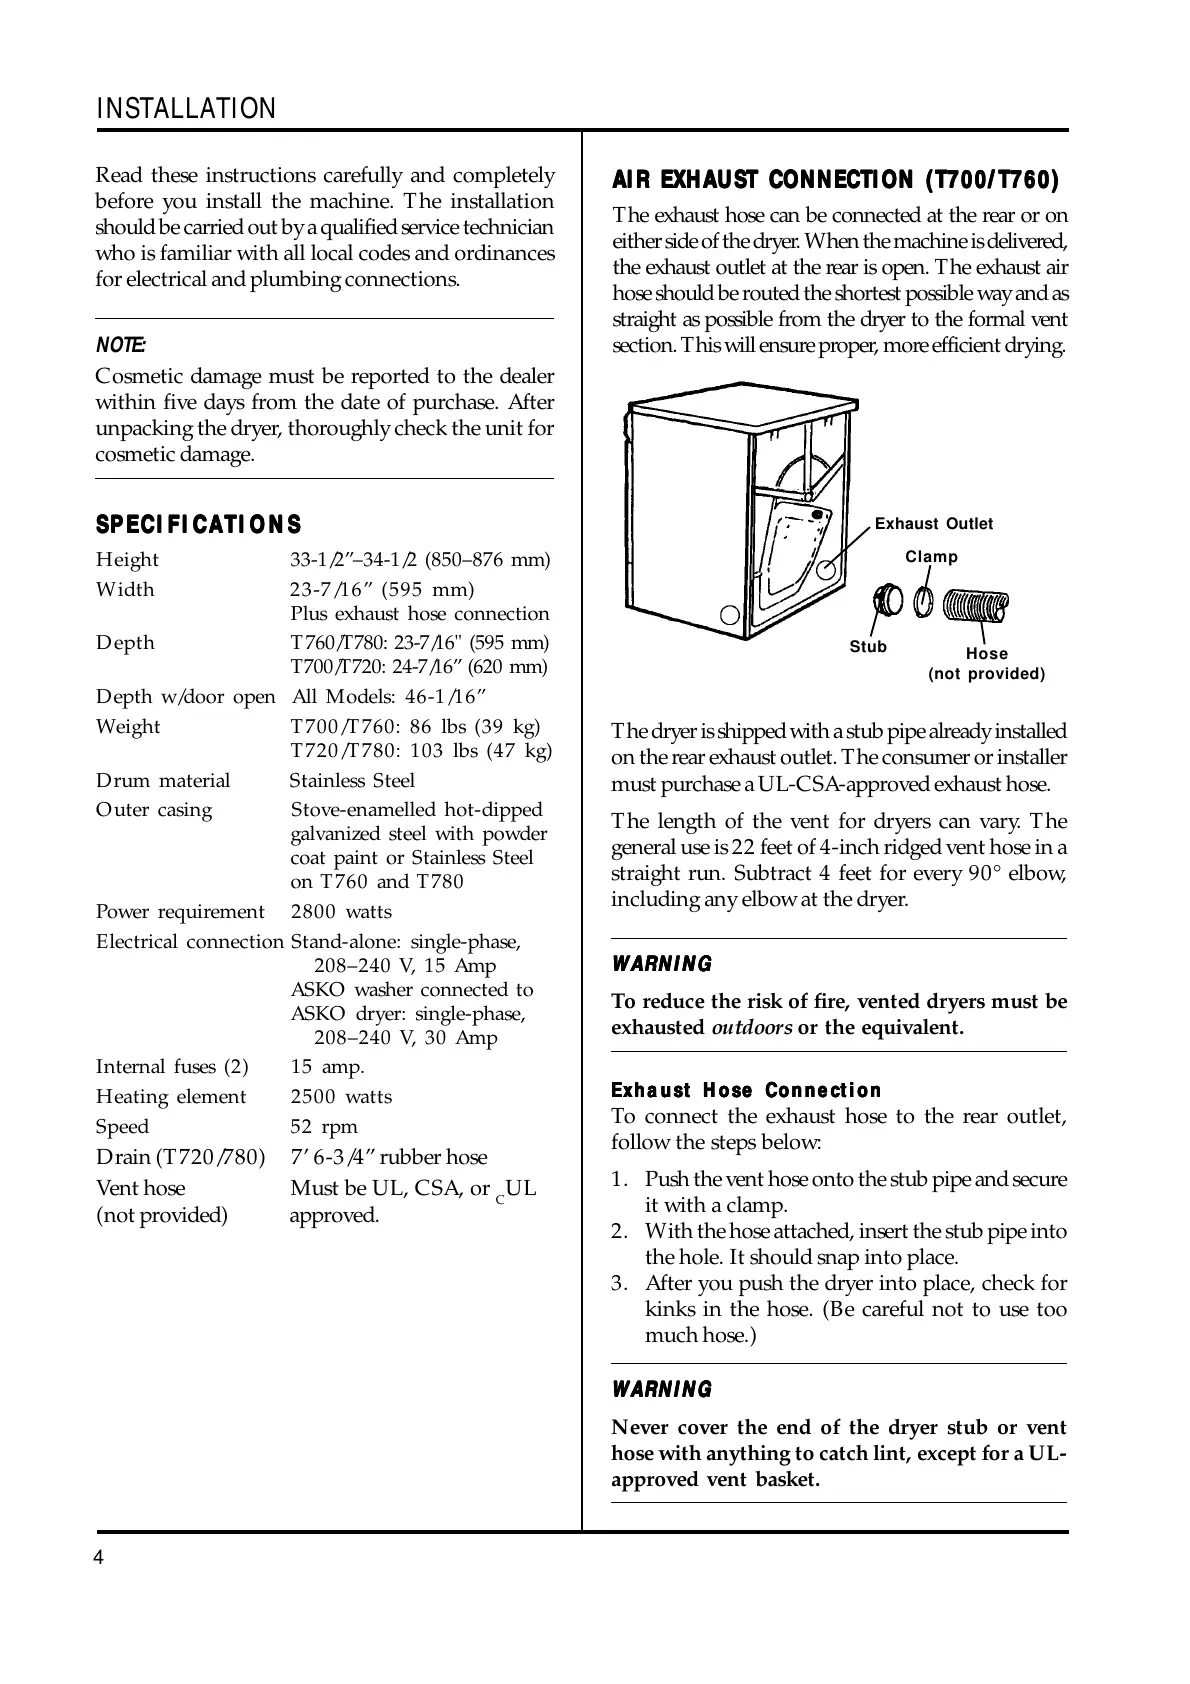
AIR EXHAUST CONNECTION (T700/ T760)AIR EXHAUST CONNECTION (T700/ T760)
AIR EXHAUST CONNECTION (T700/ T760)AIR EXHAUST CONNECTION (T700/ T760)
AIR EXHAUST CONNECTION (T700/ T760)
The exhaust hose can be connected at the rear or on
either side of the dryer. When the machine is delivered,
the exhaust outlet at the rear is open. The exhaust air
hose should be routed the shortest possible way and as
straight as possible from the dryer to the formal vent
section. This will ensure proper, more efficient drying.
The dryer is shipped with a stub pipe already installed
on the rear exhaust outlet. The consumer or installer
must purchase a UL-CSA-approved exhaust hose.
The length of the vent for dryers can vary. The
general use is 22 feet of 4-inch ridged vent hose in a
straight run. Subtract 4 feet for every 90° elbow,
including any elbow at the dryer.
WARNINGWARNING
WARNINGWARNING
WARNING
To reduce the risk of fire, vented dryers must be
exhausted outdoors or the equivalent.
Exhaust Hose ConnectionExhaust Hose Connection
Exhaust Hose ConnectionExhaust Hose Connection
Exhaust Hose Connection
To connect the exhaust hose to the rear outlet,
follow the steps below:
1. Push the vent hose onto the stub pipe and secure
it with a clamp.
2. With the hose attached, insert the stub pipe into
the hole. It should snap into place.
3. After you push the dryer into place, check for
kinks in the hose. (Be careful not to use too
much hose.)
WARNINGWARNING
WARNINGWARNING
WARNING
Never cover the end of the dryer stub or vent
hose with anything to catch lint, except for a UL-
approved vent basket.
Exhaust Outlet
Stub
Clamp
Hose
(not provided)
 Loading...