EasyManua.ls Logo

ASROCK Fatal1ty Z68 Professional Gen3 User Manual

ASROCK Fatal1ty Z68 Professional Gen3
4 pages
To Next Page IconTo Next Page
Page #1 background imageLoading...
Page #1 background image
Intel Smart Response Technology Installation Guide
This motherboard supports Intel Smart Response Technology. You can find the UI setup
instruction and the step by step instructions below.
UI setup instruction:
1. Complete initial system setup, including installing the OS to a RAID mode system, then install
all required drivers, including RST storage driver version 10.5 or later.
2. You MUST have both the HDD you intend to accelerate AND the SSD in system at this point!
3. Boot system to desktop, open RST GUI from either Start Menu or by double-clicking RST
Storage icon in Icon tray, lower right-hand corner of the screen.
4. Once open, click on the “Enable Acceleration” button on the GUI panel.
5. When pop-up menu appears, chose which SSD you wish to use as the Cache device, which
HDD you wish to Accelerate, if you want to use the full SSD as Cache device or only 20GB,
and if you want to use Enhanced or Maximized Mode.
6. For all performance testing, chose “Maximized” mode.
7. After clicking OK button, SRT will enable automatically, and the RST GUI will refresh to show
the newly accelerated system configuration.
Question and Answer IconNeed help?

Do you have a question about the ASROCK Fatal1ty Z68 Professional Gen3 and is the answer not in the manual?
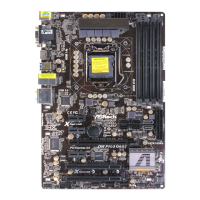
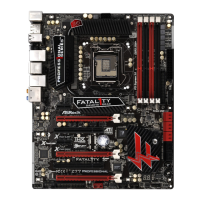
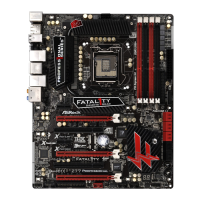
ASROCK Fatal1ty Z68 Professional Gen3 Specifications

General IconGeneral
ChipsetIntel Z68
CPU SocketLGA 1155
Max Memory32GB
USB Ports4 x USB 3.0, 10 x USB 2.0
Form FactorATX
RAID SupportRAID 0, 1, 5, 10
Memory Slots4
Expansion Slots3 x PCIe 3.0 x16, 2 x PCIe 2.0 x1
Storage Interface4 x SATA3, 4 x SATA2
Audio7.1 CH HD Audio (Realtek ALC892 Audio Codec)
LANDual Gigabit LAN

Summary

UI Setup Instructions

System Preparation and Driver Installation

Install OS in RAID mode, required drivers including RST v10.5+, and ensure HDD/SSD are present.

Initiating Acceleration via RST GUI

Open RST GUI, click 'Enable Acceleration', select cache/target drives, cache size, and mode.

Finalizing Acceleration

Choose 'Maximized' mode for testing, click OK to enable SRT and refresh the GUI.

Enabling SRT via RST GUI Steps

Launching and Enabling Acceleration

Open RST GUI via tray or Start menu and click the 'Enable Acceleration' button.

Configuring Acceleration Settings

Choose cache size, target HDD, and mode (Enhanced/Maximized), then click OK.

Verifying and Completing Setup

Confirm changes in GUI, reboot; cache setup is complete.

Disabling Intel Smart Response Technology

Initiating Disable Acceleration

Open RST GUI, navigate to the 'Accelerate' tab, and click 'Disable Acceleration'.

Confirming and Completing Disable

In the pop-up, click 'Yes' to confirm. Data is written to HDD; the process may take time.

Resetting SSD to Available State

Initiating SSD Reset

On the 'Accelerate' tab, click the 'Reset to Available' button (Orange).

Warning and Confirmation

WARNING: Resetting deletes data on the Spare Capacity Volume. Confirm to proceed.

Post-Reset Status

SSD is now reset to Available and can be used as normal storage or re-enabled.

Related product manuals