ASTRO TOOL CORP.
CONNECTOR ASSEMBLY TOOLING
______________________________________________________________________________________________
TI4001 ©2009 Astro Tool Corp Page 5 of 6 REV. A 7-9-08
Astro Tool Corporation
21615 SW T-V Hwy, Beaverton, OR 97006 USA
Phone: 503-642-9853 Fax: 503-591-7766
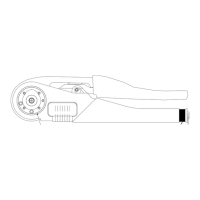
INSULATION CAVITY
1. With the Insulation Adjustment Indicator
on setting #1, close the tool handles fully,
and hold them firmly closed.
2. Insert the appropriately sized GO gage
(Green) member into the insulation cavity,
of the die (Red or Blue) you are trying to
gage (See Figure 3).
3. The GO gage (Green) member should
freely enter the die.
4. With the Insulation Adjustment Indicator
on setting #4, close the tool handles fully,
and hold them firmly closed.
5. Attempt to insert the NO-GO gage (Red)
member into the insulation cavity, of the
die (Red or Blue) you are trying to gage
(See Figure 3).
6. The NO-GO gage (Red) member may enter
slightly into the die cavity, but should not
pass fully through the cavity. If the NO-
GO gage (Red) member does enter the
cavity fully, the die is worn and should be
replaced.
GAGE MEMBER
FIGURE 3
CAUTION: DO NOT CRIMP THE GAGE MEMBER.
DOING SO MAY SERIOUSLY DAMAGE THE DIE SET!
UPPER DIE
LOWER DIE