Do you have a question about the Asus P5Q3 - Motherboard - ATX and is the answer not in the manual?
| Form Factor | ATX |
|---|---|
| Socket Type | LGA 775 |
| Chipset | Intel P45 |
| Memory Type | DDR3 |
| Memory Slots | 4 |
| Max Memory | 16 GB |
| SATA Ports | 6 |
| Audio | 8-Channel HD Audio |
| Supported CPU | Intel Core 2 Quad, Core 2 Duo, Pentium, Celeron |
| Memory Speed | DDR3 1600(O.C.)/1333/1066/800 MHz |
| Expansion Slots | 2 x PCI |
| RAID Support | RAID 0, 1, 5, 10 |
| USB Ports | 12 |
| LAN | Gigabit Ethernet |
| Power Connector | 24-pin ATX |
Statement regarding device compliance with FCC rules and regulations for radio frequency emissions.
Statement on digital apparatus compliance with Canadian radio noise emission regulations.
Precautions to prevent electrical shock hazard and ensure safe handling of components.
Guidelines for safe installation, handling, and environmental considerations for the motherboard.
Overview of the manual's chapters and organization, detailing product intro, hardware, BIOS, and software.
Guidance on finding more product and software updates via ASUS websites and optional documentation.
Explanation of symbols like DANGER/WARNING, CAUTION, IMPORTANT, and NOTE used throughout the manual.
Explanation of text formatting like Bold, Italics, <Key>, and Command used for clarity and input.
Details on supported CPU types, socket, chipset model, and system bus speeds.
Information on system memory (DDR3 DIMM slots) and expansion slot types (PCIe, PCI).
Specifications for storage controllers (SATA, PATA), LAN, and onboard audio CODEC.
Specifications for IEEE 1394a ports and USB 2.0/1.1 ports on the motherboard.
Details on ASUS Power Saving, Quiet Thermal, EZ DIY, MyLogo, and Overclocking features.
Listing of all back panel and internal I/O connectors available on the motherboard.
Details on BIOS features, manageability options, and contents of the support CD.
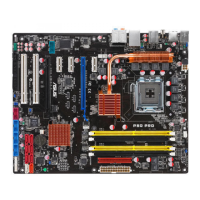
Introduction to the ASUS P5Q3 motherboard and its features.
Detailed list of items included in the motherboard package.
Summary of the special features and technologies supported by the P5Q3 motherboard.
An introduction to the ASUS P5Q3 motherboard, highlighting its features and technologies.
List of items included in the motherboard package, including motherboard, cables, accessories, and documentation.
Details on support for Intel Core™2 Extreme/Quad/Duo processors in LGA775 socket.
Information on the Intel P45 Chipset, dual-channel DDR3 memory support up to 1800(O.C.) MHz.
Details on PCIe 2.0 support for enhanced speed and bandwidth, and dual graphics technology.
Features like ATI CrossFireX for graphics and ASUS Express Gate for quick online access.
Information on Serial ATA 3Gb/s, IEEE 1394a interface, and S/PDIF digital sound output.
Details on onboard 8-channel HD audio and use of Japan-made conductive polymer capacitors.
Information on RoHS compliance and ASUS Power Saving Solution with EPU-6 Engine.
Features like AI Nap for power saving and Quiet Thermal Solution for stability and overclocking.
Details on ASUS 8-phase power design for efficiency and Fan Xpert for fan speed control.
Information on fanless design with heat-pipe and ASUS Crystal Sound for audio enhancement.
Features like Noise Filter for audio clarity and EZ DIY for easy installation and BIOS backup.
Details on Drive Xpert for data security, AI Direct Link for file transfer, and Q-Shield/Connector for easy installation.
Information on ASUS O.C. Profile, CrashFree BIOS 3, and EZ Flash 2 for BIOS management.
Details on AI Booster, Precision Tweaker 2, and C.P.R. (CPU Parameter Recall) for overclocking.
Guidance on preparing for motherboard installation and component setup.
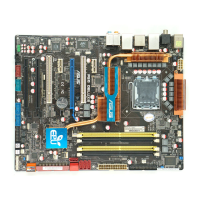
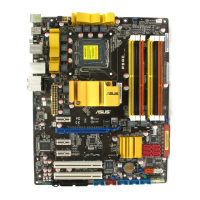
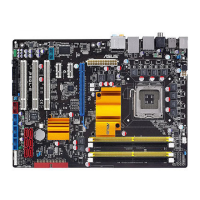
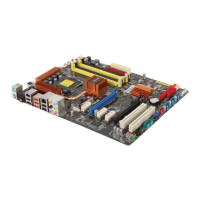
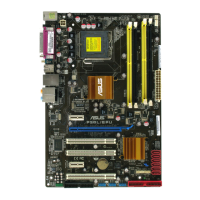
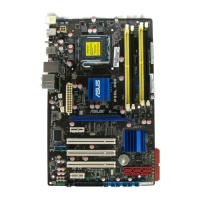
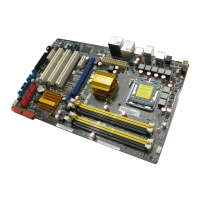
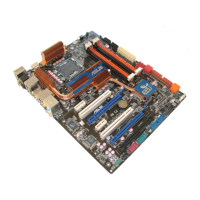
Overview of the motherboard layout, including connectors, jumpers, and slots.
Information on installing system memory (DIMMs) and expansion cards.
Details on motherboard jumpers, connectors, and procedures for starting and turning off the system.
Key precautions to take before installing or removing motherboard components to prevent damage.
Explanation of the motherboard's standby power LED and its meaning.
Diagram showing the location of various components, connectors, and slots on the motherboard.
A comprehensive list identifying motherboard connectors, jumpers, and slots with corresponding page references.
Guidance on orienting the motherboard correctly within the chassis for port alignment.
Instructions on using screws to secure the motherboard to the chassis, with a warning against overtightening.
Information on the LGA775 socket, PnP cap, and essential precautions before CPU installation.
Detailed instructions for locating the CPU socket and preparing for CPU installation.
Instructions for operating the CPU socket lever and load plate for CPU installation.
Guidance on aligning the CPU with the socket notch and inserting it correctly.
Instructions for applying thermal paste and closing the CPU load plate securely.
Information on Intel features like EM64T, SpeedStep, and Hyper-Threading supported by the motherboard.
Precautions and requirements for installing CPU heatsink and fan assemblies, including Thermal Interface Material.
Instructions for placing the heatsink and securing it with fasteners in a diagonal sequence.
Instruction to disconnect the CPU fan cable from the motherboard connector.
Steps for rotating fasteners counterclockwise and disengaging the heatsink assembly.
Information on the motherboard's four DDR3 DIMM sockets and their locations.
Recommendations for installing DDR3 DIMMs, including size, CAS latency, and vendor compatibility.
Information on maximum supported memory (16 GB) and OS limitations (32-bit OS recognizing less than 3GB).
List of approved vendors and their DDR3-1066MHz memory modules compatible with the motherboard.
List of approved vendors and their DDR3-1333MHz memory modules compatible with the motherboard.
List of approved vendors and their DDR3-1600MHz memory modules compatible with the motherboard.
List of approved vendors and their DDR3-1800MHz memory modules compatible with the motherboard.
Instructions for unlocking the socket, aligning the DIMM, and inserting it correctly.
Steps for releasing the retaining clips and removing a DDR3 DIMM from the socket.
Procedure for installing an expansion card, including reading documentation and securing the card.
Steps for configuring expansion cards via BIOS settings and installing necessary software drivers.
List of standard IRQ assignments and their corresponding functions for system devices.
Table showing IRQ assignments for PCI slots, PCIe, USB, and SATA controllers on the motherboard.
Information on PCI slots and compatible expansion cards like LAN or SCSI.
Details on PCI Express x1 and PCIe 2.0 x16 slots for network cards and graphics cards.
Procedure for clearing the CMOS RTC RAM to reset BIOS settings, including warnings.
Explanation of jumpers for enabling CPU and Northbridge overvoltage settings in BIOS.
Warnings and recommendations for adjusting overvoltage settings, including cooling system needs.
Configuration of PS/2 keyboard/mouse and USB device wake-up features using jumpers.
Identification and function of rear panel connectors like PS/2, S/PDIF, USB, and LAN.
Explanation of the LED indicators on the LAN port for activity and link status.
Description of audio ports for 2, 4, 6, or 8-channel configurations, including side speaker out.
Information on external SATA, IEEE 1394a, and optical S/PDIF out ports for connectivity.
Description of the internal connector for the floppy disk drive signal cable.
Details on the onboard IDE connector, cable types, and drive jumper settings.
Information on SATA ports, RAID configuration options (IDE, RAID, AHCI), and Intel Matrix Storage.
Details on JMicron SATA connectors for Drive Xpert, including support for SATA hard drives only.
Description of internal USB 2.0 connectors for front panel USB ports and module installation.
Description of the internal connector for a serial port module, purchased separately.
Information on connecting the IEEE 1394a module cable to the motherboard connector.
Details on fan connectors, their power support, and Q-Fan feature compatibility.
Description of the 4-pin connector for stereo audio input from sources like CD-ROM.
Connector for chassis-mounted intrusion detection sensor or switch, and jumper settings.
Description of the connector for an additional Sony/Philips Digital Interface (S/PDIF) port.
Connector for chassis-mounted front panel audio modules (HD Audio or AC'97), with BIOS setting guidance.
Description of the connector for a TPM system to enhance network security and platform integrity.
Instructions for connecting ATX power supply plugs (24-pin EATXPWR, 8-pin EATX12V) and PSU recommendations.
Description of connectors for system power LED, HDD activity LED, warning speaker, power button, and reset button.
Step-by-step guide for connecting front panel cables to the motherboard using the ASUS Q-Connector.
Steps for connecting power, turning on devices, and initial system checks.
Table of BIOS beep codes and their meanings for diagnosing startup issues.
Instructions for turning off the computer using Windows Vista and Windows XP shutdown functions.
Explanation of how to use the power switch for sleep mode, soft-off, or full shutdown.
Information on utilities for managing and updating the motherboard's BIOS.
Guide to accessing and navigating the BIOS setup menus, including Main, Ai Tweaker, Advanced, etc.
Overview of the different BIOS menus (Power, Boot, Tools, Exit) and how to save/discard changes.
Introduction to utilities like ASUS Update, EZ Flash 2, AFUDOS, and CrashFree BIOS 3 for BIOS management.
Guide to installing and using the ASUS Update utility for BIOS management in Windows.
Procedure for updating the BIOS using the ASUS Update utility via an internet connection.
Instructions for updating the BIOS using a downloaded BIOS file via the ASUS Update utility.
How to launch EZ Flash 2 from POST or BIOS setup to update the motherboard BIOS.
Steps for updating BIOS using EZ Flash 2 with a floppy disk or USB flash drive.
Procedure to copy the current BIOS file using the AFUDOS utility for backup.
Instructions for updating the BIOS using AFUDOS from a bootable floppy disk in DOS mode.
Procedure to restore BIOS from the motherboard support DVD when it fails or gets corrupted.
Steps to restore BIOS from a USB flash disk containing the updated BIOS file.
Explanation of the BIOS Setup program's purpose, access methods, and configuration capabilities.
Overview of the BIOS setup screen, including menu bar, navigation keys, and main menu items.
Description of the main menu bar items (Main, Ai Tweaker, Advanced, Power, Boot, Tools, Exit) and their functions.
Explanation of the navigation keys used within the BIOS setup utility for selecting and changing options.
Explanation of how menu items display specific items and how sub-menus are accessed.
Details on configuration fields, pop-up windows for options, and scroll bars for navigation.
How to access general help within the BIOS and use scroll bars for navigating screens.
Instructions for setting the system's current time and date within the BIOS.
Options for setting the floppy drive type and display language for the BIOS setup screen.
Overview of how BIOS detects SATA devices and displays their information.
Configuration options for IDE drive type, LBA/Large Mode, Block Transfer, PIO Mode, and DMA Mode.
Settings for SATA configuration (IDE, RAID, AHCI), Hard Disk Write Protect, and IDE Detect Time Out.
Configuration for AHCI CD/DVD boot time out values.
Display of SATA device auto-detection status and SMART monitoring settings.
Display of auto-detected BIOS information, version, build date, and processor specifications.
Display of auto-detected system memory size and usable memory.
Options to select CPU overclocking modes (Manual, Auto, X.M.P.) for achieving desired CPU frequency.
Adjusting CPU ratio and FSB frequency for overclocking, with tables for frequency synchronization.
Configuration for PCI Express frequency and automatic FSB Strap adjustment.
Setting the DDR3 operating frequency with options that vary based on FSB and DIMM settings.
Detailed settings for DRAM timing control, including CAS# Latency, RAS# to CAS# Delay, and RAS# Precharge.
Settings for DRAM timings like READ to WRITE Delay, WRITE to PRE Delay, and PRE to PRE Delay.
Option to adjust DRAM Static Read Control to enhance DRAM overclocking ability.
Settings for DRAM read/write training optimization and memory overclocking charger feature.
Features to adjust DRAM performance (Clock Twister) and system performance (Transaction Booster).
Adjusting CPU VCore voltage, GTL Reference voltage, and related precautions.
Configuration of CPU PLL, FSB Termination, DRAM, and North Bridge voltages with caution.
Settings for South Bridge voltage, PCIE SATA voltage, and CPU Load-Line calibration.
Configuration of CPU and PCIE Spread Spectrum, and CPU Clock Skew for system stability.
Settings for North Bridge Clock Skew and CPU Margin Enhancement options.
Overview of the Advanced menu and display of auto-detected CPU configuration details.
Configuration for CPU Ratio, C1E Support, Max CPUID Value Limit, CPU TM function, and Execute Disable Bit.
Enabling or disabling Intel SpeedStep (TM) Technology for CPU speed control by the operating system.
Settings for Memory Remap Feature, PCI MMIO Allocation, Memory Hole, and Initiate Graphic Adapter.
Configuration for High Definition Audio, Front Panel Type, SPDIF_OUT Mode, and Realtek Gigabit LAN.
Settings for J-Micron eSATA/PATA Controller, Controller Mode, and Realtek LAN Boot ROM.
Enabling or disabling the VIA Firewire 1394 controller.
Selecting the base address for the Serial Port1.
Settings for USB Devices Enabled, USB Functions, and USB 2.0 Controller.
Configuration for USB 2.0 controller mode (HiSpeed) and BIOS EHCI Hand-off support.
Enabling or disabling support for legacy USB devices and auto-detection at startup.
Advanced settings for PCI/PnP devices, including Plug and Play OS configuration.
Selecting the ACPI state for system suspend (S1, S3, or Auto).
Enabling or disabling ACPI 2.0 support and ACPI APIC support for power management.
Configuring system state after AC power loss and enabling RTC alarm for wake events.
Settings for powering on the computer via external modems, PCI, or PCIE devices.
Display of CPU and motherboard temperatures, and fan speed monitoring.
Configuration of CPU Q-Fan Control and Chassis Q-Fan Control for fan speed management.
Selecting fan profiles (Standard, Silent, Turbo, etc.) for CPU and chassis fans.
Monitoring power fan speed and system voltages (CPU, 3.3V, 5V, 12V).
Setting the boot device priority sequence (1st, 2nd, 3rd Boot Device).
Configuring Quick Boot to speed up POST and Full Screen Logo display.
Options for AddOn ROM Display Mode, Bootup Num-Lock state, and error message display.
Procedure for setting, changing, or clearing the supervisor password for BIOS security.
Selecting user access levels (No Access, View Only, Limited, Full Access) to Setup items.
Setting user passwords and configuring password checks during Setup or system boot.
How to run the ASUS EZ Flash 2 utility from the BIOS Tools menu for BIOS updates.
Settings for Drive Xpert modes (Normal, EZ Backup, Super Speed) and device list.
Options to enable/disable ASUS Express Gate and configure Enter OS Timer and Reset User Data.
Using ASUS O.C. Profile to save or load multiple BIOS settings profiles.
Enabling or disabling the Realtek LAN cable check during Power-On Self-Test (POST).
Options to exit BIOS, save changes, discard changes, or load default settings.
Recommendations for installing Windows XP/Vista and ensuring latest OS versions are used.
Details on the support DVD contents, drivers, applications, and utilities available.
Information on RAID configurations and procedures for creating a RAID driver disk.
Guidance on installing Windows XP/Vista and ensuring compatibility with hardware.
Instructions for launching the support DVD's Autorun feature or manual execution.
List of drivers available on the DVD, including Chipset, LAN, Audio, and controller drivers.
Using ASUS InstAll to install various utilities like ASUS Update and PC Probe II.
Details on ASUS Update for BIOS management and PC Probe II for system monitoring.
Information on ASUS AI Suite for system control and Adobe Acrobat Reader for PDF viewing.
Details on Microsoft DirectX for graphics/sound and multimedia applications like Corel MediaOne.
Utilities for data backup (CyberLink PowerBackup), diagnostics (Realtek), and file compression (Winzip).
Software for disc creation (Ulead Burn.Now) and photo editing (Ulead PhotoImpact).
Options to create RAID driver disks for Intel ICH10R (32/64-bit XP/Vista, RAID/AHCI).
How to open user manual files (PDF format) from the support DVD.
Contact details for ASUS customer support, also found on the manual's inside front cover.
Accessing general specifications of the motherboard from the support DVD.
Viewing the support DVD contents in a graphical format.
Form to fill out when requesting technical support from ASUS.
Displaying the contents of the support DVD in text format for reference.
Using ASUS MyLogo utility to customize the boot logo image that appears during POST.
Steps for selecting images, adjusting size, and flashing the BIOS to load the new boot logo.
Utilizing AI NET2's VCT for LAN cable diagnostics, fault reporting, and support cost reduction.
Guide to installing and launching ASUS PC Probe II utility for system monitoring.
Overview of the PC Probe II main window, buttons for accessing features, and sensor alerts.
Adjusting preferences such as Always on Top, Enable Monitoring Panel, and sound alerts.
Changing monitor panel positions and selecting between large and small display modes.
Setting sensor threshold values for CPU temperature, fan speed, and voltages.
Understanding sensor alerts where monitor panels turn red when values exceed thresholds.
Using WMI and DMI browsers to display Windows management and desktop system information.
Viewing information on PCI devices installed on the system using the PCI browser.
Monitoring CPU usage, hard disk drive space, and memory usage with the Usage browser.
Displaying used and available physical memory with a pie chart.
Adjusting sensor threshold values and customizing preferences in the Config window.
Introduction to Realtek HD Audio Manager for 8-channel audio, Jack-Sensing, and UAJ technology.
Instructions for installing the Realtek Audio Driver and using the HD Audio Manager interface.
Setting digital output options, including port selection and sound effects.
Adjusting speaker settings, room correction, DTS UltraPC feature, and default audio format.
Settings for analog line input and microphone input, including noise suppression and echo cancellation.
Interface for configuring audio settings in Windows XP, including Sound Effect, Mixer, and Audio I/O.
Displaying audio driver info and configuring sound effects like equalizer and karaoke.
Adjusting volume levels for playback and recording devices, and setting channel muting.
Selecting audio channel configurations and checking connected device status.
Microphone calibration with beam forming and testing 3D audio settings.
Guide to installing and launching the ASUS AI Suite for managing overclocking, fan control, etc.
Opening the monitor window and switching temperature display between Celsius and Fahrenheit.
Enabling AI Nap to minimize power consumption and operate the system quietly when away.
Using Fan Xpert to adjust CPU and chassis fan speeds based on temperature and profiles.
Explanation of fan profile modes like Disable, Standard, Silent, Turbo, Intelligent, Stable, and User.
Using ASUS AI Booster to overclock CPU speed in Windows without entering BIOS.
Guide to installing and launching the ASUS EPU-6 Engine for system power saving.
Description of the EPU-6 Engine main menu, modes, and energy saving features.
Options for CPU Frequency, vCore Voltage Downgrade, Chipset Voltage Downgrade, and CPU Loadline.
Table detailing configuration options for Turbo, High Performance, Medium, and Maximum Power Saving modes.
Instructions to enable the incoming folder for file sharing via AI Direct Link.
Steps to connect to another computer and access shared folders using AI Direct Link.
Explanation of Drive Xpert modes for data security and hard drive performance enhancement.
Steps for installing SATA hard disks and connecting them for Drive Xpert configuration.
Procedure for configuring EZ Backup or Super Speed modes and Drive Xpert icon indications.
Steps to disable Drive Xpert and use SATA connectors as normal SATA connectors.
Steps for partitioning hard disk volumes using Disk Management after Drive Xpert configuration.
Instructions for installing and using Drive Xpert within the Express Gate environment.
Steps to launch Drive Xpert from the ASUS Utility Panel after installation.
Procedure for installing ASUS Express Gate, including language selection and target disk volume.
Description of the Express Gate first screen, boot options, and automatic exit behavior.
Guidance through the first-time wizard for basic Express Gate configurations like language and resolution.
List of common hotkeys for controlling Express Gate functions and managing software windows.
Tools available in the configuration panel: Date/Time, Input Method, Network, Environment Settings.
Description of LaunchBar icons for Web Browser, Photo Manager, Chat, Skype, and Configuration Panel.
Steps to check configuration panel and network settings for internet access.
Setting up network connections for LAN ports, WiFi, xDSL/cable dial-up (PPPoE).
Using Photo Manager to view pictures from storage devices in various modes.
Steps to start the ASUS Drive Xpert application and select EZ Backup or Super Speed mode.
Accessing Express Gate configuration options within the BIOS Tools menu.
Procedures for updating Express Gate software to new versions or repairing it.
Definitions of RAID 0 (striping), RAID 1 (mirroring), RAID 5 (striping with parity), and RAID 10.
Overview of Intel Matrix Storage technology for creating RAID sets and improving performance/safety.
Steps for installing SATA hard disks for RAID configuration, emphasizing identical drives.
Procedure to set the SATA configuration item in BIOS to [RAID] for RAID set creation.
Instructions for accessing the Intel Matrix Storage Manager utility during POST.
Procedure for creating a RAID 0 volume, including naming, selecting RAID level, and choosing disks.
Selecting stripe size and volume capacity for RAID 0 array creation, with warnings.
Procedure for creating a RAID 1 volume, including naming, selecting RAID level, and capacity.
Procedure for creating a RAID 10 volume, including naming, RAID level, and stripe size.
Procedure for creating a RAID 5 volume, including naming, RAID level, and selecting disks.
Selecting stripe size and volume capacity for RAID 5 array creation, with warnings.
Steps to create a RAID driver disk using the support DVD and optical drive before OS installation.
Procedure to create a RAID driver disk from the support DVD within Windows OS.