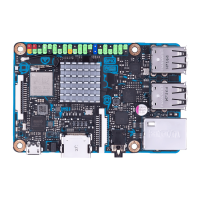
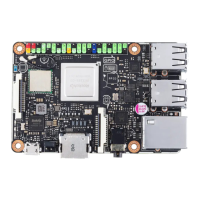
Getting Started
Booting from onboard eMMC
Requirement:
• 1 x Micro USB cable with data transfer function
• 1xTinkerPowerSupply*orotherqualied5V/3Apowersupply**
• 1 x Monitor with HDMI cable
• 1 x Keyboard and Mouse set
* The Tinker Power Supply is purchased seperately.
** Ensure that the cable is able to deliver up to 3A of power current.
ConnecttheTINKERS/BRtoaPCusingaMicroUSBcable,thenwaitforthePCto
recognizethedevice.
DownloadtheTinkerOSimagefromtheTINKERS/BRwebsiteandburnitintothe
TINKERS/BRusingathird-partyISOsoftware,suchasWin32DiskImager or Etcher.
Connect the power supply, keyboard, mouse, and monitor to your TINKER S/BR to
boot up.
Booting from external Micro SD card
Requirement:
• 1xMicroSDcardwithatleast8GBcapacity
• 1xTinkerPowerSupply*orotherqualied5V/3Apowersupply**
• 1 x Monitor with HDMI cable
• 1 x Keyboard and Mouse set
* The Tinker Power Supply is purchased seperately.
** Ensure that the cable is able to deliver up to 3A of power current.
Insert the micro SD card into a Windows®PC
DownloadtheTinkerOSimagefromtheTINKERS/BRwebsiteandburnitintothe
microSDcardusingathird-partyISOsoftware,suchasWin32DiskImager or Etcher.
Insert the bootable micro SD card into your TINKER S/BR, then connect the power
supply, keyboard, mouse, and monitor to boot up.
IftheeMMCcannotberecognized,pleaserefertowww.asus.comformore
details on eMMC Recovery.