EasyManuals Logo

Asus TUF-AX3000 User Manual

Asus TUF-AX3000
136 pages
To Next Page IconTo Next Page
To Previous Page IconTo Previous Page
Page #92 background imageLoading...
Page #92 background image
92
3. Set a static IP on your computer and use the following to set up
your TCP/IP settings:
IP address: 192.168.1.x
Subnet mask: 255.255.255.0
4. From your computer’s desktop, click
Start > All Programs > ASUS Utility > Wireless Router >
Firmware Restoration.
5. Specify a rmware le, then click Upload.
NOTE: This is not a rmware upgrade utility and cannot be used on
a working ASUS Wireless Router. Normal rmware upgrades must be
done through the web interface. Refer to Chapter 4: Conguring the
Advanced Settings for more details.
5.3 Setting up your printer server
5.3.1 ASUS EZ Printer Sharing
ASUS EZ Printing Sharing utility allows you to connect a USB
printer to your wireless router’s USB port and set up the print
server. This allows your network clients to print and scan les
wirelessly.

Table of Contents

Questions and Answers:

Question and Answer IconNeed help?

Do you have a question about the Asus TUF-AX3000 and is the answer not in the manual?
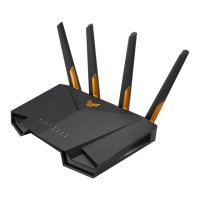
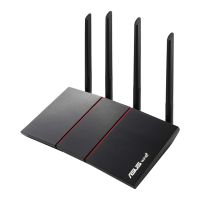
Asus TUF-AX3000 Specifications

General IconGeneral
Wi-Fi StandardWi-Fi 6 (802.11ax)
Maximum Data Rate3000 Mbps
Frequency Bands2.4 GHz, 5 GHz
Antennas4 external antennas
MU-MIMOYes
BeamformingYes
OFDMAYes
RAM512 MB
Flash Memory256 MB
Ports1 x Gigabit WAN, 4 x Gigabit LAN
SecurityWPA3, WPA2, WPA
VPN SupportPPTP, L2TP, OpenVPN
AiProtectionAiProtection Pro
Gaming FeaturesGame Boost

Related product manuals