Do you have a question about the ASV POSI-TRACK SR-70 and is the answer not in the manual?
Defines terms like front, rear, left, and right from the operator's perspective for machine descriptions.
Explains the 'Attention! Be alert! Your safety is involved!' symbol and its meaning.
Defines DANGER, WARNING, and CAUTION terms used in safety messages.
Locates Product ID Number and Engine Serial Number for identification and service.
Indicates the location for storing the operator's manual within the cab.
Describes the seat belt's function, safety switch, and importance of wearing it.
Explains the lap bar's role in keeping the operator securely fastened in the seat.
Details the switch that requires the operator to be seated for motion to be allowed.
Explains switches ensuring attachments don't engage when starting and require neutral position.
Describes the parking brake mechanism that locks the transmission to prevent movement.
Ensures attachments are fastened before operation; engine won't start if unlocked.
Describes the brace for safety during service work with raised lift arms.
Identifies the rear window as an escape hatch and explains its use in emergencies.
Defines tipping load as the weight causing the machine to tip forward.
Explains ROC as a percentage of tipping load, specific to loader types.
States the maximum GVW for SR-70 and SR-80, noting it voids warranty if exceeded.
Lists daily tasks to prevent fires, including cleaning debris and checking components.
Warns against using ether, advises cooling before refueling, and prohibits open flames.
Advises maintaining 3-point contact with steps and handrails.
Lists essential checks before starting the machine, like seat belt and neutral controls.
Recommends warming up the engine before operation.
Advises carrying loads low and turning on level ground.
Instructs to travel with the heaviest end of the machine facing uphill.
States that riders are not permitted on the machine.
Warns against using a work tool as a work platform.
States consequences of not following warnings.
Warns to keep away from tracks while the machine is in motion.
Advises daily inspection of undercarriages for debris to maintain performance.
Emphasizes reading and understanding the manual before operation.
Warns against protruding body parts from the operator enclosure to prevent injury or death.
Explains how to engage and disengage the two-speed system.
Warns that brushcutting can cause fires and requires cleaning hot areas.
Strictly prohibits going under raised lift arms unless the brace is installed.
Highlights the importance of understanding instrument locations and functions for safe operation.
Lists and describes the functions of various gauges and indicators like temperature, pressure, fuel, and voltmeter.
Explains that the glow plug light illuminates during pre-heat.
Identifies switches on the left panel, including parking brake, headlights, and bucket positioning.
Identifies switches on the right panel, including auxiliary hydraulics, heater, and ignition.
Explains the left joystick controls track motion, with spring return to neutral.
Describes the right joystick for lift arm and attachment movement, including float function.
Details how to use the foot pedal to control engine RPM for precise movements or increased power.
Explains how the drive control joystick buttons activate electric attachments via a receptacle.
Locates and lists the auxiliary hydraulic couplers on the left side of the lift arms.
Describes using the roller switch on the joystick for intermittent low flow auxiliary control.
Explains how to activate continuous low flow using a rocker switch on the panel.
Details activating continuous low flow via rocker switch, including locking devices.
Details activating continuous high flow via rocker switch, including locking devices.
Warns about matching GPM ratings for attachments to avoid system damage or poor performance.
Explains the SR 80's two-speed system (low/high range) for tasks and transport.
Describes the feature allowing attachment fastening/unfastening without exiting the machine.
Lists essential checks before operating, covering cleanliness, fluid levels, belts, and controls.
Notes automatic parking brake activation upon seat belt removal or manual activation for stationary tasks.
Warns against entering or exiting under raised lift arms due to serious injury or death risk.
Provides a step-by-step guide for starting the machine, including pre-heating and idling.
Emphasizes that failure to fasten the seat belt can result in serious injury or death.
Warns against using aerosol starting aids like ether due to explosion risk.
Advises not to crank the engine for more than 20 seconds and to allow starter cooldown.
Stresses familiarizing with controls and practicing in a safe, open area.
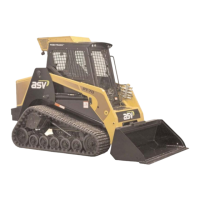
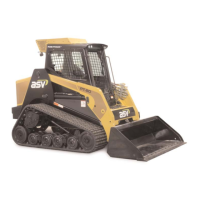
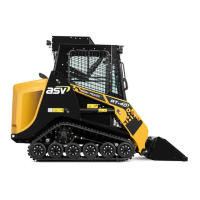
Highlights superior traction, floatation, and weight distribution for efficient dirt work.
Warns against lifting the front off the ground with the bucket to protect traction and component life.
Details the steps for efficiently filling the bucket with material.
Outlines the procedure for grading, including bucket angle adjustments.
Warns against pushing dirt with the bucket in "Dump" position to prevent cylinder stress.
Describes the process for leveling ground using the lift arms and float function.
Explains the procedure for loading material into a truck bed or trailer.
Provides guidelines for safe operation on inclines, including angle limits and slow movements.
Discusses working on turf, emphasizing gradual turns to minimize surface disturbance.
Details the steps to securely attach implements using the quick attach mechanism.
Explains the procedure for safely detaching implements from the quick attach.
Describes the process for fastening attachments using the power quick attach switch.
Outlines the steps to unfasten attachments using the power quick attach switch.
Emphasizes periodic maintenance for performance and recommends authorized dealer service.
Lists critical safety warnings for performing service work, including safe areas, tools, and support.
Explains the brace's role in safely supporting raised lift arms during maintenance.
Strictly prohibits working under raised lift arms unless the brace is correctly installed.
Provides step-by-step instructions for correctly installing the lift arm brace.
Details the procedure for safely removing the lift arm brace after maintenance.
Explains the cab tilts up for maintenance access, aided by gas spring and brace.
Outlines the steps to tilt the cab up, including removing bolts and engaging the brace.
Details the procedure for lowering the cab, releasing the brace, and refastening bolts.
Emphasizes using appropriate jacks and jack stands, and never working under a jack-supported machine.
Provides step-by-step instructions for safely lifting the machine using a jack and stands.
Warns to only lift the machine under the torsion axles to avoid damage.
Lists maintenance tasks, required service, intervals, notes, and capacities for various components.
Illustrates and lists the locations of grease fittings on the machine's left side.
Advises lubricating all fittings DAILY or every 10 hours for component life and function.
Explains the importance of keeping coolers clean for operation and how to clean them.
Details periodic cleaning of the chassis and engine compartment for safe operation.
Describes the SR 70/80's two air filter elements and their importance for engine life.
Provides steps for removing and inspecting primary and secondary air filter elements.
Notes the secondary element is not serviceable and should be replaced after three primary filter cleanings.
Details how to clean and reuse the primary element, and when to replace it.
Outlines the process for cleaning the primary filter using compressed air or water and detergent.
Warns against using heat sources over 160°F to dry the filter.
Advises replacing elements during warranty instead of cleaning, as cleaning may void warranty.
Explains the fuel filter's function and the procedure for changing it every 500 hours.
Details how to drain the water separator daily to maintain proper fuel system function.
Describes how to check fan and A/C belt tension and condition daily.
Provides steps for adjusting belt tension by pivoting the alternator or A/C pump.
Details the process for removing and installing the fan belt.
Outlines the procedure for removing and installing the A/C belt.
Explains the importance of regular oil changes and details the steps for changing oil and filter.
Warns that leaving the old filter gasket can cause an oil leak and engine failure.
Details preparing the new filter, threading it, and filling the engine crankcase with oil.
Describes visual inspections, starting the engine, and checking oil pressure.
Recommends ASV Posi-Lube 10W-30 oil and specifies minimum API CH-4 requirements.
Provides a chart showing recommended oil viscosity grades based on ambient temperature.
Details the steps for checking the engine oil level using the dipstick.
Emphasizes cleanliness for hydrostatic components and outlines the procedure for changing fluid and filters.
Instructs to rub fresh oil on new filter gaskets and thread them by hand.
Details refilling the reservoir and operating circuits to purge air.
Explains the case drain filter's purpose and when it should be replaced.
Identifies the fuse panel location and explains fuses protect electrical components.
Advises checking the fuse panel first for electrical malfunctions and replacing fuses correctly.
Discusses harsh working conditions for undercarriages and recommends daily inspection and cleaning.
Explains the critical role of proper track tension for performance and preventing damage.
Details how to check track tension by measuring deflection.
Provides steps for adjusting track tension using the turnbuckle.
Lists the necessary tools for track removal and installation.
Outlines the steps for removing a track, including cleaning and loosening components.
Continues the track removal process, detailing wheel and scraper plate removal.
Details the initial steps for installing a track, including lubrication and using a ratchet strap.
Continues track installation, involving assistants, pushing, and working track over wheels.
Covers installing idler wheels, scraper, and securing with bolts, plus final tension checks.
Explains how rollers on drive sprockets help minimize friction and prolong track life.
Advises inspecting rollers every 50 hours and replacing worn or cracked ones.
Details the steps to remove the sprocket and replace worn rollers.
Covers reinstallation of the sprocket and provides a note on handling the bearing cap.
Recommends replacing rollers as a set for simplified inspection and function.
Recommends following maintenance schedules and identifies common symptoms and causes.
Lists possible causes for the engine not cranking, such as battery issues or blown fuses.
Lists possible causes for the engine not starting after cranking, like fuel issues or glow plug problems.
Covers potential causes when the machine starts but hydraulics don't function, like seat switch or relay issues.
Addresses scenarios where lift controls work, but tracks do not, due to drive system issues.
Discusses problems where tracks move but lift arms do not, potentially related to hydraulic flow or control valve issues.
Lists causes for auxiliary hydraulic circuits not working while lift arms are functional, such as fuse or switch issues.
Explains why lift arms might not float, involving RPM, charge pressure, or control valve issues.
Addresses problems with the joystick not locking into float position, potentially due to fuses or detent magnets.
Covers issues where multiple electrical accessories are non-functional, indicating potential power relay or ignition switch problems.
Lists causes for battery charging issues, such as alternator belt or faulty alternator.
Covers reasons for hydraulic oil overheating, including cooler blockage or low oil level.
Lists causes for engine overheating, such as low coolant level or radiator debris.
Provides specifications for machine width, ground clearance, lift height, length, and ROPS height.
Details track width, length on ground, and ground contact area.
Lists operating weight with bucket, shipping weight, and ground pressure.
Details the engine model, type, displacement, horsepower, and torque.
Lists tipping load, 35% tip load, and 50% tip load for the SR-70 and SR-80.
Provides the maximum speed for low and high ranges.
Details the flow rates (low/high) and pressure for the auxiliary hydraulic pump.
Lists capacities for fuel tank, hydraulic tank, engine coolant, and engine oil.
Outlines the warranty duration for retail and rental machines, batteries, and parts.
Lists conditions and actions that will void the machine's warranty, such as improper maintenance or misuse.
Provides standard torque specifications for various inch-sized fasteners.
Provides standard torque specifications for various metric-sized fasteners.
Lists specific torque values for drive sprocket roller bolts/nuts and retaining bolts.
Introduces ASV Posi-Lube products for optimal performance and lists available fluids and lubricants.
Specifies the type of diesel fuel required for the machine, referencing ASTM D975.
| Brand | ASV |
|---|---|
| Model | POSI-TRACK SR-70 |
| Category | Compact Loader |
| Language | English |