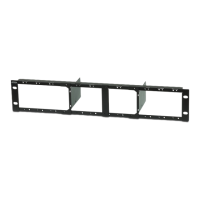
Video Extender Rack Mount Kit
VE-RMK3U
Installation:
1. (A) Position the VE-RMK3U Frame on the front of the rack and align the holes in the mounting brack-
ets with the holes in the rack, then screw the mounting brackets to the rack. Rack screws are not
provided. (B) Remove the two screws to detach the center brace.
A
B
2. Place the Video Extender over the 3U Mounting Plate and bring the two pieces together so that the
mounting post enters the rear hole. Next, slide the Video Extender forward to lock it in place. For video
extenders without brackets, see step 4.
Package Contents:
User Instructions
1 x VE-RMK3U Frame
12 x 3U Mounting Plates
26 x Plastic Captive Screws
18 x Hexagon Head Screws
36 x Countersunk Head Screws
The VE-RMK3U kit provides a mounting frame and accessories to install
12 ATEN Video Extenders in 3U of rack space. Compatible with ATEN
models VE800A, VE803, VE810, VE600A, VE602, VE560, CE100, VE601,
and VE801.