Do you have a question about the Atlas Copco Cobra Combi and is the answer not in the manual?
Safety guidelines and warnings related to machine installation.
Safety guidelines and warnings to prevent hazards during machine operation.
Safety guidelines and warnings for performing maintenance tasks.
Safety guidelines and warnings for storing the machine.
Details fuel requirements, mixing, and filling procedures.
Information and precautions regarding the machine's working tools.
Detailed instructions for starting, stopping, and restarting the machine.
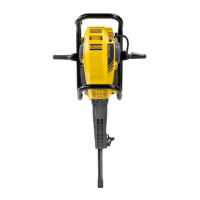
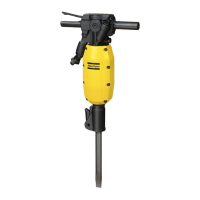
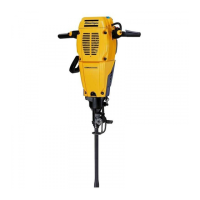
This document provides safety and operating instructions for the Cobra Combi, a combined drilling and hammering machine manufactured by Atlas Copco Airpower. It is designed for professional use in breaking asphalt and concrete, as well as drilling in concrete and granite. With appropriate accessories, it can also be used for driving posts, fences, and ground sampling.
The Cobra Combi is a versatile petrol-powered tool that integrates both drilling and hammering capabilities. Its core function involves a combustion engine that drives a hammer piston, delivering impact energy for breaking and a rotation mechanism for drilling. The machine is equipped with a choke, throttle lever, and a function selector to switch between drilling and breaking modes. In drilling mode, it engages rotation and flushing air to clear debris. For breaking, the rotation mechanism is locked, allowing for pure impact. The engine speed is controlled by the throttle lever, offering both idling and full engine speed.
Before operation, users must read and understand the safety and operating instructions. The machine requires a specific fuel mixture of petrol and 2% two-stroke oil, preferably Atlas Copco's environmentally friendly two-stroke oil. Fuel should be mixed in a clean can, with oil added first, then petrol, and shaken thoroughly. The fuel tank must be filled outdoors in a well-ventilated area, away from sparks and open flames, with the machine in an upright position and the engine cool. The filler cap should be released slowly to allow pressure to escape and then securely screwed on before use.
Choosing the correct working tool is crucial for efficient operation. The tool shank dimension must match the machine's specifications. A simple rule for selecting the breaker size is that a normal-sized piece of broken material should be removed from the workpiece within 10-20 seconds. If it takes less than 10 seconds, a smaller breaker is needed; if more than 20 seconds, a larger one.
Fitting and removing the working tool requires the machine to be stopped and the tool cooled down. The tool retainer is then closed using the foot. For cold starts, the fuel cap is checked and secured, the start button slid towards the fuel tank, the primer pump pumped 5-10 times, and the choke closed (START position). The throttle lever is pushed down, and the starter handle pulled. Once the machine ignites, the choke is opened one step clockwise to the WORK position for a 30-60 second warm-up, then fully opened to WORK for full performance after approximately 5 minutes. For warm starts, the choke should be open (WORK position), and the starter handle pulled.
When starting a cut, the operator should stand in a stable position with feet well away from the working tool. The machine is pressed against the surface before starting, and the feed force adjusted so the handle is pressed at least 'half way down' for optimal vibration damping and breaking force. For breaking, the machine should not be used as a lever; impact energy should do the work. The operator should avoid pressing too hard, ensuring the vibration-absorbing handle is not forced all the way to the bottom. The throttle lever should be released when lifting the machine.
For drilling deep holes, it is recommended to warm up the machine on a tamping pad for about 5 minutes. Before drilling, the flushing hole in the drill steel must be checked for obstructions. A short drill is used first, then a longer drill with a slightly smaller bit diameter. If the working tool gets stuck, an extraction tool should be used to loosen it. During breaks, the machine should be stopped and placed in a safe position to prevent unintentional starts.
Regular maintenance is essential for the safe and efficient use of the Cobra Combi. Before any maintenance, the machine should be thoroughly cleaned to avoid exposure to hazardous substances. Only approved original parts, tools, and accessories should be used. Damaged parts must be changed immediately, and worn components replaced in good time. When cleaning mechanical parts with solvent, appropriate health and safety regulations and satisfactory ventilation must be ensured. Major service should be performed by an authorised workshop.
Daily maintenance includes cleaning and inspecting the machine and its functions, checking for leaks and damage, ensuring the fuel cap gasket seals properly, inspecting electrical cables for wear, checking the insertion tool for sharpness and wear, and replacing damaged or worn parts. A tool chuck check is performed using a chuck gauge; if the gauge can be fully inserted across the flats of the chuck, it indicates wear and requires replacement. The air filter should be checked and replaced every shift during continuous use, never washed, and the filter container cleaned.
Every third month, the tightness of nuts, bolts, screws, and hose fittings should be checked and retightened to the correct torque settings. Annually, the machine requires overhauling, which must be performed by authorised personnel at an authorised workshop for safety reasons.
For repairs, such as replacing the starter cord, specific steps must be followed. The screw-cap of the PTO and three bolts from the protective cover of the starting mechanism are removed. The cover is lifted, grasping the starter pulley, and rotated carefully to release spring tension. After removing the old cord, the needle bearing in the starter pulley is oiled. The starter pulley and protective cover are fitted together, ensuring the starting spring locates correctly. The full length of the cord is wound onto the pulley, and the starting spring is pre-tensioned by two-thirds of a turn clockwise before fitting the assembly. The starting handle is pulled carefully to locate the cover, and the hexagonal bolts and PTO screw-cap are fitted and tightened.
If the engine does not start, runs unevenly, or has poor output, troubleshooting involves checking the Stop button position (ON), fuel level, spark plug electrode distance, and ensuring the air and fuel filters are not blocked. For drilling, the flushing hole in the drill steel must be checked for obstructions. If issues persist, an authorised Atlas Copco workshop should be contacted.
For storage, the tank should be emptied, and the machine thoroughly cleaned. It should be stored in a dry place, preferably standing upright, or on its back cover if lying down, and kept locked up, out of reach of children. When disposing of a used machine, it must be emptied and cleaned of all oil and fuel, which should be handled in an environmentally correct manner, and used filters sent for environmentally sound disposal.
| Weight | 25 kg |
|---|---|
| Power Source | Gasoline |
| Engine type | 2-stroke |
| Impact rate | 2700 blows/min |
| Type | Breaker, Drill |
| Blows Per Minute | 2700 |
| Applications | Breaking, Drilling |