Do you have a question about the atomi smart LED Spot Lights and is the answer not in the manual?
Download the Atomi Smart app from the App Store or Google Play.
Follow the on-screen instructions to register an account.
Press "Add Device" or the "+" sign and select the Smart Bridge from the list.
Turn on phone's Bluetooth, connect Smart Bridge to charger and outlet.
Enter your WiFi password and ensure connection to a 2.4GHz network.
Turn on the Smart Spot Lights and add them via the Atomi Smart app.
Steps to resolve when the app can't find the smart device.
Solutions for WiFi network not appearing or connection problems.
Fixes for "Failed to Add Device", DHCP errors, and 5GHz conflicts.
Addresses "Unavailable" status and issues after router changes.
Answers on cord burial and controlling multiple lights.
Contact phone number and email for assistance.
The Atomi Smart WiFi LED Spot Lights are designed to enhance your outdoor lighting experience with smart control and customizable features. This quick start guide outlines the simple steps to get your smart spot lights up and running, from downloading the app to connecting your devices and troubleshooting common issues.
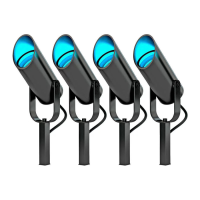
The Atomi Smart WiFi LED Spot Lights system consists of two main components: the Smart Bridge and the LED Spot Lights themselves. The Smart Bridge acts as the central hub, connecting your spot lights to your home's WiFi network and allowing you to control them remotely via the Atomi Smart app on your smartphone. The LED Spot Lights provide illumination, offering a range of colors and brightness levels to create various ambiances for your outdoor spaces.
The primary function of these lights is to provide smart, controllable outdoor lighting. This means you can turn them on or off, change colors, adjust brightness, and set schedules directly from your phone, no matter where you are. The system is designed for ease of use, allowing for quick setup and intuitive control.
App-Based Control: The core of the Atomi Smart LED Spot Lights' functionality lies within the Atomi Smart app. After downloading the app from the App Store or Google Play and registering an account, you can begin the setup process.
Smart Bridge Setup: The first step in setting up your lighting system involves adding the Smart Bridge. You'll connect the Smart Bridge to a USB wall charger and plug it into an outlet. During this process, it's crucial to turn on your phone's Bluetooth, as the app uses Bluetooth to initially discover and connect to the Smart Bridge. The app will guide you through connecting the Smart Bridge to your 2.4GHz WiFi network. It's important to note that Atomi Smart devices are not compatible with 5GHz networks, so ensure your phone is connected to a 2.4GHz network during setup. For a smoother connection, the guide advises against adding the Smart Spot Lights at this stage; instead, you'll be prompted to add them later.
Adding Smart Spot Lights: Once the Smart Bridge is successfully connected, you can proceed to add your Smart Spot Lights. This is done by opening the Smart Bridge device within the Atomi Smart app. From there, you'll have the option to "Add new device" or "Add existing device" if you've previously attempted to add them. The app will provide on-screen instructions to complete the addition of your spot lights.
Individual and Group Control: A key feature of the Atomi Smart LED Spot Lights is the ability to control individual lights or group them for simultaneous control. To control multiple lights at once, you can open the Atomi Smart app, select one of the added spot lights, tap the 'Edit' button in the top-right corner of the screen, and then choose 'Create Group'. After selecting the lights you wish to group and pressing 'Save', you can control all grouped lights simultaneously, making it easy to manage your outdoor lighting schemes.
Customization: While not explicitly detailed in the provided text, the nature of smart LED lights implies a range of customization options. Users can typically expect to adjust brightness, change colors (often from a wide spectrum), and potentially set dynamic lighting effects or scenes through the app. The ability to set schedules is also a common feature, allowing lights to turn on or off at specific times, enhancing convenience and energy efficiency.
Outdoor Use: The mention of "LED Spot Lights" and the question "Can the cords be buried?" strongly suggest these lights are designed for outdoor use, likely for landscape lighting, accentuating features, or providing general illumination in gardens, patios, or pathways. The confirmation that cords can be buried indicates a design mindful of outdoor installation aesthetics and safety.
The provided manual focuses primarily on initial setup and troubleshooting, with limited explicit information on ongoing maintenance. However, some aspects can be inferred:
Troubleshooting Guide: The manual includes a comprehensive troubleshooting section to address common issues users might encounter. This is a crucial "maintenance" feature as it empowers users to resolve problems independently, reducing the need for external support.
Durability and Installation: The ability to bury cords suggests a degree of weather resistance and durability in the design, implying that the physical components are built to withstand outdoor conditions. While not a direct maintenance task, proper installation (including burying cords) contributes to the longevity and low-maintenance nature of the system.
Customer Support: For issues that cannot be resolved through troubleshooting, the manual provides contact information for customer service (phone and email), serving as a crucial support "maintenance" resource for users.
In summary, the Atomi Smart WiFi LED Spot Lights offer a user-friendly and flexible solution for outdoor smart lighting, emphasizing ease of setup and app-based control. While direct maintenance instructions are minimal, the comprehensive troubleshooting guide and robust design for outdoor use contribute to a low-maintenance user experience.
| Connectivity | Wi-Fi |
|---|---|
| Color Temperature | 2700K-6500K |
| Voltage | 120V |
| Lifespan | 25, 000 hours |
| Control Method | App, Voice |
| Voice Control | Amazon Alexa, Google Assistant |
| Color | RGB |
| Dimmable | Yes |