Introduction
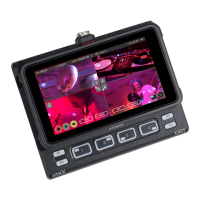
Thank you for purchasing the AtomX CAST Switching and
Streaming Dock that will transform the Ninja V and Ninja V+
into a 4 input HDMI video switcher.
Dock your Ninja V/V+ on to the AtomX CAST, connect your
inputs and unlock multicam production and streaming to
deliver broadcast quality production to your choice of local or
global platforms/CDNs.
Checklist
q 1 x AtomX CAST
q 1 x AtomX SSDmini handle
q 1 x USB to USB-C cable
q Quick Start Guide
You will also need (sold separately)
q Atomos Ninja V / Ninja V+ Monitor-Recorder
q HDMI Cable/s
You will require HDMI cables to connect your input devices
to both the AtomX CAST and Ninja V/Ninja V+. Atomos have
a range of HDMI cables with die cast connectors and coiled
cables in a range of lengths and connections (sold separately).
Dock, connect and power-up
NOTE: AtomX CAST will power the docked Ninja V/V+
device. AtomX CAST is reliant on DC power from the
international DC power supply included with the Ninja V
or Ninja V+ you are using with this device OR alternatively,
AtomX CAST and the docked Ninja V or Ninja V+ can be
powered via a D-Tap power source using the optional D-Tap
battery cable (ATOMDTPCB1). Ensure you have a suitable
power supply ready to commence operation.
Connecting Ninja V / Ninja V+
NOTE: Before attempting to attach monitor, ensure locking
arm is released to allow docking. Never force or apply
undue pressure when attaching your monitor. When
correctly aligned the devices will lock together eortlessly.
1. Rotate the thumb screw to release CAST’s locking arm
(used to secure Ninja V/V+ once docked).
2. With the Ninja V/V+ in hand, align the battery slot of Ninja
with expansion port of CAST and gently slide in to place in
the same fashion as connecting a battery. The Ninja V/V+ will
engage with a reassuring click of the battery release button.
3. Move locking arm into position, align with Ninja top mount
and rotate the thumbscrew to secure the locking arm in place.
Attach Power
With the docking process complete, insert the DC jack into the
DC port on the rear of the CAST and rotate the locking nut to
secure it in place. The DC connection will provide power to both
the AtomX CAST and the Ninja V/V+.