EasyManua.ls Logo

ATOMSTACK R2 User Manual

ATOMSTACK R2
50 pages
To Next Page IconTo Next Page
To Previous Page IconTo Previous Page
Page #45 background image
3
Guía de instalación
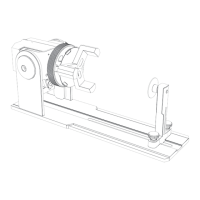
Paso 3: Ajustar la marcha
3.1 Seleccione diferentes marchas en función de los elementos grabados.
3.3 Mueva el motor para tensar la correa y apriete los tornillos en
la pae inferior del motor.
3.4 Ajuste de la instalación del sopoe: elija diferentes marchas de acuerdo con los
elementos grabados de forma especial, y mueva el sopoe a una posición adecuada.
3.2 Coloque el rodillo en la marcha adecuada y apriete el tornillo.
1
3
2
4
Question and Answer IconNeed help?

Do you have a question about the ATOMSTACK R2 and is the answer not in the manual?

ATOMSTACK R2 Specifications

General IconGeneral
BrandATOMSTACK
ModelR2
CategoryIndustrial Equipment
LanguageEnglish

Summary

R2 Roller Installation Guide

Step 1: Roller Assembly

Installation guide for the roller component, detailing its placement and main parts.

Step 2: Gear Selection

Guidance on selecting appropriate gears based on engraved item specifications for optimal performance.

Step 3: Gear and Belt Adjustment

Instructions for adjusting gears, motor, and bracket for proper belt tension and positioning.

Step 4: Wiring Instructions

Detailed instructions for connecting the roller kit to the engraving machine via provided cables.

Using LightBurn Software

Enable Rotary Function

Steps to enable the rotary function within the LightBurn software's main interface.

Configure Rotary Setup

Configuring rotary parameters such as roller type, axis, and object dimensions in LightBurn.

Engraving Workflow

Importing designs, setting pattern size, engraving power, speed, and previewing the job.

Related product manuals