8 Feb 21, 2024
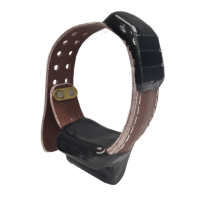
Collar Attachment
Your Collar(s) has been optimized according to the collar dimensions specified during
ordering. The size of the collar is determined by the collar adjustment bracket and the
main collar holes. To adjust the collar and/or attach the collar to an animal, the
procedure is as follows (some differences may exist between models):
1. First remove the collar adjustment bracket nuts and plate from the collar
adjustment bracket and remove the collar adjustment bracket from the main
collar.
2. Wrap the collar around the animal’s neck so that the extra length (if any) of the
main collar is tucked inside the main collar end with the solar panels. The extra
length can also be cut if desired.
3. Observe where the set of holes on the solar panel end of the main collar line up
with the holes on the other end of the main collar such as to maintain a desired
tension level on the animal’s neck.
4. Place the collar attachment bracket through both sets of holes and through the
brass bracket and tighten the collar adjustment bracket nuts using the provided
nut driver. Do not over-tighten as this may damage the collar adjustment bracket.
5. Finally ensure that the case nuts have been tightened before releasing the
animal.
Section 7 Warranty and Service
The model Collar(s) series collars are warranted for one year from the time of shipment.
NOTE: Collars ARE NOT refurbishable. Do not return collars for refurbishment or
disposal.
Should you encounter any difficulty during configuration or operation of your trackers,
please contact ATS Sales and Service at 763.444.9267 during normal business hours.
This and other ATS User Manuals, as well as software, are available for download from
the ATS website, at www.atstrack.com.