Thank you for purchasing
this
audient product!
ASP880 is an 8 channel mic pre, with sweepable high pass filters, switchable input
impedance, balanced insert points and pristine analogue to digital conversion.
This quick start guide will get you up and running with your ASP880, but for more detailed
information, download the full manual, specifications & recall sheets from:
www.audient.com/products/asp880/downloads
Enjoy capturing your performances with this classy front-end solution! Consider pairing
ASP880 with our DAW recording interfaces for a slick, portable recording & mixing solutions!
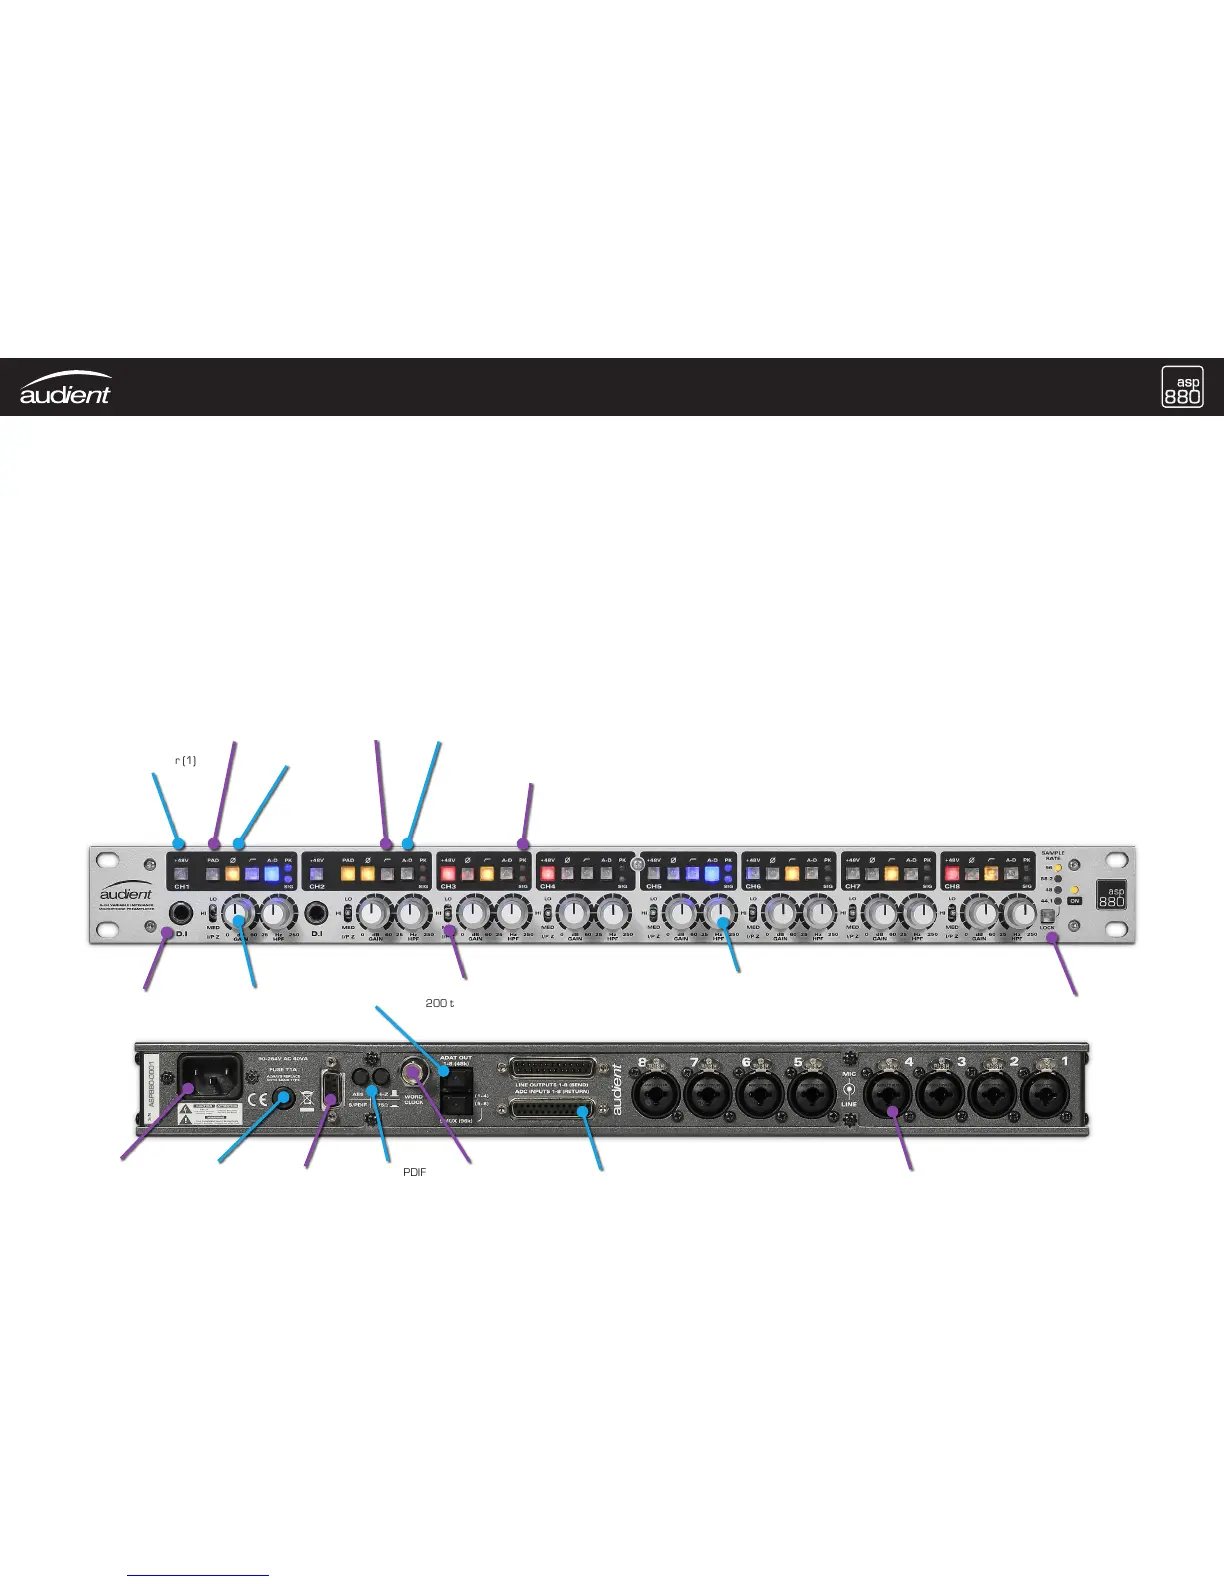
48V Phantom Power (1)
-10dB Pad (2)
Polarity
Reverse (3)
HPF Engage
(4)
Direct ADC Access /
Insert Engage (5)
Meter
Peak = -2dBFS
Signal = -28dBFS
D.I Instrument Input
(6)
Gain (7)
0 to 60dB
Variable Impedance (9)
200 to 3600 Ohms
IEC Mains Input
(12)
Fuse - T1A
AES / S/PDIF
9-Pin DSUB
AES / S/PDIF
Mode Select & Wordclock
Termination
BNC Wordclock
Input (13)
ADAT Optical
Output (8)
Basic Setup & Routing with
ADAT Enabled Interfaces
1. Connect the supplied IEC cable from ASP880
(12) into an available mains socket
2. Connect an optical (TOSLINK) cable from the
upper ADAT output on the ASP880 (8) to the
ADAT input on your audio interface
3. Select your sample rate on the ASP880 by
pressing the SAMPLE RATE button (11) until
the correct rate is illuminated (green indicates
external clock source via BNC - 13)
4. Set the audio interface to clock from it’s ADAT
input and ensure the sample rate of your project
matches the ASP880
5. Make sure 48V (phantom power) is switched off
on all channels of the ASP880 (1)
6. Make sure all A-D buttons are switched off (5)
unless you want to insert processing between the
mic pre & ADC (use DB25 connectors - 14 & 15)
7. Plug microphones into the rear panel XLRs (16)
and D.I (6) sources into channels 1 or 2 on the
front panel if required
8. After ensuring that your interface (or DAW)
monitor mixes are muted to avoid clicks & pops
as mics power on, switch on 48V for the channels
that require phantom power (1)
9. Once powered, un-mute your inputs, adjust the
gain knob (7) and PAD switch (2) to get good signal
levels - it is best to monitor the level in your DAW
and aim for -10dBFS on the loudest peaks
10. When recording with multiple microphones
check and correct phase cancellations with the
ø
switch (3)
11. Engage the HPF (4) for channels that have
unwanted low frequency content and adjust the
frequency pot (10) to clean up the low end
12. For inputs fed from microphones, experiment
with the input impedance switch (9) to explore the
triangle of tone that exists here - listen for softness
at lower settings and speed/punch at the highest
setting. HAPPY RECORDING!
Sample Rate (11)
& Clock Select
Variable High Pass Filter (10)
25 to 250 Hz
Line Outputs & ADC Inputs
(use as insert point with A-D switch) (14 & 15)
XLR & Line Inputs
(16)
 Loading...