VM750SH
User
Manual
Duel
Moving
Magnet
Stereo
Cartridge
Manuel
de
l'utilisateur
Cellule
stereo
a
double
aimant
mobile
Bedlenungsanleitung
Dual
Moving
Magnet
Stereo
Tonabnehmeraystem
Manuele
delrutente
Fonorivelatore
a
Magnete
Mobile
Stereo
Manual
de
usuario
Capsula
est8reo
de
im8n
m6vil
Manual
do
Usulirio
C8psulaTipo
..
Moving
Magnet
..
Dual
Est8reo
PyK080ACT80
nonllo30aaTenR
rono&Ka
JByKOCH~t~o~areml
CTepeoclloHH'Ie<:u•
C p,eoihtWt.l nOASH*HWt.l M8rHHT014
fi!Jliii!IIJia !tiJIIIVMllll:l'LIIlt<lllil
7"?'9-tt-t::'A~JI.\T:
*-6.£~-.&MCIJ"'C.
II!!.W~'\t'JJ:ft·l±A8t!l;:tt7.!~~1fmr;:if'31.n:tB.•IJttll'8.
ti.ll
8
1i:!
lt0)
1Ul
III
·
~(;:J::O~H~<!ttLLV>-Jt~*"t
·
~l!tc~=V~lJI
'&Id:
.
~Cttl:L.\1'-Jt:l!ff
.
tl.L.,
..ttf~
8*
1tld:I.JV
-t-
1<J.:etj:
,
~~t;:lbi;:QaC:~I,:j;;:I}JI;:fi!WIJ.
Q13:l:OJIII'Id:
tf,'f-~tliiL.
'IJ*V
.
mll.\@'bttS'e
(U!Il:f:t/I¥89:
00-17
:
3m
II!~O)f.ttf
·ll!l.11J't.::Y:.Sl!
·lll.i'.O)~
ftlll!l<l;,
ii3.L.'-l:I10Jil32i~t.::l<l;~t±~O.SJ::t111i-br.:,-~OJ'!:t;t:-
1-
~'t';JS.l,IIJ~'§"
.
ellSlHJIUID<~·t&\trttJ
•o120-n3-417
<tiUifU ·
PHS1<J~O)~·Jffl)<l;
03·6746-0211)
FAX
:
042
·7
3
9-9120
E ;t.-1\.t : s
uooort
Oaudio-technlca.co.
j)
e'!t-~::~:t!::.t:9-(M
·
MJ
1110120-887·416
<HU
·
PHS1<J~OJ~ift001<1;
03
-6746-0
212)
FAX
:
042·739·9120
E
)(-}\.t:
servicecenterOaudio-tectvlica
.CO.jp
em:-4.-.:.-v ('!tit(-t-l
www
.audio-technica.
eo.jo/atj/soooortf
lllit~!i,.-7'.,,.7,=1l
T
194-8666
~III
IJ
EBRH!
§
Ii£.
2-46-1
www.audio·technica.co.Jp
Audio-Technica Corp.
2-46-1 Nishi-naruse,
Madlida,
Tol::yo 194-8666, Japan
@2016
Audio-Technic& Corp.
<1>101:;1;!13J"IIIUU!M
M.iOi:
i1tl$1!!fllfi!Uj!iifi~BJ
M:
i
1ti$K~
I&t:1'lLIJ
=~3l
~~fft*
.ll:9
08~
Egg:
...
86{0)20 - 376192
91
$f'=f
if,
Ja:;
GB8898-2011,
GB13837
-
20
12
if.
PIIl!:
B*
lll!&BIIIJ:
20
16
..
08!l
liil!&i11MIIl!11103JS·I!·t;~
l!ftll!:•""l*<l>"')l!!l'l"l
fi!id::
fi=i111.8ll.IIJ~~tfjSl\triJJliPlt:1'lV-~=M9fiK
~
·~
: +
852
. 23569268
!lliiii!IIIOI!'JSWI!•M
~o••=B••~~~ffi~~~BJ
il!hl:
32050Vtlllilit:1'llllii!AftM'IIii~=W:322t!6\t
liJ!
• • : 0800 -774488
!!<1!11!:
8 $
112301130 2016.08
•
~~~:~
~M.
Oft
21llftl<:'<lGIFII;:.
~sm~illl!L..-c<r..:c-L.'~
1
A915A7•f7
2il!llb>\
' ll'I!W
4ti:I
1Jli!
T
5
t.J-1-
~-yY
if<T.f
6
707?9-
-----
0
1.
*•lii'E"'Y
~~:rJt.ift:l<l;:!.l:r:}\.t-~11!
t--::1
7-bf<:1!11Jff(1if'Vo 0
2.
wn•TOJtltttcii:av~.
•
;-
~7~:t'fm•
IJ~T
• •
......
,
~V:r:!VOJIJ-I""f-~7t:~!Zi!.i.OJWt.l~
T~.
icJt;~O)
U-~·Z'HU:
l'i:IJ~T
~
w
n•
:r
r
;:rai\Y~TJ.~CD~~~~
~
;:ro;t7JL.I
Z'<TCCL.l.
3.
:$WiiOJGIJMI1m.•.~tiE•r;:i:J!~ifT
.
(;t-
H-1\::.t~OJillll)
G
7 -
L>*~I
<1;:1
LJ-t'
-~A7
1>0)!N
t&li2
~ W
[;:ti.b"C.
::t
-
H-/
\
::.t~O)PJII~l.Ja:""t
.
:f
IJl
Tc!=\1!5'13:.
~O)J:;3(;:S:f-~'50):1LJ-t'
I<:A~JJIJ'Sf;j'l,rCU9iJ-
t-~
-yVOJat
9t1'
.0:
11:
ILtlt>tt"C<r..:<!L.,.
4.tt.EE-!:ML..:t::"f'~
*-t:lr!i
iOJtt.EEia
r:r?
=
1J
Jt.
7 -
9J
-rtiiM!t.J
"C
(t.:<!l..lo
5.
7-L>.OJili<!'!IIIIL..~T
6
"'~
~~:r:JVOJ.IitOOt:LJ:J-~OOfJIM:tr•s~-c
!JZfir;:tJ:GJ::51;:,
ii6"
<!~511!1L..-c<r..:c
t.'~
7-L>.O)iliCfJiiJt,l'.ll:Ta:L.lC:,
:<t>!l&IO)if<7...-
fJILJ:J-
~~;:
~
ftiJ.
B.f.ll:lif
i:;
L..~IJ.
I.J:J
-l"l
<:
.fJI
M<t:C:~IJ~~
.
6.
7Y:10)PHONO(MM
)
..
T":S'.fi.J?
t-l;:llll
L..ifTo
7Y:11i:PHONO.T1Jitd:L.lJitl
(
d:.
7;t.l-(
:::J
-5111-
(:;j(J
!JI!
)
H.lfi
VC
<TCCL.l
.
~OJJUii~Pttil
Potltfonreartab.
A9-f5A7'Y71;:<:<1Jf->i'IJ't11Jif:tCL..t.::'la!<l;.
MB0)75VZ:~nl..'l<:
L..
-c < t.:Cl. '·
· 75
~1<1;J0~Ll:J-
~
OJJ:iftJ516JI;:Jtit:>'L..I'Cl1JISif
Jftl,.."C(~<!L.,.
A:9-f7A7~70)~t11JIOa\llela:.
A91'7A?
u-r
-
(SIJJID
am~G<:c~a~~oY:rt.Jif9
.
•
t~U(DL-t.>'lt
----
- G
t
&Xtrclf-HtnTc~:L.\~'31;:7o7?:9-~~t.Jt:
W;
,
~~1j'!OJ(<:~b
·
lj,
9'1-L..~T
o
.
2.llil..L.~~1J-I'-U~~11t:f.fl<:li!1:Dffl1it:TG
~Mtto»iiiilal3~t:
L.
L¥.18001!\i!lmZ:~
.
•
7?=-1l1~7-~
- -
----
Al!
ii::V
M
~
lll~iillliti:till
:
20-
27
.0
00H
z
W
:tJ11EE
:
4.0
mV (1kHz. S
cm/
sec.)
7
'1>':/~JV'I?J(V-!.13:/:
3DdB
(l~Hz)
wtJH'5Y~:
l.OdB
(1kHz)
ltEE
:
1.8-
2.2s
(2.0s
•s
J
::J-f!H/I:::'- :5':/A:
2.71::0
( 1kHz)
iiiUVi
:
BOOO
allttUJ'i :
471::0
A
lltS
a:
1
00
-200DF
::J4Jt.4Y:Sf:7$'/;A.: 46QmH (1kH
Z)
.A$'7'~
?::J
/7547YA:
40
x
10
-
8
cm
/dyne
:Sf
-f'f
:=.'.I'?:J:/7'5
4
/'/~:
10
X
1
0-
8
cm/~]OCHz}
~$'1'5~
:
.li6VJ($'it
t.I/7VIt
-:
Y'
J
t.-
:::
7-H-
!~ 4::1
!A ll:t-?•.>'.:f:/~111:
23'
:9(.jj:;']'iii;:
17.3
mm x
17.Dmmx28.2mm
(H
xWxD)
MW:
S.Os
~tt
(
~J~
I" :
VMNSOSH
1<ta§l:
h-1'-U'.I'V'Ill!Dfltl::tt:'~5rrmX2
10rrmX2,
?
'!I
!.~
'I>
- X
2.
7\ll!::t"~t-x
2.
;JF&it!l:t-'
'51'
/(
-
x
1,
::1'5VX
1.
U-
1'
·12:'.1'1'-X
1
"
:$:
l!
lii0>3Eiltti<J V"-450016001700
V'J
- A
Aii?:'J',
;:
O)V'J- A?:'U.
A?.f77.7-Y70>1111'f->;at!IJE;tW,liiU>-GJR
lfl:tt~<:mavt:~~~l'
.
ll
L<t<J
.
~ttm-.L."(-:J
(
www
.audio-feetri::aco.illlatjMn/) 'I!:<:U<r.::et.l.
•~11'-:tnilili
/
Dimensions
•
:7V-"t'-HIIOJt.J-I··•J::~V'
Certridge ttlet
eeme
wiehtheturnteble
V
.......
H
<.:GODI!~I!~I::tiE•I<:8bttil
Mekethisdiaeneeas
eKaet
espoaslble.
@
1 ;
00
B
~
"':
L·~
~
(llli!!:mm)
(unit:mm)
Tha
n~
yo~,~
for purchasing th
is
~Tedmica
product. Before using t
he
produ
ct
read
through this user manual 10
en
surethatyouw
i
llusetheproductcorrectly
. P!ease k
eepthismanualfor
futurereference
• Safety precautions
• Keep
the
plastic beg
provided
with
the
product
out
of
the
re&ch
of
small children end
away
from
open
flames
to
avoid
accidents
or
fire.
• Keep
the
product
out
of
the reech
of
small
children
to
evoid
accidents
or
malfunction
.
•
Do
not
put
the product In a location
wher
e
ills
exposed
to
direct
sunlight.
near
heating devices,
or
in
placea
with
high
teml)8retures,
high
humidity,
or
high
conoentrations
of
Oust
to
avoid
malhmction
,
•
Do
not
touch the product's
vibration
system
to
evold
malfunction.
•
Do
not
attempt
to
disassemble
or
modify
the
product
to
avoid
malfunction.
•
Do
not
subject
the product
to
strong
Impact
to
avoid
malfunction
.
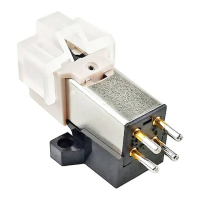
• Nama
of
each part
----
Q •
Care
--------
$
Beco
me
familia
r
with
each part
before
using
the
product.
t
Stytustip
2
Vibrationsystem
3 Replace
ment
stylus
4
Outputterminals
cartr
idge
body
Protector
•How
to
use
------
0
1.
Mount
the
product
onto
the
headshell
or
heedshell·integrated
tone
arm.
0
2.
Connect
the
lead
tips,
noting
output
polarity
, O
·
Connect
headshefllead
tips
to
the
product
output
t
erminals
of
the
same
color.
·
Neve
r
apply
heat
(from
solder, etc.)
to
the
output
term
inals.
3.
Determine
the
correct
position
for
installing
the
product
(adjust
overhang),
G
·Adju
st
overha
ng
following
the
i
nstru
cti
on
s
in
the
tone
a
rm's
or
phonog
ra
ph's user
manual
If
you
are
unsure, align
th
e
stylus
tip
to
the
cartri
dge
originally
anached
to
the
tone
arm
(asshowni
n
thef
igu
re
).
4.
Adjust
tracking
force.
·
Confirm
the
trad<ing force
fo
r
the
pr
oduct
in
"Specifications."
5.
Adjust
erm
height.
·Adjust
the
hei
ght
so
t
hat
the
bottom
surface
of
t
he
heads
hell
and
the
record
surface
are
parallel, as
seen
from
the
side
. An
Improper
arm
height
may
cause
the
body
of
the
product
to
make
contact
with
the
record and
could
im
pair aud
io
quality
or
damage
the
record
.
6,
Connect
directly
to
the
PHONO
(MM)
te
rminal
of
the
preamplifier/amplifier.
· If
your
preamplifie
r
/am
plifier
does
not
have a
PHONO
te
rminal,
use
a
phono
equalizer
!sold
separately).
· Use
the
i
nc
luded
brus
h
to
remove
dirt and
dust
f
romt
hestylust
ip
.
·
Always
move
the
brush in
the
direction in
which
t
he
record
rotates.
·
Astyl
usc
lear.er{soldse
pa
rately)is
recommended
to
remo
ve stubborn dirt.
•
Replacing
the
stylus
----
Ci)
t.
Remove
the
replacement
stylus
by
pulling
in
the
direction
of
the
arrow
after
raising
the
protector
without
touching
the
vibration
system
••
2.
Install
a
new
replacement
stylus
onto
the
cartridge
body. G
· Lifet
ime
of
the
r
ep
la
cem
e
nt
sty
l
us
is approx.
800hours
.
• Specifications
------
-
-
·-----
---~
Tv
oe
:VM
Frequencyrespanse:20to27.000Hl
Outputvo~ag
e
:
4
.
0mV(1
kHz,5
cnVsec
J
CMnnelsepa
rat
ion:30dB(
1k
HZ)
Output
balance:
1.
0d8
11
k.Hz
l
Tr
ad<
i
ng
f
on:
e: 1.8to2.
2gl2.0gst
and
ard
)
Co
rl
•flllldance
:2.7k
otl
msl
1
kHz
)
DCrasistance:SOOotlrns
Load
im
ped<lnc
e:47kohms
Loadcapacitance:100to200pF
Co
lli
nductance:460rnH
(1kHz)
Ststic
eompliance
:
40x
1tt'enVdyne
Dyna
mic
compli
a
nce
: 10><1tt'cmldyne
(1
00Hl)
Stylus: N
ude
Shibata
Cant
il
ouer:Aiuminum
tapered
pipe
Vertica
l t
raek
ingeng
le
:23
"
Dimens
ion
s:
17
.3
rnm
Kl-66")
><
1
7.
0 mm 10.67")
><
28.2
mmt
1.1
1'J(
H ~WxD)
1Ne
ig
ht:8
.0 g
Aep
la
eementstyl
us
(
sol
ds.tljlarately)":
VMN50SH
A.ecessories:Cartridge
install
at
ionscrews5nvnx2and
10rnrnx2,Wllsherx2
,
Hex&go
nn
ut
x2
,
No
n-magne
ticscrewdriverx
1,
Brush
><
1,
Lead
wire
set~
1
'Th
e replaoamettt stylus
olthisprod
UCI
Ie
used
fGtVM
5001600(1
00
series products.
In
!h
is
ser
i
es,
we
offer
repl
-me
m
styt
i
withdiffe
rem
stylust
ips
tr~r
esond
poi
mshape
s _for
mor
eaetails.piN
M
vis
~
oorAudio-
T
oo;:lri(:ewebsi
l
e
f:Nww_auaio-t~
.oo
.
P
atVvrrVI
~eif
ie
ationsare
s
l.t)jaettochangewit
hou
tnotiee
dueto
i
mprove
ments
Nous voos remercions d'avoir feiti'KQuisition
de
ce produit Audii>Technice.
Ava
nt
de
l'utilise
r,
lis
ez
enti•rement
cema
nuel
del
'
ut
ilisateu
refindevoosessurerquevoosutlliserezcorrectementleproduitVeuille:eonserverce
manuelpourr8
f8re
ncef
uture.
•PrkautJonsdeHcurit4
~--
-
---
·
-------
-
----
-- --
-
--
• Gerdez
le
aec plestique
foumi
evec
le
procluit hOfS
de
POrth
des
jeunea enfanta
et
81oign8
de
flam
mea
lfind'8vitertoutlccidentoulncendle.
• G1rdez
le
proclult
hora
de
porth
des
jeunes
enfentslfin
d'Witef
tout
eccident
ou
dyafonctiortnement.
•
Ne
placez pas le procluit dans
un
endrolt
oU
II
eat
expoW
aux rayons directs
du
solei!, 6
proxlmit8
d'eppereils
de
cheuffege,
ou
dans
deslieux
oU
regnent des temperatures
eleven,
une
humidit8
81ev8e
ou
des poussi8res 6 forte concentration
pour
8viter
tout
dysfonctlonnement.
•
Ne
touchaz pas
le
syst8me
de
tr1nsmi11ion
des
vibretiOfll
pour
eviter
tout
dysfonctionnemenL
• Ne tentez
pe
a de demonter
ou
d'41PQrter dea modification• au produit efin d'evitet tout dysfonctionnement.
• Ne soumettez
pasle
proclult 6
de
forts
impacts
efin
d'8viler
tout
dy8fonctionnement
•
•
Nom
de chaque element - - - Q
Familiarisez·vous avec chaque &
18m
ent
avant
d
'util
iserleprodu
it.
1 Pointe
de
lecture
2 Syst&me de t
ransm
ission
des
vibrations
3 Pointe
de
lecture
de
remp
lac
emen
t
Bomesdesort
ie
Corps
de
Ia
cellule
6
Protection
• Procedure d'utilisation -
--
0
1.
lnstallez
le
produit
sur
le
pone-cellule
ou
le
bras
de
lecture
int8grti
au
pone-cellule.
e
2. Raccordez les
extr8mit8s
de
fils
en
notant
Ia
polarit8
de
sortie. e
·
Raccordezlesextf8mit~sdef
i
lsdupone.ce
lluleaux
bornesdesortieduproduitdem&mecouleur.
· Nec:hauffezjemais
(llpartird
'unesoudu
re
,etc
.)
les
bornesdesortie
.
3. Determinez
Ia
position correcte
pour
l'inatalletion
du
produit
(r8glage
de
l'overtlang), G
.
Reglezl'overtlangensuivantlesinS1ructions
du
manuel
derutilisateurduphonographeoudubrasdelecture.
En
easdedoute,al
i
gnezlapointede
lecture
ala
cellulefix&e i
nitialementaubrasde
lecture
(comme
indiqu~
dans
Ia
figu
re)
.
4. R9glez Ia
force
d'eppui
.
Ye
ri
fiezleforced'appuidu
produitenvous
r~f~rant
aux •
carac:t~ristiques
techniques •·
5. R8glez Ia
hauteur
du
bras.
·R~Iezleh
aute
ur
desorteq
uelasurfece
de
fond
du
porte-celluleetlasurfacedudisquesoient
p.aralleles,
comme
vu
de
profil. Une hauteur du
brasincorrectepeutentraln
etuncon
tactd
ucorps
du
produitavecled
i
squee
tpeut
aMrerlaqua
l
it'
audioouendommager
le
disque.
6.
Connectez
directement
a
le
borne
PHONO
(MM)
du
pr&-amplificateur
l
amplificateur
.
·
Sivotr
eprH
mplificateur/amplificateurn'estpas
6quip6 d'une borne PHON
O,
ut
ili
sez un 6galiseur
p
h
ono(vendusepar~me
ntl
.
• Entmlen -
---
-
---
e
• Utilisez
Ia
brosse fournie pour enlever les impuretes
et
Ia
poossi~e
autour
dele
pointe
de
lecture.
• Oeplaeez
toujours
Ia
brosse
dans
le
sens
de
rotation
de
I'
enregist
rem
ent
.
•
Une
solution
nettova
nte
pour
pointe
de
lecture
(vendue
s$parementl
est
recommande
pour
enlever
las
i
mpuretes
persistantes
.
•
Romplacomom
de
lo
pointe
do
ltc1U10
- G
1.
Retirez
1a
pointe
de
lecture
de
remplaeement
en
tirant
dans
Ia
Mns
de
Ia
flkhe
apr8s
avoir
aouiM
le
protection,
uns
toiK:her
Ia
systeme
de
trensmlnlon
des
vibratioM.
e
2.
lnstallez
une
nouvelle
pointe
de
lecture
de
remplacement
sur
le
corps
de
Ia
cellule.
Q
·
Ladureedeviedelapoi
n
tede
lectur
ede
rerT'JI)Iace
mentestd
'environSOOheures.
• Caract6ristlques technlques
---
Resistance
l~dechargerecommendee
:
47
ko
h
ms
dl
arge
reco
mmandH:
100
6
200
pF
delabobine: 460mH(1
kHzJ
steticjue:40><10""cm/ctvne
ctynemicjue:
l~x
10""ci'J'I/dyl'le(100Hl)
:nue
, Shibeta
Can
ti
'-r
: tuvauconiQueenalum,
nium
Angledelecturevertical :
23
"
DimellSions
: 17.3nvn
><
17;0mmx
28,
2mm(Hx
L><
PI
Poids:S,Og
~O.Iecuedetefllllaoament('.endues8pal*-ttl"
:
VMN50S
H
Accessoires
: visde
fixetion
de
lil ce-llule5mm><2st10mm
><2
,
rondel1e
_
><2,krco.thexagone
lx
2,t~mevi
s
i'IOI'l
magn6toq
ue
><
1,brosse
~
1,
set
de
f
ils><
1
"
li
POinlede
leo;tu
"
de~tdeaol)n)du
~e
st~""
pour
les
proclRis
de
seneVM
500'6001700.
O.nsce:re Wit!,
r.ous
proposoosdes!X*ltesde
lecuederernpl_,....,t«!llipMsde
difftre
msrypesd'assembl6gesde
ll
poio
t
edelectuo'
estde
lormesdePQinle.Pcur plas dede
tai
ls.llisilaz lesileWeb
dlludio-
T
9Cincatwww.IUdio-tec:t>nice.oo.jpi~
.
Les
caracteris
t
iques
sont
su~ptib
iH
d'tu:e modiliees
sans
notif
ictl
tiorl
pr6alablesuote~
des
arneliorebOns
Vtelen
D
a
n ~
fUr
den Kauf dieses Audio-
Techn
ica-Produl::tes. Lesen Sie vor dem Gebrauch dieses Produlctes die
Bedie
n
ungsa
n~
it
u
n
g
fiir eine ordnungsgemliBe Nutzung. Bitte bewahreo
Sie
diese Anleitung zum sp8toren
Nachschlagenauf
• Slchemeitshinweise
• Bewahren
Sie
den
Plestikbeutel,
der
dem
Pt-odukt beiliegt. euBerhalb
der
Reid'tweite
von
kleinen
Kindem
auf
und
fern
von
offenen Feuern,
urn
Unfille
ocler Bri
nda
zu
verhindem
.
• Bewahren
Sie
das Produkt auBerhalb
dar
R~lte
von
klelnen
Kindem
auf
.
urn
Unfille
oder
Fehlfunktionenzu
ve
rmelden.
• PlaaJeren
Sie
das
Ptodukt
zurVermeidung
einer
Fetllfunktion nid'tt en
einem
Ort, an
dem
es
direktem
Sonnenlid'tt ausgesetzt ist,
in
der
Nihe
von
Heizgeriten
oder en Orten, an denen
eine
hohe
Temperetur ocler hohe Luftfeuchtigkeil herracht ocler vie I Staub
vorhanden
ill,
• BerOhren Sie zur Vermeidung
einer
Fehlfunlction
nicht
das Schwingungssystem des Produkts.
• Versuchen
Si
e 1urVermeidung einer Fehlfunktion nicht das Produkt
au~einandenubeuen
oOer
zu
modifizieren.
• Setzen Sle
da
s Produkt
zurVermeidung
einer
Fehlfunktlon kelnen atali!:en StOBen au
1.
• Bezeichnung derTeile
--
- Q
Machen
Sie sich
vor
de
r
Verwendung
des
Pr
odu
l:te
s
mit
der
Bezeid'lnung
der
Te
ile
vertraut
.
1 Spitze
derAbtas
tnadel
2
Sdl
w
ingungssystem
3 Austauschnadel
4
Ausgangsklemmen
5
Tonabnehmergehiiuse
6 Schutzkappe
• Verwendung G
1.
Befestigen Sie das Produkt
amlonebnehmerkopf
oderamintegriertenTonarm
. e
2. Verbinden Sie
die
Drahtenden
unter
Beachtung
derAusgangspolaritiit.O
· VerbindenSiedieDrehtendendesTonabnehmerl::opls
mit
den
Ausga
ng
sklemmen
der
gleichen
Fa
rbe.
· Setzen
Sie
die Ausgangsldemmen
~eine
rW.!i
nne
au
s!vonl6tarbe
itenusw.J.
3.
SestimmenSiedierichtigePosit
io
nfiirdie
lnstallationdesPtoduktes(Oberhangjustieren).G
Justier
enSie
denOberh
anggemiiedenArr.Ye
isungen
in
:,Sn~:n:=!e!~~:t!~~~":,~;~
·
Abtastnadel
an
dem
urspNnglich
am
Tooarm
belesligtan
TonaOOehme
r aus(wieiod
er
Abbii6Jng
dargeS1a
llt).
4,
Justieren
Sie
die
Auflagekraft.
· Priifen SiedieAuflagekrattdos
Produ
kts unter
.TechnischeDaten~
5.
Justieren
Sie
die
TonarmhOhe.
·
JustierenSiedieH6tl
e
so.aassdieU
nterseitecles
Tonabnetlmerl::opfsund
dieS
chellplattenoberfl3che
parallel sind,
wievon
derSe
it
eeosbetrechtet
El
n
ef
alsche
ArmhOh
eKanneventuell
dazuf
ii
hren,
dessdas Produlctgehiiusodie
SChallp
latt
ebe
ri.l
hrl.
wodur
ch
die Audioqualitjt beeintrllchtigt oder die
Schellplattebeschidigtwird
6.
SchlieBenSiedenPiattenspieler
di
rebamPhono-Eifl9aO!I
{MM)desVorverstarkers\'ollverstirkersan.
Wonn lhrVorverstiirl::erNollverstiirker keinen
PHONQ-Anschluss besitzt. verwenden
Sie
e
in
en
Phono-Equalizer {gesonderterhiildich).
•Pflege
e
· Verwe
nden
Sie
den mitgelieferten
Pinset,
urn
Schmutz
undStaubvonderSpitzederAbtastnadet zuentfeme
n.
•
Bewegen
Sie
den
Pinsel i
mmer
in
Dreh
ridl
tung
der
Schellplatte.
· EinAbtastnadelreiniger
(se
paraterhBitlidlJwirdfOrdie
Entfemung
von
hartniictigam
Schmutz empfohlen.
• Austeusdlen
dar
Nadel
---
G
1.
Nehmen
Sie
die
Austauschnadel
ab
.
lndem
Sie
slain
pfeUrichtung
abzlahen,
nactldem
Sia
di•
Schutzkappe
angehoben
haben,
ohne
das
Schwingungssystem
zu
beriihren.
0
2.
Setzen
Sie
eine
neue
Austauschnadel
in
den
Tonabnehmer
ein.
4D
·Dielsben
sdauereinerAustausdlnadelbet
rag
tetwa
SOOStunden.
• Tachnischa Doten
------
Typ
:
VM
Frequen:geng
: 20bis27.000Hz
Aus
(lllngsspennung:
4,
0mV
{1kHz,5cmlsek.J
Ka
n<renn~.r~g:3
0d8(1
kHzl
Ausgangsbalance:I,Od8
11kHz)
Auflagokraft
: 1,8bis2.2g(2,0gStandllrdl
Spulen
i
mpedenz
: 2
,7
k
Ohm
(1
kHz)
DC·Widerstand:SOOOhm
Lastimpeclanz:
47k0htn
Lastkapazit§t100bis200pF
SpuleninduktiYitit:460mH11kHz)
Statisd>eCompliance:40xt0"4crrVctvne
Dynamisctoa
Compliance:
10
><
104cm/ctvne
l1
00
Hzl
A.btastnadei:Sh
i
bata
, nactt
Na
dekJtge
r:
Ve~iingendes
Ai
uminiumrolu
Vert
i
kalerAbtastwinkai
:2J-
Abmlssunge.n
:
17,3
mm
><
17.0
mm
><
28
.2 mm {H
><
8
><
n
Gewictl
t 8,
0g
Austausdmadel
(liJ!Is
ondert
erh
iiltlich)•;
VMN50SH
Z~beh(lr
:
Tonabnehme~BeleSii!)Uogsschrauban
5
mm
><
2
und
10
mm><2
.
A.bstandshalter
><2
,Se<tlskantmJttar><2.
M
'd
llrn~.gnel
i
sdlerSctn\bendrehotrx
1
,
Pinsel~
1.
An$chlunkabel$alz
~
1
"
DifiAustaus<:hnade
ldi
esesF'rOO.Jktswirdver-nOstfUIProduk
te
de<Ba
u
r
eih
e n
VM5001601Y700
.
1ndi
ese
nBa
~
reihenbisteowir
a001Austausct'INde
l
nm
~
lll>deren
N
II(jejspiUankons
truktlonen
und
-looneoen.NAhe
t
ll$ertahrenSi
a
euf
der
'Nebs~evon
Audio-
ledlrtica
(
._
.e~i<:a
.
co
.pj
a~
.
Anderuogendertechni$ChenDatena
uf
QIUI'IdYOrt
Vefbes$0
~\Ml~l
en
otlne
Ankiindigung
vorbehal!en