9 GB
Tip: By keeping the / button
11
or the
/ 12 / 24 button
14
pressed, you acceler-
ate the process and reach the desired value
more quickly. This quicker method can also
be used for making the other settings. If dur-
ing a period of 30 seconds no buttons are
pressed, the LC display returns automatically
to the default display.
Press the MODE button
15
. The minute value
flashes. Press the
/ button
11
or the
/ 12 / 24 button
14
to set it to the desired
value.
Confirm your settings by pressing the MODE
button
15
.
Activating / deactivating the
alarm function
Press the MODE button
15
to access the
activate or deactivate the alarm mode.
Press the ALARM button
10
to activate the
alarm function. The Alarm symbol
13
appears
in the LC display.
Press the ALARM button
10
again to deacti-
vate the alarm function. The Alarm symbol
13
disappears from the LC display.
The alarm will sound when it reach to the set
time. Press the MODE button
15
, the /
button
11
, the / 12 / 24 button
14
or the
SNOOZE / LIGHT button
12
to switch off
the alarm signal. Otherwise the alarm signal
sounds for about 2 minutes then stops auto-
matically.
Press the SNOOZE / LIGHT button
12
, to
switch off the alarm. The alarm automatically
switches back on after 5 minutes.
When you press the / button
11
or the
/ 12 / 24 button
14
, the alarm switches
off and only switches on again on the next
day in the previously set time.
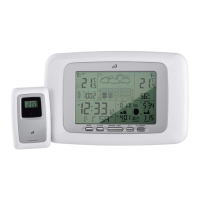
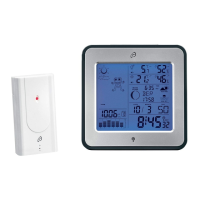
Displaying the sun and moon
rising / setting times
Note: The calculated times of setting and rising
of the sun and moon are intended for orientation
only. You should contact your local weather fore-
casting service for the exact times.
Note: After you have completed all the settings
(see”setting the date / language / clock / time
zone), the weather station calculates the rising and
setting times of the sun and moon. The setting /
rising time of the sun or moon flashes during this
operation.
Press the SUN / MOON button
31
to display
the calculated sunshine hours of the selected
day.
To check the setting / rising time for other
location & date, press and hold down the
SUN / MOON button
31
for about 3 sec-
onds to access the setting / rising time of the
sun or moon quick control mode. The loca-
tion
8
flashes.
Set the country, city, year, month and the
day for which you wish the information to be
displayed by pressing the SUN / MOON
button
31
or the / button
11
or the
/ 12 / 24 button
14
.
Press the SUN / MOON button
31
to con-
firm your settings.
Note: The sun and moon setting or rising
time flashes while the values are being
calculated.
Note: If the next moon rising or setting is
on the following day, the display shows
MOONRISE+1 or MOONSET+1.
Moon phases
The following moon phases are shown by the
moon phase symbol
6
:
New moon Waxing half-
moon
Half-moon Waxing full
moon
Full moon Waning full
moon
Half-moon Waning half-
moon
Preparing to use the weather
forecasting function
Note: Please take the weather forecast from
your local weather forecasting service into account
as well as the forecast from your weather station.
If there are discrepancies between the information
from your device and from the local weather
forecasting service, please take the advice of the
latter as authoritative.
Salzburg SAL
Vienna VIE
Belgium BEL
Antwerpen ANT
Brugges BRU
Bruxelles BRL
Charleroi CHA
Liege LIE
Switzerland,
Liechtenstein
SWI
Basel BAS
Bern BER
Chur CHU
Geneva GEN
Locamo LOC
Luceme LUC
St Moritz MOR
St Gallen GAL
Sion SIO
Vaduz VAD
Zuerich ZUE
Czech
Republic
CZR
Prague PRA
Greece GR
Athens AT
Cyprus CY
Nicosia NI
Romania RO
Bucharest BU
Bulgaria BG
Sofia SO