G.) Launch Lite Enable - The Launch Lite feature can be Enabled or Disabled.
PressandreleasetheMODE(+)buttonuntil“LEn”isshownonyourdisplay,pressENTERtoconrmthatyouwouldliketo
Enable or Disable this feature. The current setting will be displayed, either “LEoF” for Disabled or “Leon” for Enabled. Press the MODE (+) button to
Enable, or the ENTER button to Disable. Press the EXIT (–) button to save the setting.
H.) * SHIFT LIGHT COLOR SET –ToadjustthecolorofthelightonyourLevel2or3product,presstheMODE (+) buttonuntil“CoLr”isdisplayed,thenpress
ENTERtoconrmyourchoice.
•Ifthisisyourrsttimeselectingthecolor,yourfactoryprogrammedpresetisRED.Whenyouenter“CoLr”fromthemenu,thedisplayshould
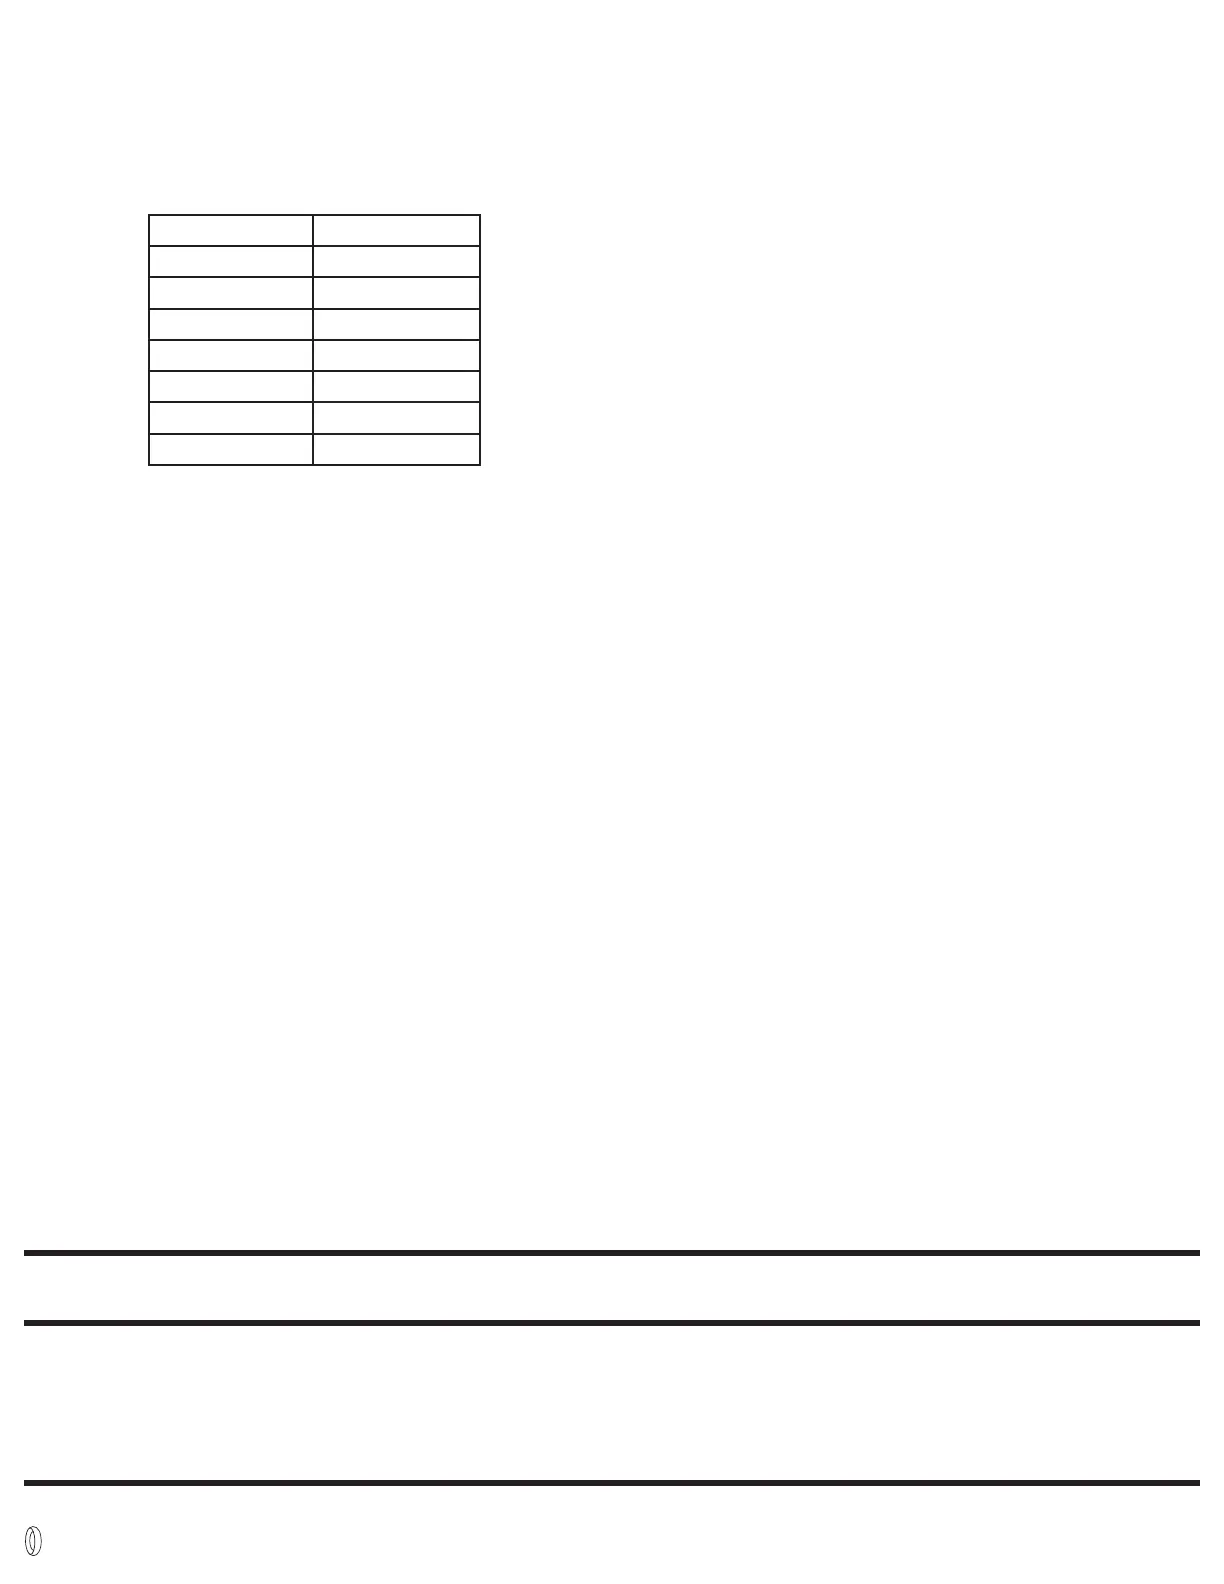
indicate“1”andtheshiftliteshouldilluminateRED.UsetheMODE (+) and EXIT (–)buttonstocycleupanddownthecolorchoices.Usethe
chart below for your reference.
• PressENTERtoconrmyourcolorchoiceandreturntoMenuMode.
• NOTE:Ifyellowischosenasshiftlightcolor,progressiveearlywarninglightcolorchangestoMagenta,seeProgressiveShiftLightsetformoreinfo.
I.) SHIFT LIGHT BRIGHTNESS SET – To adjust the high and low brightness settings of your Digital Pro Shift, press the MODE (+)until“LLV”(LightLeVel)is
displayed and press ENTERtoconrmyourchoice.
• “Lo”isdisplayed.Factoryprogrammedpresetisthelowestsetting,“1.”Toadjust,usethe MODE (+) and EXIT (–) buttons. Max brightness setting
fortheLowlevelfromthefactoryis“11.”
NOTE: Lowbrightnesssettingcannotbesethigherthan4lightlevelsbelowtheHighsetting(i.e.iftheHighbrightnesssettingischangedto“11”the
newdefaultLowlevelsettingwillbe“7”andcannotbeincreaseduntiltheHighsettingisincreased).
•PressENTERtoconrmyourLow(dim)levelsettingandproceedtoyourHigh(bright)levelsetting.
•“Hi”isdisplayed.Factoryprogrammedpresetisthebrightestsetting,“15.”Toadjust,usetheMODE (+) and EXIT (–) buttons.Lowestbrightness
settingfortheHighsettingfromthefactoryis“5”.
NOTE: Highbrightnesssettingcannotbesetlowerthan4lightlevelsabovetheLowsetting(i.e.iftheLowsettingis“7”,theHighsettingcannotbe
setlowerthan“11”withoutrstloweringtheLowsetting.).
•PressENTERtoconrmyourHigh(bright)levelsettingandreturntomenuselectoption.
J.) PROGRESSIVE SHIFT LIGHT SET – The progressive shift light feature of this product enables a color change and blink feature to alert the driver of the
approachingshiftpointaswellasapotentialover-revsituation.Toadjustthissettingsofthisfeatureorturnitonoro,presstheMODE (+) button until
“PSL”isdisplayed,thenpressENTERtoconrmyourchoice.
•“PSL1”shouldnowbedisplayed.Thisistheearlywarningpointandisindicatedbyasolidyellowlight.Toadjustthispoint,pressENTER.Usethe
MODE (+) and EXIT (–) buttons to adjust the percentage of the current shift point set that you would like the progressive early warning color to
activate. The factory programmed preset for this point is 60%. This entry may be set as low as 10% of the current shift point, or as high as 1 below the
PSL2setting.SettingthisfeaturetoonebelowPSL2disablesthisfeature.Onceyouhaveselectedthedesiredvalue,pressENTERtoconrm.
•“PSL2”willbedisplayedifyoupresstheMENUbuttononceafter“PSL1”isdisplayed.Thisistheshiftpointapproachingwarningindicatedbya
blinking yellow light. To adjust this point, press ENTER.Usethe MODE (+) and EXIT (–) buttons to adjust the percentage of the current shift point set
thatyouwouldliketheprogressiveearlywarningcolortoactivate.Thefactoryprogrammedpresetforthispointis80%.Thisentrymaybesetas
lowas1abovePSL1,orashighas100%.Settingthisfeatureto100%disablestheblinkingyellowlightfeatureoftheprogressiveshiftlightfunction.
Onceyouhaveselectedthedesiredvalue,pressENTERtoconrm.
•“PSL3”willbedisplayedifyoupresstheMODE (+)buttontwiceafter“PSL1”isdisplayed.Thisistheover-revwarningandisindicatedbyablinking
red light. To adjust this point, press ENTER.UsetheMODE (+) and EXIT (–) buttons to adjust the percentage of the current shift point set that you
would like the progressive over-rev warning color to activate. The factory programmed preset for this point is 110%. This entry may be set as low as
101%orashighas150%ofthecurrentshiftpointsetting.Onceyouhaveselectedthedesiredvalue,pressENTERtoconrm.
• “on”/“oFF”PresstheMODE (+) buttonthreetimesafterthedisplayshows“PSL1”inordertobeabletoturnonorotheprogressiveshiftlightfunction.
Thefactoryprogrammedpresetforthisfunctioniso.UsetheENTERbuttontotogglethissettingonoro,theMODE (+)buttontoconrmorthe
EXITbuttontocancel.
•*NOTE: If you have selected yellow as your chosen shift light color, your early warning progressive light color will change to Magenta.
It will default to yellow for all other color options. The over rev feature remains blinking red even if red is selected as the chosen
shift light color.
K.) PEAK Recall –TheDPSfeaturesa“peak”recallormemorytorecallthehighestRPMreachedduringaparticularrun.ScrollthroughtheMenu
Mode [MODE (+)]untilthedisplayreads“PEAC”thenpressENTER.ThiswilldisplaythehighestRPMachieved.ToclearthepeakpressMODE (+).
Display Indicater Shift Light Color
0 White
1 Red
2 Yellow
3 Green
4 Teal
5 Blue
6 Magenta
12 MONTH LIMITED WARRANTY
AutoMeter Products, Inc. warrants to the consumer that all AutoMeter High Performance products purchased from an Authorized AutoMeter Reseller will be free from defects in material and workmanship for a
period of twelve (12) months from date of the original purchase. Products that fail within this 12 month warranty period will be repaired or replaced at AutoMeter’s option, when determined by AutoMeter that the
product failed due to defects in material or workmanship. This warranty is limited to the repair or replacement of parts in the AutoMeter High Performance product and the necessary labor done by AutoMeter to
effect the repair or replacement of the AutoMeter High Performance product. In no event shall AutoMeter’s cost to repair or replace an AutoMeter High Performance Product under this warranty exceed the original
purchase price of the AutoMeter High Performance Product. Nor shall AutoMeter Products, Inc. be responsible for special, incidental or consequential damages or costs incurred due to the failure of an AutoMeter
High Performance Product. This warranty applies only to the original purchaser of the AutoMeter High Performance Product and is non-transferable. This warranty also applies only to AutoMeter High Performance
Products purchased from an Authorized AutoMeter Reseller. All implied warranties shall be limited in duration to the said 12 month warranty period. Breaking the instrument seal, improper use or installation,
accident, water damage, abuse, unauthorized repairs or alterations voids this warranty. AutoMeter disclaims any liability for consequential damages due to the breach of any written or implied warranty on all
products manufactured by AutoMeter Products, Inc. For a comprehensive listing of Un-Authorized AutoMeter Resellers please visit www.autometer.com/autometerlocator/index/unauthorized.
FORSERVICESENDTO:AutoMeter PRODUCTS, INC.413W.ElmSt.,Sycamore,IL60178(866)248-6357
ForEmail:Service@autometer.com
2650-1942-77 10/6/17
The “Super Bezel” is a registered trademark of AutoMeter Products, Inc.
SERVICE
ForservicesendyourproducttoAutoMeterinawellpackedshippingcarton.Pleaseincludeanoteexplainingwhattheproblemisalongwithyourphonenumber.Ifyouaresending
product back for warranty adjustment, you must include a copy (or original) of your sales receipt from the place of purchase.
© 2017 AutoMeter Products. Inc.
 Loading...