EasyManua.ls Logo

AutoMaxi Super Rider User Manual

AutoMaxi Super Rider
16 pages
To Next Page IconTo Next Page
Page #1 background imageLoading...
Page #1 background image
1
25
mn
réf. imp. 056024/A9-1
PLAQUE DE SIGNALISATION
(livrée avec kit de branchement 7 broches pour attelage et 2 sangles de
fixation). Disponible en 13 broches
LIGHTBOARD : kit for towbar mounting (7 pins) and 2 mounting straps
are included. Available with 13 pins
SIGNALTAFEL (wird mit 7-stiftigem Anschlusskit für Anhänger und 2
Befestigungsgurten geliefert.) Mit 13 Stiften erhältlich.
SIGNALISATIEPLAATJE - (geleverd met 7-pins aansluitingskit voor aankoppe-
ling en 2 bevestigingsriemen). Ook verkrijgbaar in uitvoering met.
PLACCA DI SEGNALAZIONE (completa di kit di collegamento 7 spine
per attacco e 2 cinghie di fissaggio). Disponibile a 13 spine.
PLACA DE SEÑALIZACIÓN (sulministrada con kit de conexión de 7 pasadores
para enganche y 2 correas de fijación). Existe en 13 pasadores.
PLACA DE SINALIZAÇÃO - Fornecida com kit de ligação 7 agrafos para
reboque e 2 correias de fixação. Existe en 13 agrafos.
TABLICA SYGNALIZACYJNA -
Dostarczona z zestawem pod
∏à
czeniowym
7 stykowym do haka i 2 pasami mocuj
à
cymi. Dost
´
pna równiez
.
w wersji
z 13 stykami.
EN OPTION / AS AN OPTION / ALS OPTION / IN OPZIONE
OPCIONA / EN OPÇÂO / OPTIONEE / OPCJA
Réf: 393069
x 3
= Max. 45 kg
= 12,9 kg
MONTAGE - FITTING - MONTAJE - MONTAGGIO - MONTAGEM - MONTAZU
ISO 15263-4
Conforme
à la nouvelle norme
Complying
with the new standard
e x 4
u x 6
b x 8
c x 4
v x 2
L x 6
a x 1
6x50 mm
g x 16
f x 32
h x 1
d x 4
i x 6 j x 5 k x 2
6x14 mm
m x 6
6x35 mm
o x 6
n x 6
p x 1
q x 4 r x 1 s x 6 t x 6
w x 4 X x 1 Y x 4
Question and Answer IconNeed help?

Do you have a question about the AutoMaxi Super Rider and is the answer not in the manual?

AutoMaxi Super Rider Specifications

General IconGeneral
BrandAutoMaxi
ModelSuper Rider
CategoryAutomobile Accessories
LanguageEnglish

Summary

Optional Accessories

Lightboard and Signaling Plate Information

Details for the optional lightboard and signaling plate for vehicle lighting.

Bicycle Rack Assembly Guide

Step 1: Component Assembly

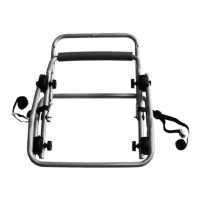
Assembling the main parts of the bicycle rack.

Step 2: Connecting Sections

Joining different sections of the rack frame.

Step 3: Adjusting Grooves and Clamps

Fine-tuning rack clamps for vehicle compatibility.

Step 4: Securing Components

Finalizing the assembly of rack parts.

Important Safety and Precautions

Step 5: C1 Vehicle Attachment Method

Attaching the rack to vehicle using configuration C1.

Step 6: C2 Vehicle Attachment Method

Attaching the rack to vehicle using configuration C2.

Step 7: C3 Vehicle Attachment Method

Attaching the rack to vehicle using configuration C3.

Vehicle Attachment Procedures

Step 8: Securing Upper Straps (C1)

Securing the upper straps for C1 configuration.

Step 9: Securing Upper Straps (C3)

Securing the upper straps for C3 configuration.

Advanced Assembly Steps

Step 10: Attaching Support Arms

Installing the arms that support the bicycles.

Step 11: Securing Rack Frame

Ensuring the main rack frame is firmly attached.

Step 12: Installing Protective Elements

Adding protective parts to the rack.

Vehicle Mounting and Final Checks

Step 13: Roof Positioning

Placing the rack onto the vehicle's roof area.

Step 14: Body Securing

Fastening the rack to the vehicle's body.

Step 15: Rack Adjustment

Fine-tuning the rack's position on the vehicle.

Step 16: Final Attachment Verification

Confirming all rack attachments are secure.

Specific Vehicle Mounting Configurations

Configuration C1: Tailgate/Flat Window

Mounting for vehicles with composite tailgates or flat windows.

Configuration C2: Side Strap Removal

Procedure for removing a side strap for certain vehicles.

Loading and Securing Bicycles

Step 17: Placing and Securing Bikes

How to position and secure bicycles on the rack.

Step 18: Using Racing Tire Adapters

Instructions for using special adapters for racing tires.

Final Securing and Strap Usage

Step 19: Attaching Safety Straps

How to attach the provided safety straps.

Step 20: Tensioning Straps

Ensuring all straps are properly tightened.

Step 21: Final Bike Tie-Downs

Final steps to secure the bicycles to the rack.

General Warnings and Safety Guidelines

Road Safety

Rules for safe driving with the bicycle carrier.

Assembly and Safe Use

Guidelines for proper assembly and usage.

Driving with the Carrier

Precautions to take while driving with the loaded carrier.

Carrier Maintenance

Recommendations for maintaining the bicycle carrier.

Related product manuals