EasyManua.ls Logo

AutoPets Litter-Robot 3 User Manual

Default Icon
8 pages
To Next Page IconTo Next Page
Page #1 background imageLoading...
Page #1 background image
Headquarters
1080 W Entrance Dr
Auburn Hills, MI 48326
Assembly
561 S Fairfield Ave
Juneau, WI 53039
Carbon Filter installation Guide
installation
The Litter-Robot 3 is equipped with a Carbon Filter for absorbing
odors and controlling moisture in the Waste Drawer. The flexible
filter pad can be removed and replaced when cleaning the drawer.
For optimal odor control, we recommend changing the filter every
three months. If you use scented litter, change the filter more
frequently, as it will also absorb the fragrance.
Replacement Carbon Filters can be ordered at www.litter-robot.com.
Removal:
1. Pull out the Waste Drawer and locate the
Carbon Filter in the front wall.
2. Push the top edge of the filter downward to free
it from the hooks.
3. Pull the filter out of the slot and discard.
Installation:
1. In the front wall of the Waste Drawer, slide the
new filter into the slot.
2. Bend the top edge of the filter and slide it under
each hook.
3. Adjust the filter, so it covers the front-facing
vent completely.
Note: It is normal for the Carbon Filter to shed
during installation. Simply wipe up or vacuum
any debris.
Properly installed Carbon Filter
Slot
Hooks
Visit www.litter-robot.com for installation videos.
Contact Customer Service
Monday - Friday, 9am - 5pm EST
1-877-250-7729 or support@litter-robot.com
LR3-8155
Question and Answer IconNeed help?

Do you have a question about the AutoPets Litter-Robot 3 and is the answer not in the manual?

AutoPets Litter-Robot 3 Specifications

General IconGeneral
BrandAutoPets
ModelLitter-Robot 3
CategoryPet Care Product
LanguageEnglish

Summary

Carbon Filter Installation Guide

Filter Removal

Instructions for safely removing the old carbon filter from the waste drawer.

Filter Installation

Steps to correctly install a new carbon filter into the waste drawer.

Seal Strip Installation Guide

Seal Strip Installation

Detailed steps for installing new seal strips on the base of the unit.
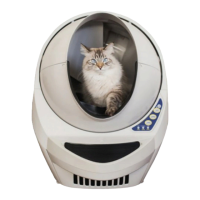
Related product manuals