This document is a user manual for Avantco Equipment's Heater/Proofer Cabinets, covering models 177HEAT1836, 177HEAT1836I, 177HPI1812, 177HPI1836, 177HPU1812, and 177HPU1836. The manual provides comprehensive information on the function, specifications, installation, operation, maintenance, and troubleshooting of these units.
Function Description
The Avantco Heater/Proofer Cabinets are designed for holding hot food at a constant temperature and/or providing humidity for proofing applications. These units are not cooking appliances and should not be used for re-thermalizing food. They are intended for indoor use only.
The models are categorized based on their features:
- "HEAT" (H): Heating only function.
- "PROOF" (P): Proofing function, which also includes heating.
- "INSULATE" (I): Insulated cabinets.
- "NO INSULATE" (U): Non-insulated cabinets.
- PAN WIDTH INCH: Specifies the pan width (e.g., 18").
- PAN QTY: Indicates the number of pans the cabinet can hold (e.g., 12 to 36).
For example:
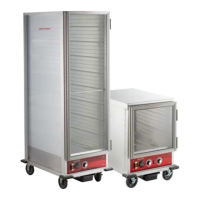
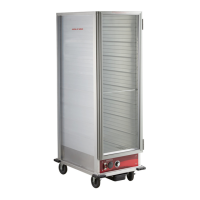
- 177HEAT1836: Heated cabinet only, no proofing, non-insulated, 18" pan width, 36 pan capacity.
- 177HEAT1836I: Heated cabinet only, no proofing, insulated, 18" pan width, 36 pan capacity.
- 177HPI1812: Heated/Proofing cabinet, insulated, 18" pan width, 12 pan capacity.
- 177HPI1836: Heated/Proofing cabinet, insulated, 18" pan width, 36 pan capacity.
- 177HPU1812: Heated/Proofing cabinet, non-insulated, 18" pan width, 12 pan capacity.
- 177HPU1836: Heated/Proofing cabinet, non-insulated, 18" pan width, 36 pan capacity.
These cabinets are crucial for maintaining safe food holding temperatures and ensuring proper sanitation in food service environments.
Important Technical Specifications
The Avantco Heater/Proofer Cabinets operate on a 120V electrical supply with a wattage of 1440W. They require a dedicated grounded 120V 15 or 20 Amp outlet. Modification of the cord and plug will void the warranty and may render the unit inoperable.
Product Specifications Summary:
| Item # |
Function |
Cabinet Size |
Insulation |
Voltage |
Wattage |
Overall Dimensions (W x D x H) |
| 177HPU1812 |
Holding/Proofing |
Half Size |
Non-Insulated |
120V |
1440W |
23.1" x 33.2" x 30.6" |
| 177HPI1812 |
Holding/Proofing |
Half Size |
Insulated |
120V |
1440W |
23.1" x 33.4" x 31.6" |
| 177HEAT1836 |
Heating Only |
Full Size |
Non-Insulated |
120V |
1440W |
23.1" x 33.2" x 66.5" |
| 177HEAT1836I |
Heating only |
Full Size |
Insulated |
120V |
1440W |
23.1" x 33.4" x 67.5" |
| 177HPU1836 |
Holding/Proofing |
Full Size |
Non-Insulated |
120V |
1440W |
23.1" x 33.2" x 66.5" |
| 177HPI1836 |
Holding/Proofing |
Full Size |
Insulated |
120V |
1440W |
23.1" x 33.4" x 67.5" |
Heating/Holding Instructions:
- Temperature range: 80-185°F.
- The dial numbers 1-9 do not correspond to specific calibrated temperatures; exact settings require familiarization with the unit and depend on ambient conditions.
- The unit is equipped with a 1440W heating element and an internal air circulation blower, which operate continuously when the power switch is ON.
Humidity/Proofing Control:
- Humidity range: 30-100%.
- Dial numbers 1-9 do not correspond to specific calibrated humidity percentages.
- A hygrometer is recommended for precision proofing applications.
- For proofing, the water pan must be filled with clean hot tap water. Water level should be checked every 3 hours and refilled as necessary.
Usage Features
Installation:
- Inspection: Upon delivery, check for shipping damage to both packaging and cabinet. Document any damage with pictures and notify the freight company immediately.
- Placement: Set the cabinet on a stable, level surface. Engage casters in the lock position if applicable.
- Unpacking: Remove all tape and packing material from both the interior and exterior of the unit.
- Protective Covers: Remove any protective covers from the door and corners. Avoid using scrapers that may scratch or dull the door panel.
- Power Connection: Plug the cabinet into a dedicated grounded 120V 15 or 20 Amp outlet (NEMA 5-15P).
- Initial Burn-in: Turn the unit ON using the power switch, set to "heat" mode, and adjust the dial to maximum setting 9. Allow the unit to run for at least 1 hour to burn off manufacturing odors.
Operating Instructions:
- Control Panels: The control panel features a POWER switch (A), indicator light (B), TEMPERATURE control (C), HEAT/PROOF switch (D), and HUMIDITY control (E) (for proofing models).
- Heating/Holding Mode:
- Set HEAT/PROOF Switch (D) to HEAT.
- Set POWER switch (A) to ON; the power indicator light will illuminate.
- Set TEMPERATURE control (C) to 9 for pre-heating.
- Pre-heat until the desired temperature is reached (approx. 45 minutes to 160°F/71°C from 77°F/25°C ambient). Cabinet temperature can reach 185°F/85°C.
- Reset TEMPERATURE control (C) to the desired holding temperature (typically 6-8 for 150-160°F).
- Adjust HUMIDITY control (E) to the desired level (9 being highest, 1 lowest, OFF for no heat to water).
- Proofing Mode:
- Set HEAT/PROOF Switch (D) to PROOF.
- Set POWER switch (A) to ON; the power indicator light will illuminate.
- Set TEMPERATURE control (C) to 2.
- Set HUMIDITY control (E) to 9.
- Pre-heat until desired temperature and humidity are reached (approx. 30 minutes to 95°F/35°C and 95% relative humidity from 77°F/25°C ambient).
- Adjust HUMIDITY control (E) to the desired level.
- Food Safety: Always pre-heat the cabinet before placing cooked, hot food. This is not a re-thermalizing cabinet. Use a food probe to check internal food temperature.
Maintenance Features
Safety Information for Maintenance:
- WARNING: Unplug the cabinet before cleaning or servicing.
- WARNING: Do not wash the cabinet with a water jet or high-pressure water.
- WARNING: Allow the unit to cool completely before cleaning to prevent burn injuries.
- CAUTION: Do not spray or pour water into the heated control drawer module to prevent short-circuits.
- CAUTION: Water dripping from open doors can create a slip hazard.
Cleaning the Cabinet Interior & Exterior (Excluding Door Panel):
- Ensure the power cord is unplugged and off the ground.
- Open the door and remove the water pan.
- Remove the heated control drawer module by lifting the front to clear the detent, then pulling it away from the cabinet with the power cord through the rear clearance hole.
- Wipe down all interior and exterior surfaces (excluding the polycarbonate door panel) with a mild detergent diluted to the manufacturer's specifications and a clean cloth.
- Wipe all surfaces with a clean cloth and allow to air-dry.
- Replace the heated control drawer module by slipping the power cord through the rear clearance hole and sliding the module into the bottom of the unit until it sits on its detent.
Cleaning the Door Panel:
- Ensure the power cord is unplugged and off the ground.
- Wipe down both sides of the door panel with a cleaner recommended for polycarbonate plastics and a clean cloth. Avoid synthetic cloths or cleaners not intended for polycarbonate plastics, as they may scratch or dull the panel.
- Isopropyl Rubbing Alcohol or a small amount of liquid dish detergent diluted with water can help remove grease smudges, dirt, fingerprints, and make the panel antistatic.
- Paste-wax approved for polycarbonate plastics and food service equipment can be used to hide small scratches, restore luster and clarity, and make the panel antistatic.
Troubleshooting:
- Power Check: Ensure the power cord is firmly plugged into the wall outlet. Check the circuit breaker of the wall outlet and reset if necessary.
- Unit Fails to Start:
- Remove the heat drawer from the cabinet.
- Remove the bottom cover of the drawer.
- Visually inspect for loose or disconnected wires, black or burnt marks on components, or loose heating elements.
- Replace any components with burn marks or discoloration, along with attached wires.
- If a heater element is loose or broken from mounting tabs, it can short out on metal, causing permanent damage. Both the element and the main power switch (with wires) must be replaced.
- If the LED Thermometer is not reading a constant temperature, it must be replaced along with its power supply transformer.
Limited Replacement Warranty:
Avantco Equipment offers a 1-year limited replacement warranty from the date of purchase for defects in material and workmanship. Claims must be made within 1 year. The warranty is void if the equipment is modified, improperly installed, or used for purposes other than intended. The warranty does not cover:
- Equipment sold or used outside the Continental United States.
- Use of unfiltered water (if applicable).
- Wearable parts not covered under warranty.
- Equipment not purchased directly from an authorized dealer.
- Equipment used for residential or other non-commercial purposes.
- Equipment that has been altered, modified, or repaired by anyone other than an authorized service agency.
- Equipment where the serial number plate has been removed or altered.
- Damage or failure due to improper installation, improper utility connection or supply, and issues resulting from improper ventilation or airflow.
- Defects and damage due to improper maintenance, wear and tear, misuse, abuse, vandalism, or Act of God.
For warranty inquiries, contact the location where the product was purchased or Avantco Equipment customer support.