This document is an installation guide for the Avigilon H4 PTZ Dome Camera, specifically models 1.0C-H4PTZ-DP45 and 2.0C-H4PTZ-DP30. It provides comprehensive instructions for setting up, operating, and maintaining the camera, emphasizing safety precautions and regulatory compliance.
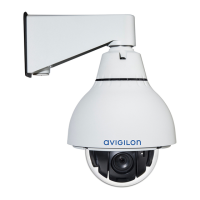
The Avigilon H4 PTZ Dome Camera is a sophisticated surveillance device designed for robust security solutions. Its primary function is to capture and transmit high-definition video streams, offering pan, tilt, and zoom capabilities for wide-area coverage and detailed monitoring. The camera integrates with network video management software, such as Avigilon Control Center (ACC)™, to provide a complete security system. It supports various power options, including Power over Ethernet (PoE) Plus and external power sources, ensuring flexible deployment in different environments. The camera is equipped with an SD card slot for onboard storage, allowing for local recording even if network connectivity is temporarily lost.
Usage Features:
The camera offers several features to enhance its usability and performance:
- Pan, Tilt, and Zoom (PTZ) Functionality: The PTZ capabilities allow users to remotely adjust the camera's field of view, enabling dynamic surveillance of large areas. This is crucial for tracking subjects, zooming in on specific events, and adapting to changing monitoring needs.
- Home Preset Position: Users can configure a "Home" preset position, which is the default field of view the camera returns to after being used for investigations or when idle. This feature is particularly useful for maintaining a consistent surveillance baseline. The home preset can be set manually through the ACC Client software or automatically through a PTZ tour or a rule, providing flexibility in how the camera manages its default view.
- IP Address Assignment: The camera automatically obtains an IP address when connected to a network, simplifying initial setup. For more advanced network configurations, the IP address settings can be changed through the camera's web browser interface, network video management software, or using the ARP/Ping method. This ensures compatibility with various network infrastructures.
- Live Video Stream Access: The live video stream can be accessed through a web browser interface or network video management software, offering convenient remote monitoring. The default camera username is "administrator" with no password, which should be changed for security purposes after initial setup.
- SD Card Storage (Optional): The camera supports SD card storage for onboard recording. This feature provides a backup recording solution, ensuring that video data is captured even during network outages. It is recommended to use an SD card with a capacity of 8 GB or more and a write speed of class 6 or better to ensure optimal recording performance.
- External I/O Connections: The camera provides connections for external input/output and audio devices, allowing for integration with other security systems like door contacts, relays, speakers, and microphones. This expands the camera's functionality beyond just video surveillance, enabling a more comprehensive security solution.
- Flicker Control: The video output signal (NTSC or PAL) is determined by the camera's flicker control setting, which can be configured using the Camera Installation Tool. This ensures optimal video quality based on regional electrical standards.
- LED Indicators: The camera features LED indicators that provide visual feedback on its operational status, including connection state, IP address acquisition, and firmware updates. This helps users quickly diagnose and troubleshoot common issues.
Maintenance Features:
Proper maintenance is essential for the longevity and optimal performance of the Avigilon H4 PTZ Dome Camera. The guide outlines specific procedures for cleaning and resetting the device:
- Cleaning the Dome Bubble: The dome bubble is a critical component for image clarity. If the video image becomes blurry or smudged, it requires cleaning. The recommended cleaning method involves using hand soap or a non-abrasive detergent to wash off dirt and fingerprints, followed by drying with a microfiber cloth or non-abrasive fabric. It is crucial to avoid strong or abrasive detergents and to be careful not to scratch or touch the dome bubble, as this can negatively impact image quality and cause unwanted IR light reflection.
- Cleaning the Camera Body: The camera body can be cleaned using a dry or lightly dampened cloth. Similar to the dome bubble, strong or abrasive detergents should be avoided to prevent damage to the camera's finish.
- Resetting to Factory Default Settings: If the camera malfunctions or does not operate as expected, it can be reset to its factory default settings. This involves pressing and holding the firmware revert button, located between the status LEDs, for two seconds after removing the dome cover. This process can resolve various software-related issues and restore the camera to its original configuration. Users are cautioned against applying excessive force when pressing the button to avoid damaging the camera.
- Protective Material Removal: During installation, it is imperative to remove the protective material inside the dome cover. This material is designed to prevent damage during shipping but must be taken out before the camera is fully installed to ensure proper operation and image quality. Users are advised to keep protective covers on the outside of the dome bubble until installation is complete to prevent scratches or fingerprints.
Safety and Regulatory Compliance:
The installation guide places a strong emphasis on safety and regulatory compliance. It includes "Warning" and "Caution" symbols to highlight potential hazards, such as electric shock, injury, or damage to the camera. Key safety instructions include:
- Qualified Personnel: Installation must be performed by qualified personnel and conform to all local codes.
- Power Source Requirements: The camera is designed to be supplied by a UL Listed Power Unit marked "Class 2," "LPS," or "Limited Power Source" with specific voltage and wattage ratings. Direct connection to mains power is strictly prohibited.
- External Power Insulation: Any external power supply connected to the camera must be properly insulated.
- Environmental Precautions: The camera should not be installed near heat sources, and cables should not be subjected to excessive stress or pinching.
- No User Serviceable Parts: Users are explicitly warned not to open or disassemble the device, as there are no user-serviceable parts. Servicing should only be performed by qualified personnel.
- Salt Water Environment Precautions: Special precautions are outlined for installations near salt water to prevent corrosion and maintain functionality. This includes using Avigilon-offered mounting accessories, ensuring third-party accessories are compatible, and avoiding the pairing of steel mounting accessories with aluminum camera enclosures.
- FCC and ICES-003 Compliance: The device complies with FCC Part 15 rules for Class B digital apparatus and Canadian ICES-003, ensuring it meets electromagnetic interference standards.
- Disposal and Recycling: The guide provides instructions for proper disposal and recycling of the product at the end of its useful life, in accordance with local environmental laws and guidelines, to conserve natural resources and protect human health.
Overall, the Avigilon H4 PTZ Dome Camera is a versatile and robust surveillance solution, designed with user-friendly features and clear maintenance guidelines to ensure reliable performance and longevity in various security applications.