EasyManua.ls Logo

Avocent SwitchView DVI - User Manual

Avocent SwitchView DVI
2 pages
To Next Page IconTo Next Page
Loading...
NOTE: The default setting of the SwitchView
DVI switch is appropriate for most systems.
You do not need to confi gure the switch
before installation. You should power off your
computers before beginning installation.
Connecting power
Connect the external power supply to the
SwitchView DVI switch.
NOTE: If you do not use a USB device on
any of the USB 2.0 hub ports or hub ports
connected on a USB keyboard, the switch will
function via the USB self-power. The switch
receives power from the USB interface and
is instantly powered up when you connect
the switch to a PC. If using a USB device
other than a keyboard or mouse, plug in the
external power adaptor.
Connecting your peripherals
Connect your keyboard, monitor and mouse
into the console connectors on the rear of your
SwitchView DVI switch.
Connecting your computers
Connect each of your computers to the
SwitchView DVI switch using the DVI-I video
cable, USB cable (Type A to Type B) and audio
and mic cables provided.
Powering up your system
Power up the the connected computers, ensuring
that the keyboard and mouse are enabled. The
green LED indicates PC port status (solid green =
active port, fl ashing green = PC not connected).
The red LED indicates the hub port control status.
When lit it indicates which PC port has control of
all of the hub ports and their connected devices (if
USB LED 1 is red, PC port 1 has control).
The Power of Being There
®
Quick Installation Guide
SwitchView
®
DVI
2 or 4-Port DVI USB KVM Switch
The following instructions will help you
install and use your SwitchView DVI
KVM switch.
Should you require further assistance, please
contact Avocent Technical Support.
To install the switch
To Contact Avocent Technical Support Call (888) 793-8763 VISIT www.avocent.com/support DOWNLOAD www.avocent.com
Avocent, the Avocent logo, The Power of Being There and LongView are registered trademarks of Avocent Corporation or its affi liates. ©2005 Avocent Corporation. All rights reserved. 590-491-501A
1
2
3
4
1
4
Connect external
power supply.
2
Connect your
peripherals to the
SwitchView DVI.
3
Connect your
computers using the
cables provided.
Power up the
connected
computers.
Operating the SwitchView DVI Switch
There are two ways to control the SwitchView DVI
switch for PC and USB hub port control, as well as
audio/mic channel selection: front panel push-but-
tons or a hotkey sequence.
Front panel buttons
The front panel buttons provide direct control over
KVM channel switching by pressing the PC button
for PC port switching. If binding is enabled between
PC/USB hub port control and audio/mic switching,
they will jointly be selected simultaneously.
USB 2.0
hub
5
Question and Answer IconNeed help?

Do you have a question about the Avocent SwitchView DVI and is the answer not in the manual?

Avocent SwitchView DVI Specifications

General IconGeneral
Product TypeKVM switch
Video Resolution1920 x 1200
Number of Computers4
Number of Users1
Audio SupportYes
USB SupportYes
Power SourceExternal power adapter
Switching MethodFront panel buttons, hotkeys
CompatibilityPC, Mac
Connectors ConsoleDVI-D, USB, audio
Connectors ComputerDVI-D, USB, audio

Summary

SwitchView DVI Quick Installation Guide

To Install the Switch

Instructions for physical setup: connecting power, peripherals, computers, and powering up.

Connecting Power

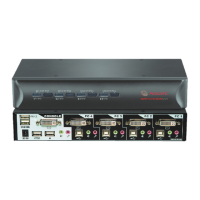
Connects the external power supply to the SwitchView DVI switch.

Connecting Peripherals

Connects keyboard, monitor, and mouse into the console connectors on the switch.

Connecting Computers

Connects each computer using provided DVI, USB, audio, and mic cables.

Powering Up Your System

Powers up connected computers and explains LED indicators for PC and hub status.

Operating the SwitchView DVI Switch

Explains how to control the switch via front panel buttons or hotkey sequences.

Front Panel Buttons

Provides direct control over KVM channel switching by pressing the PC button.

Hotkey and Front Panel Button Reference

Select PC Channel

Selects the active PC channel, potentially binding PC/hub/audio control.

Select Hub Port Control

Selects the PC channel controlling all USB hub ports, binding PC/hub control.

Select Audio and Mic Channel

Selects the active audio/mic channel, binding PC/audio/mic control.

Bind PC and Hub Port Control Switching

Enables default binding of PC port and hub port control switching.

Unbind PC and Hub Port Control Switching

Disables binding of PC port and hub port control switching.

Bind PC and AudioMic Switching

Enables default binding of PC port and audio/mic switching.

Unbind PC and AudioMic Switching

Disables binding of PC port and audio/mic switching.

Next lower PC Channel

Selects the next lower PC channel, potentially binding control.

Next higher PC Channel

Selects the next higher PC channel, potentially binding control.

Previous PC Channel

Toggles between the previous channel and the current channel.

Beep Sound OnOff

Toggles the beep sound for operations on or off.

Define Hotkey Preceeding Sequence

Selects the hotkey sequence prefix from Scroll Lock, Cap Lock, Esc, F12, or Num Lock.

Autoscan

Scans through all connected channels with a 10-second delay per channel.

Autoscan with Programmable Delay Time

Specifies autoscan delay time between 10 to 100 seconds.

Stop Autoscan

Terminates the active autoscan sequence.

Related product manuals