12
Axon Fleet Camera System Quick Start Guide
English (U.S./Canada/Australia/U.K.)
Axon Fleet power unit
10°
90°
A A
B B
C C
D D
E E
F F
4
4
3
3
2
2
1
1
DRAWN
CHK'D
APPV'D
MFG
Q.A
UNLESS OTHERWISE SPECIFIED:
DIMENSIONS ARE IN MILLIMETERS
SURFACE FINISH:
TOLERANCES:
LINEAR:
ANGULAR:
FINISH:
DEBURR AND
BREAK SHARP
EDGES
NAME
SIGNATURE
DATE
MATERIAL:
DO NOT SCALE DRAWING
REVISION
TITLE:
DWG NO.
SCALE:1:2
SHEET 1 OF 1
A4
WEIGHT:
instructional assembly
WARNING! FOLLOW SAFETY INSTRUCTIONS
Read, understand, and follow all current instructions, warnings, and relevant Axon training materials before using any Axon system. The
most up-to-date warnings and instructions are available at www.axon.com.
!
Recording
The Axon Fleet camera system has 2 operating modes. The default
mode, or BUFFERING mode, provides pre-event buering to cap-
ture activities that occur before you activate the EVENT (recording)
mode.
Note: The Axon Fleet camera will not operate outside of its mount.
1 Turn the system on. Move the ON/OFF switch to the ON position.
• The camera takes a few seconds to boot up and be ready to
record (the red area under the switch will be exposed with the
switch moved to the ON position).
• The operation LED will be solid red and then transition to
blinking green when the system goes into BUFFERING mode.
Solid Red
Boot up mode
Blinking Green
BUFFERING mode
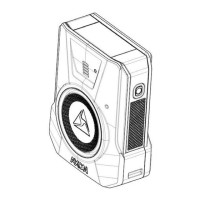
Axon Fleet Features
1. Camera lens
2. Power switch (red = On/BUFFERING mode)
3. Speaker
4. Battery LED (green = 41–100%; yellow = 20–40%; red = less than
20%)
5. Microphone
6. EVENT button (press = start recording; hold 3 seconds = stop re-
cording)
7. Battery status button: (push to show status of battery)
8. Operation LED
9. Function LED
10. Dataport (data transfer through PC or Axon Dock)
11. Upload status LED
12. Carriage bolt (allows tilting the camera to the desired angle, and
then fixing the camera in place)
camera front
1
2
3
4
5
6
7
8
camera back
9
10
camera top
camera bottom
11
mount without camera
front
mount and camera
front
mount and camera
back
Axon Fleet Hardware
The camera can be tilted 90 degrees in 10-degree increments
Note: Move the ON/OFF switch to the OFF position before
removing the camera from the mount.