Do you have a question about the B.E.G. RC-plus next 130 and is the answer not in the manual?
Includes safety precautions, socket base corner mounting, and use of extra cover.
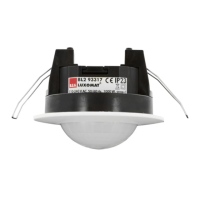
Covers wall mounting, ceiling mounting, and outside corner mountable options.
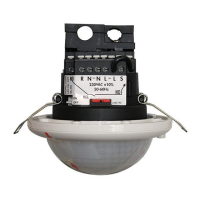
Details separating the terminal case, mounting the socket, and adjusting its orientation.
Explains cable routing from top, bottom, or behind, and terminal markings.
Discusses choosing a safe location, weather effects, and minimum distance to lights.
Describes the self-test cycle after connecting power and readiness for settings.
Covers manual adjustments for range, follow-up time, and lux value using potentiometers.
Details the default factory settings and the procedure for resetting the device.
Explains how to adjust the sensor head vertically and horizontally for range.
Methods to avoid interference, including using cover-up clips for blanking.
Information on using remote controls for advanced configuration of the detector.
Procedure to unlock the device's functions using the remote control.
Steps to activate or deactivate the 'Light OFF' feature during the self-test cycle.
Setting up the device for vacation mode or comfort function with timed light.
Activating the walk test mode to check motion detection and light activation.
Covers the alarm function, and the 'Light ON/OFF for 12h' party function.
How to reset remote control settings and lock the IR-RC reception.
Explains how follow-up time saves energy by adjusting to movement direction.
Illustrates wiring for standard, parallel, and permanent light operation.
Covers power supply, capacity, detection range, time, and lux value settings.
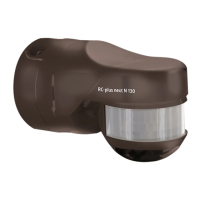
Provides physical dimensions, material, and color options for the detector.
Lists part numbers for detectors, remote controls, and available accessories.
The B.E.G. LUXOMAT® RC-plus next is a motion detector designed for various lighting control applications, offering a blend of automatic and user-adjustable features for convenience and energy efficiency.
The core function of the LUXOMAT® RC-plus next is to detect movement within its specified range and control connected lighting accordingly. It operates based on a combination of motion detection, ambient light levels (Lux value), and a user-defined follow-up time.
Upon initial power-up, the device undergoes a self-test cycle, indicated by a flashing LED for approximately one minute, after which it becomes operational. The device is not intended as an intrusion detector as it lacks a tamper contact.
Motion Detection: The device features a multi-zone detection area (130°, 230°, or 280° depending on the model, plus 360° anti-creep protection). Movement within these zones triggers the connected lighting. The sensitivity and range of detection can be adjusted both mechanically and electronically.
Lux Value Control: The integrated photo electric switch allows the device to activate lighting only when the ambient light falls below a set Lux value. This value can be set from approximately 2 Lux (darkness) to 2500 Lux (day operation), or it can automatically read in the current light value. In "Day operation" mode, the light sensor is inactive, and switching occurs at any brightness value.
Follow-up Time: Once motion is detected and the Lux value threshold is met, the lighting remains on for a user-defined "follow-up time." This duration can be set from 15 seconds up to 16 minutes. An "Impulse function" is also available, providing 1 second ON and 9 seconds OFF.
Follow-up Accommodation: A unique energy-saving feature, "follow-up accommodation," dynamically adjusts the follow-up time. If the last detected movement is in the anti-creep zone (e.g., near a doorway), the follow-up accommodation time is reduced to one-quarter of the original setting, saving energy. This feature is active when the unit is in factory settings or when follow-up accommodation is set via remote control (15 seconds to 16 minutes). It is inactive when set via potentiometers (15 seconds to 16 minutes).
Anti-Creep Protection: This feature ensures detection directly below the sensor, preventing blind spots. It can be switched ON or OFF.
LED Functional Display: A single LED provides visual feedback on movements and operating states. This display can be switched ON or OFF using the remote control.
Vacation- and Comfort Function: This function allows for extended light-on periods. After unlocking the unit and activating this function, the light-on period can be selected from 15 seconds up to 16 hours. Once set and locked, the "Vacancy/Comfort" function becomes active. If this function is active and the Lux value deviates, the light will turn on after a 60-second delay.
Alarm Function: This mode switches the light ON for 30 seconds, then OFF for 1 second, before returning to normal operation.
Light ON for 12h / Light OFF for 12h (Party Button): A single press of the party button switches the light on for 12 hours. A double press switches it off until the next evening.
Light OFF Function: This function allows the light to be switched off, then automatically returns to normal mode. It is deactivated by default for sabotage protection and must be activated during the self-test cycle by pressing the "Light OFF" button.
The LUXOMAT® RC-plus next offers flexible installation and adjustment options to suit various environments.
Mounting: The device can be wall-mounted or ceiling-mounted. The RC-plus next 280 model also supports outside corner mounting with an included plug-in socket. Connection cables can be inserted from the top, bottom, or behind the unit.
Mechanical Range Adjustment: Each detection zone can be mechanically adjusted using a screwdriver. The sensor head itself can be swiveled vertically (-10° to +45°) and horizontally (±90°, laterally ±10°) for fine-tuning the detection area. Cover-up clips are provided to selectively blind out distant or close-up ranges, or both, to exclude unwanted detection areas.
Potentiometer Adjustments: For basic settings, potentiometers are available to adjust the follow-up time and Lux value. The factory settings for these are 3 minutes and approximately 20 Lux, respectively. Adjusting to the "TEST" and "SUN" symbols resets the device to these factory defaults.
Remote Control (LUXOMAT® IR-RC / IR-RC-Mini): For advanced and convenient adjustments, the device is compatible with optional infrared remote controls. These remotes allow for fine-tuning of sensitivity, follow-up time, Lux value, and activation/deactivation of various functions. Remote control settings override potentiometer settings.
Permanent Light Operation: The device supports permanent light operation via an external push button. A short press (0.5-2 seconds) allows for manual switching. For permanent light operation, the light must be switched off manually.
Sensitivity Adjustment: The sensitivity can be electronically adjusted by approximately +15% to -30% using the remote control.
Lock Device (Sabotage Protection): The device's IR-RC reception can be locked to prevent unauthorized changes. It can be unlocked by pressing "Locking" again within 5 seconds.
Test Operation: A dedicated test mode allows the light to switch ON/OFF with every detected movement, useful for verifying the detection area and settings.
Mounting Place Considerations: For optimal performance and longevity, the unit should be mounted in a safe place, protected from direct weather exposure. A minimum distance of 1 meter should be maintained between the device and switched lighting, whether frontally or laterally. The connected lights should never be mounted directly below the motion detector.
The LUXOMAT® RC-plus next is designed for minimal maintenance, with features focused on reliable operation and easy adjustment.
Reset Function: A "Reset" function is available to erase all values set via the remote control, reverting to the potentiometer settings. This also resets all parameters to factory settings (indicated by fast LED flashing).
Activation/Deactivation of "Light OFF": The "Light OFF" function, initially deactivated for sabotage protection, can be activated or deactivated during the self-test cycle. This ensures that the device's core functionality remains secure while allowing for user customization.
The device is constructed from UV-stabilized Polycarbonate, contributing to its durability and resistance to environmental factors.
| Protection Class | IP54 |
|---|---|
| Type | Motion Detector |
| Power Supply | 230 V AC |
| Ambient Temperature | -25 °C to +50 °C |
| Switching output | Relay |
| Switching capacity | 2300 W |